第6章 故障排除#
CHAPTER 6 Troubleshooting
完美的设计方法并不能保证产品生产过程一帆风顺。我曾共事的一位工程师常说:“直到一万件产品顺利下线,我才会感到安心。”我见过在生产出五十万件产品之后才出现公差问题的情况。这类问题很难预测和预防。
事实上,设计分析越彻底,产品的量产时间就越晚;但如果产品永远无法投入生产,就没人能拿到报酬(当然政府项目除外)。因此,必须在设计分析、测试和生产试运行之间取得平衡。既然如此,你很可能在职业生涯中某个阶段会面临定位生产问题的任务。你将如何着手解决?你会采用什么方法?希望本章能为你提供一些思路。
The perfect design approach doesn’t guarantee that everything will go flawlessly in production. One engineer I worked with was fond of saying,“I’m not happy ’til ten thousand pieces have gone down the line okay.” I’ve seen tolerance problems appear in production after half a million pieces have been run. It is very difficult to predict and prevent something like that.
The fact is, the more thoroughly you try to analyze a design, the longer you will be waiting to produce it, but if a product never gets into production, no one gets paid (except in government work, of course). So, a balance needs to be struck among design analysis, testing, and production runs. This being the case, you will likely be faced with trying to determine a production problem at some point in your career. How will you go about it? What approach will you take? Hopefully this chapter will give you some ideas.
准备开始排查#
GETTING READY FOR THE HUNT
在我们讨论“发现问题并解决问题”这个话题时,我会经常引用自己的经验。我相信你将有属于自己独特甚至完全不同的经历。本节的目的并不是告诉你你的设计问题出在哪里,而是为你提供一些可用于自行排查问题的指导方针。
As we discuss the topic of finding trouble and shooting it, I will often refer to my own experiences. I am sure you will have unique and often completely different results. The idea here isn’t to tell you what the problem is in your design but to give you some guidelines you can use to troubleshoot the problem yourself.
“猎枪婚姻”#
Shotgun Wedding
我们稍后再解释这个有趣的小节标题。虽然这可能显得有些跳跃,但我认为我们应该先讲一件事,因为它对后续过程非常关键。第一个经验法则是:不要轻易否定任何理论(无论它多么明显或荒谬)。要通过实验去验证其正确与否,然后再继续考虑下一个想法。你很可能会因为一个自己都未察觉的假设而走向错误的结论。因此,拥有一套验证理论的流程至关重要。否则你将不断在不同想法之间徘徊,始终无法得出结论。说到这,我们继续前进。
在故障排查方法中,我将其大致分为两类:
- 科学方法。
就像优秀的侦探一样:收集所有已知线索,并根据经验和知识推理出可能的问题所在。
优点:最终你会找出问题所在。
缺点:需要大量的耐心和时间。
- 猎枪法。
尽可能尝试所有可能性,希望其中一个能击中问题。有时你运气好,很快就能解决问题。
优点:运气好时,可以迅速解决问题。
缺点:运气不好时,会永远在无头苍蝇般乱转。
虽然这两种方法各有其用武之地,但我在标题中巧妙提出的是第三种故障排查方法。我称之为“科学猎枪法”——可以理解为猎枪法与科学方法的结合。
开始时应这样做:当问题第一次出现时,先尽可能广泛地猜测可能原因。把你认为可能导致问题的所有情况都记录下来。在这一步中发挥你的直觉和经验。用比喻来说,就是拿起猎枪,瞄准,然后开火。然后启动科学方法,为每种可能性设计验证方式,从而证明其正确或错误,并着手解决问题。
根据我的经验,使用科学猎枪法通常会得到如下结果:70%的情况下问题是一些愚蠢的小错误,猎枪法可以轻松迅速发现,比如使用了旧版软件、元件未安装、保险丝烧毁等。20%的情况下,需要通过一些试错和数据分析才能找出较隐蔽的问题。剩下的10%可能需要更长时间,但最终会通过不断重复上述方法找到解决办法。猎枪法常常能引导出新的研究方向,而这些方向通过科学方法最终解决问题。总体来看,科学猎枪法能在最少走弯路的情况下迅速解决问题。(你有没有想过这两个词会一起出现还这么有意义?)在消费电子产品这个领域里,按时交付新设计至关重要,这种方法无疑是一项重大利器。
We will get into the interesting section header a bit later. Though it might seem a little out of order, I think we should cover one item first because it is so important to the rest of the process. The first rule of thumb is: Don’t discount a theory (no matter how obvious or ridiculous it might seem). Try to prove it right or wrong by experiment and then move on to the next idea. Too often you will be carrying an assumption that you won’t even realize can lead you to a wrong conclusion. It is vitally important that you have a process to check and validate a theory. Without that, you will be forever jumping from one idea to another without ever coming to a conclusion. With that said, let’ s move on.
When it comes to troubleshooting methods, I group them into two common categories:
- Scientific method.
Do what any good detective would do: Look for all the clues you have been given and deduce what the problem might be based on experience and knowledge.
Advantage. Eventually you will identify the problem.
Disadvantage. It takes a lot of patience and time.
- Shotgun method.
Take a shot at as many possibilities as you can and hope you get a hit. Sometimes you get lucky and you solve the problem fast.
Advantage. If you are lucky, you will solve the problem fast.
Disadvantage. If you are not lucky, you will chase around in circles forever.
Although both these methods have their place, what I propose so subtly in my title is a third approach to troubleshooting. I call it the Scientific Shotgun Method—a marriage, if you will, of the shotgun method and the scientific method.
Start like this: When a problem first comes to your attention, take a shot at as many possibilities as you can. Write down all the things you think might be causing it. Use your intuition as well as your experience in this exercise. Speaking metaphorically, get out the shotgun, take aim, and fire. Then let the scientific method kick in and figure out a way to evaluate each of your possibilities to prove or disprove them, and have at it.
When employing the scientific shotgun method, based on my experience, results like these are typical: 70% of the time it will be something stupid that the shotgun method catches easily and quickly. For example, using an old software version or if a component wasn’t stuffed or a fuse was burned out, 20% of the time something more subtle will be found that takes some trial and error and requires new data to be found and evaluated until the problem is solved. About 10% of the time the solution takes a while longer but eventually is found by repetitive applications of both methods. Often the shotgun approach will open up new areas of research that scientifically lead to the resolution. On the aggregate, problems are typically solved quickly with a minimum of running in circles when the scientific shotgun approach is used. (Did you ever think you would see those two words together as something meaningful?) This is a real boon in a consumer-product world where shipping that new design on time is all-important.
你也能学会排除故障#
You Too Can Learn to Shoot Trouble
你是否曾看到某位工程师在诊断问题根源时陷入巨大困境,而一个普通的技术员顺道过来却立刻指出了坏零件?或者你也见过技术员苦苦排查几天,最终工程师只看了一眼原理图就说:“问题在这儿。”
有些人确实不擅长排查问题,而另一些人似乎天生就有这种本事。当你请他们解释是怎么快速解决问题的,他们往往说不出来——他们只是会这么做而已。我坚信即使不具天赋,也能学会任何技能,因此我把那些“天生能人”做的事提炼成了一些经验法则。
Have you ever seen an engineer having immense difficulty in diagnosing the cause of a problem when a lowly tech stops by and identifies the bad part right away? Or maybe you’ve seen a tech struggle for days only to have the engineer take one look at the schematic and say,“There is your problem.”
Some people have trouble with troubleshooting, and others just seem to have a knack for it. If you ask them to explain what they do to solve problems so quickly, they are often at a loss as to how they do it—they just do. Believing that you can learn anything even if it doesn’t come naturally, I have distilled down into Thumb Rules some of the things that those with the knack do.
从简单的事情开始#
Simple Things First
当你列出所有可能出错的项后,从简单的事情入手。我父亲在我年轻时讲过一个经历,让我至今记忆犹新。他基本上把整辆车的线路都重接了一遍,为了找一个电气故障。结果令人沮丧——竟然只是一个保险丝坏了。看上去没事,但测量后发现是断的。旁观者也许会觉得这是“低级错误”,但这其实是个很容易掉进去的陷阱。避免这种情况的办法就是先检查简单的地方。芯片的引脚是否真的有电?(不仅是板上有电。)振荡器在运行吗?一步步排查简单的问题,避免假设,先查清所有容易出错的地方。
After you have made the list of things that could go wrong, start with the sim- ple things first. My father recounted an experience to me when I was younger that really stuck with me. He basically rewired an entire car looking for an elec- trical problem. To his dismay it turned out to be a bad fuse. Looking at it, it appeared okay, but when measured, it was open. This might seem like a “duh” moment to the outside observer, but it is an easy trap to fall into. The way to avoid it is to check out the simple things first. Does the chip have power at its pins? (Not just to the board.) Is the oscillator running? Walk your way through the simple stuff, avoiding assumptions and checking everything for simple failure first.
Look Outside Your Specialty#
放眼你专业之外的领域
很难一概而论哪个环节更容易出问题,因为通常某个具体问题会有很多细微线索。更复杂的是,问题往往是多个因素共同造成的。
人之常情总是关注自己熟悉的领域;其他一切看起来多少有点神秘。优秀的故障排查者往往是优秀的通才。他们什么都懂一点,用这些知识将因果联系起来。他们总是想知道“为什么这个是那样的”、“那个东西有什么作用”等等。[1]_
有时候线索看似微不足道。我刚入行时,我们公司曾遇到某些显示器故障的问题,一部分产品在测试中失败,我被指派去查原因。我拆开设备后,它又能正常工作了;装回去后又出问题。我查了几个小时,想找压坏的线或者虚焊点,但毫无所获。于是我坐在那儿盯着电路板看。
我注意到电阻上有两个小划痕;我开始琢磨这些划痕是哪来的。经过检查,我发现电路板装入机壳时,有一个螺丝头会接触到这颗电阻。事实证明,当装好设备并拧紧螺丝时,螺丝头会在电阻上短路,导致该部件失效。我取下螺丝后,再装回去,设备就正常工作了。不要害怕在你熟悉领域之外寻找问题的根源。
It’s hard to make a blanket statement about what is likely to fail, since there are often many small clues to a particular problem. To further complicate things, it is often a combination of more than one factor that’s causing the problem.
It is human nature to focus on what you know; everything else seems somewhat magical after all. Good troubleshooters are often good generalists. They know a little bit about everything and use that to connect the cause to the effect. They always want to know why this is that and what does that thing do, and so on. [1]
Sometimes there could be seemingly insignificant clues. One time early in my career we had a problem with some displays we were producing. A percentage of them were failing and I was assigned to find out why. When I took the unit apart, it would function correctly. When I put it back together, it would fail again. I looked for hours trying to find problems with pinched wires and cold solder joints, to no avail. So I sat there and stared at the PCB for a while.
As I did, I noticed two small marks on a resistor; I wondered where they had come from. After some examination, I discovered a screw head coming in contact with that particular resistor when the PCB was installed. It turned out that the screw head would short across the resistor installed once things were tightened down, making the part fail. When I removed the screw, the console worked correctly after assembly. Don’t be afraid to look outside what you know for the cause of the problem.
不要忽略任何东西#
Don’t Ignore Anything
尽量记录某个问题的所有线索。将所有症状和线索列成清单,供你推理时参考。不要忽略任何细节,因为某一条信息可能会和另一条联系起来,指向正确的方向。下面就是一个例子。
在对我们工程团队设计的一个控制电路进行测试时,我们遇到了随机、难以解释的问题。测试工程师说这些问题似乎是从我们开始使用表面贴装PCB设计后才出现的。我们完全想不到两者有什么联系。我想起在看电路板时,注意到板子上有些细小的黑色纤维,看起来像是灰尘。测试工程师起初认为这只是使用过程中环境中积累的塑料碎屑(合理猜测,因为设备中有条塑料带在运行过程中会磨损掉屑)。他确信这不会产生影响。
然而我们知道,电路板上的某些点,如果被一个几兆欧的阻抗短接,也会导致我们所看到的问题重复出现。结合贴片元件之间间距更小这一事实,这种短路的可能性也随之增加。我坚持要我们确认这些纤维是否具有导电性。
我们做的第一件事就是收集一部分“灰尘”,然后靠近磁铁试验(假设如果它是铁磁性的,那它很可能也是导电的)。结果令我们吃惊:这些被认为是塑料屑的东西中居然有很多铁磁性物质。这让我想起经典的物理实验——在纸上撒铁粉,然后用磁铁在下面移动以观察磁场分布。一旦我们对电路板进行防护,避免这类污染,异常现象就消失了。
正是因为我们没有忽略这些纤维的明显存在,并将其与我们开始使用SMT设计的时间点联系起来,才找到了问题的根源。
Try to keep track of all the clues to a particular problem. Keep a list of symptoms and clues that you can refer to in your deductions. Don’t ignore anything, since one fact might connect with another to point you in the right direction. Here is a case in point.
During testing of a control circuit my engineering team had designed, we had been experiencing random unexplainable problems. The test engineer made the statement that these problems seemed to have started when we began using surface-mount PCB designs. We were completely at a loss as to any connection between this and the problems. Then I remembered, when looking at one of the circuit boards, I had noticed some small black fibers that appeared to have dusted the PCB. The test engineer initially dismissed this as small bits of plastic that accumulated in the environment of the circuit during use (this made sense because there was a moving belt made of plastic that could leave these bits as it wore down). He was sure it wouldn’t make a difference.
However, we knew there were points on the PCB that, if they were shorted by even a few mega-ohms, could make the circuit repeat the problem that we were seeing. Connecting that with the fact that the surface-mount components would have closer spacing made such a short more likely. I insisted that we determine conclusively whether these fibers were conductive.
The first thing we did was collect a sample of this“dust” and bring it near a magnet (on the presumption that if it is ferrous it is likely conductive). We were surprised at how much ferrous material was in these presumed plastic shavings. It reminded me of the classic physics experiment where you put metal filings on a piece of paper and then move a magnet underneath to see the field interactions. Once we protected the board from this contamination, the strange behavior stopped.
By not dismissing the obvious presence of these fibers, combined with the clue that it started when we went to an SMT design, we were able to make a connection that allowed us to solve the problem.
这些东西中哪个不一样?#
Which of These Things Is Not Like the Other?
你小时候看过《芝麻街》吗?我最喜欢的片段之一是“这些东西中哪个不一样?”你被教导去识别相似之处,然后指出那个看起来不合群的。这是一项非常重要的故障排除技能。所有的好技能不仅仅适用于“电子工程师的世界”,它们几乎可以应用于任何问题的排查中。以下是达伦档案馆中的又一个案例。
多年前,我们的冰箱不再出水了。我觉得我应该动手拆开看看。[2] 毕竟,水阀是由一个电磁阀控制的。
这对我来说已经够“电”的了。冰箱里有两个阀门,一个是出水的,一个是制冰的。我把这些阀门拆开后,注意到出水阀里的一个橡胶垫圈有些磨损。电磁铁会把这个垫圈压在阀门的一个孔上。由于磨损严重,这个垫圈开始掉橡胶碎屑。当我查看制冰电磁阀(它工作正常)时,它的橡胶垫圈并没有磨损。
这个垫圈分解的样子实在不对劲。它看起来就是不对劲。所以我换了这个橡胶垫圈。重新装好,一试,成功了!在这个案例中,关键的技巧是寻找那个“看起来不对劲”的地方。有时你可以问自己:“我会设计一个会自行分解的垫圈吗?”在这个例子里,显然答案是不会,所以一定是垫圈出了问题。
Did you watch Sesame Street as a kid? One of my favorite segments was“Which of These Things Is Not Like the Other?” You were taught to identify similarities and then point out the one that just didn’t seem to fit. This is a very important troubleshooting skill. All the good skills work in more than just the“world of sparkies.” They can be applied in just about any problem hunt. Here is another case from the Archives of Darren.
Years ago our fridge stopped dispensing water. I figured I should just tear into it and take a look. [2] After all, the water valve was controlled by a solenoid.
That was close enough to electricity for me. There were two valves, one for water and one for ice. I tore these valves apart and noticed some wear on a rubber washer inside the water valve. The solenoid pressed this washer against a hole in the valve. Little bits and pieces of rubber were falling off because it was so worn. This became especially important after I looked at the ice solenoid (it was operating correctly) and the rubber washer on that one didn’t show wear.
It just didn’t seem right for the washer to be falling apart like that. It just didn’t fit. So I replaced the rubber washer. Put it all back together and, voilà, it worked great. The skill in this case was looking for something that simply didn’t seem right. Sometimes you can figure this out by asking yourself,“Would I have designed the washer to fall apart?” The obvious answer in this case was no, hence something was wrong with the washer.
估算再探#
Estimation Revisited
有时候我们一半的时间都花在设计电路上,另一半则用来搞清楚为什么它没按我们设计的方式工作。 在 第一章 中,我们学习了如何对基本元件建立直觉性的理解。这个过程中的一个重要部分就是培养估算的能力,从而判断电路是否大致运行在应该的状态。
估算在故障排除中也扮演着重要角色。如果你擅长估算,你的直觉通常是正确的,会把你引向解决问题的正确道路。将这项技能与现代计算器的强大功能结合起来,再加上我们在 第五章 中讨论过的电路仿真器,你将拥有一套强大的工具来诊断问题的根本原因。
Sometimes it seems we spend half our time designing a circuit and the other half trying to figure out why it isn’t doing what we designed it to do. Back in Chapter 1 we learned to develop an intuitive understanding of basic components. An important part of this process was developing the skill of esti- mation, to get an idea if the circuit is even close to where it is supposed to be. Estimation plays an important role in troubleshooting as well. If you are good at estimation, your intuition will be correct and will point you down the right path to solving the problem. Combine that skill with the power of the modern- day calculator, and even a circuit simulator as we talked about in Chapter 5, and you have a powerful toolset to diagnose the root cause of a problem.
你能再次让它坏掉吗?#
Can You Break It Again?
这是一个简单却常被忽略的规则。当你发现并修复了一个问题后,你能再次让它坏掉吗?
也就是说,你能移除修复措施,并再次看到电路出现之前的问题行为吗?很多时候,特别是那些难以重现的问题,一个工程师应用了一个修复措施,问题看起来消失了,于是他就认为万事大吉了。然而,如果这个问题比较“情绪化”,也就是说,它并不总是在你想要时出现,你可能只是碰巧在问题自行消失的时候刚好应用了修复。在我的经验中,这种情况相当常见,所以请再次“让它坏掉”,看看你是否真的修复了它。
以为你已经解决了问题,结果一上线生产就又停产,是件很让人沮丧的事情。你也可能花大笔钱实施其实并不必要的修复措施。通常,把它弄坏再修好几次,是确保你真正解决了问题的好方法。
This is a simple rule that is often overlooked. Once you have found and corrected the problem, can you break it again?
That is, can you remove the fix and see the circuit act up again, doing whatever it did before? Often, especially with problems that are difficult to repeat, an engineer will apply a fix, have the problem seemingly go away, and figure he is good to go. However, if the problem is a bit temperamental, meaning it doesn’t always show up when you want it to, you might just coincidentally have applied the fix when it happened to go away on its own. In my experience this can happen quite often, so break it again to see if you are really fixing it or not.
It’s no fun to think you have dealt with a issue only to fire up the production line and shut it down again when the problem reappears. You can also spend a lot of money applying fixes that are not really needed. Often it is a good idea to break it and fix it several times to be sure you have truly solved the problem.
根本原因#
Root Cause
一个优秀的故障排除者会有条不紊地追踪有问题的信号直到它的来源。在这个过程中,他会质疑电路中每一个元件是否都在正常工作。他会问自己诸如“这个运放的输出信号是否与输入引脚上的信号一致?”这样的问题。
这也是为什么那些真正厉害的工程师总是在自言自语。他们不是精神分裂,他们只是常常在问自己很多问题。(好吧,也许他们的确有点精神分裂,但相信我,这是好的那种。)
最终你会找到问题的根本原因——那个没有按预期工作的元件——然后你就可以弄清楚为什么会这样,并修复它。
A good troubleshooter will methodically trace an offending signal back to its source. As he does so, he will question whether each component in the circuit is operating correctly. He will ask himself things like“Does the output signal of this op-amp agree with the signals that are on the input pins?”
This is why the really good engineers seem to always be muttering to themselves. They aren’t schizophrenic, they just ask themselves a lot of questions. (Okay, maybe they are schizo, but trust me, it’s in a good way.)
Eventually you will find the problem’s root cause—the component that isn’t doing what it is supposed to—and then you can figure out why and get it corrected.
对问题进行分类#
Categorize the Problem
优秀的故障排除者会将问题分门别类,并针对疑似问题类型采用最合适的方法。
- 设计问题
这是最常见且最容易发现的错误, 因为它通常是可重复且一致的。
方法:既然是可重复的,保持问题持续出现,同时使用工具(示波器、万用表等)追踪问题。确保找到根本原因。
- 容差问题
本质上也是设计问题,但我单独列出这一类,因为这类问题通常表现不稳定且难以重复。环境因素常常加剧此类问题。
方法:如果可能,需重复导致问题的环境条件。这里也是运行仿真的好地方,可以调整你怀疑的元件容差并观察结果。
- 电磁干扰(EMI)问题
这类问题同样难以重复。谁知道何时电磁干扰会出现?它经常会让最有经验的工程师也头疼。
方法:这部分内容非常有趣,我专门准备了一整篇论述,稍后介绍!
- 软件问题
如今许多产品都采用某种软件或固件。我见过软件表现出以上各种症状,甚至用软件来修正一些实际上是硬件问题的故障。正因如此,这个话题被单独分类。[3]
方法:放弃吧,回家休息。(开玩笑)不过现实是,这类问题通常难以在合理时间内定位。再加上软件工程师普遍害怕使用示波器[4]_,诊断软件问题时你可能会遇到不少挑战。这个段落越写越长,我觉得它需要专门讨论,稍后会讲到。(又是双关!)
Good troubleshooters will separate the problems into various buckets and use an approach that works best for the type of problem suspected.
- Design problem.
This is the most common mistake and the easiest to find, since it is generally repeatable and consistent.
Approach. Since it is repeatable, keep it misbehaving while you use tools (scopes, meters, etc.) to trace down the problem. Make sure you get to the root cause.
- Tolerance problem.
Really a design problem, but I give it a special category because this is typically inconsistent and difficult to repeat. Environmental effects commonly aggravate this type of problem.
Approach. You will need to repeat the environment that caused it if possible. Here is also a good place to run simulations where you can vary the tolerance of the parts you suspect and see what happens.
- EMI problem.
This can also be difficult to repeat. Who knows when EMI is going to hit? It will often trip up the most competent engineers.
Approach. This one is so much fun I have dedicated a whole discourse to it, coming up next!
- Software problem.
So many products today use some type of software or firmware. I have seen software exhibit all the preceding symptoms and be used to correct some of these problems, even though it was really a hardware issue. This topic gets its own category for that reason. [3]
Approach. Give up, go home. No, not really, but it is a fact that these can be a bugger (pun intended) to figure out in a reasonable amount of time. Combine that with software engineers’ natural fear of oscilloscopes [4] and you can see you are in for a treat when diagnosing a software problem. The longer this paragraph gets, the more I think it needs its own discussion, so I put one in. We’ll get to it in a bit (pun intended again!).
去解决问题吧#
Go Shoot Some Trouble
既然你已经掌握了一些基本技能,就把它们拿出来试试吧:瞄准并迅速解决问题!最后一个建议是,记录你调查的内容和得出的结论。如果你要找的问题需要花些时间才能发现,这一点尤其重要。这些记录在你制定设计规范时也很有用,可以帮你避免下次设计中犯同样的错误。
我知道这听起来像是你学生时代那些令人讨厌的实验笔记本,没错,但记住,你不需要被打分。只需用自己觉得合理的方式记录即可。做些笔记,走出去,把问题击退!
Now that you have some basic skills, put them to the test: Take aim and blow that trouble out of the water! As one last idea, keep notes of what you are look- ing into and the conclusions you are drawing. This is especially important if what you are looking for is taking a while to find. It is also nice to have when you are creating your design guidelines. You can refer to these notes to know what not to do in the next design.
I know it sounds like those dastardly lab books you had to keep while in school, and it is, but remember, you aren’t getting graded on them. Just keep the notes in a way that makes sense to you. Take some notes, get out there, and blast trouble away.
经验法则
不要完全否定一个假设;通过实验试图验证它的正确与否。
采用“霰弹枪婚礼”方法快速找到问题根源。
先检查简单的东西。
跳出你的专业领域去观察。
不要忽视任何线索,也不要轻易假设。
寻找不合群的异常。
用估算和直觉指引方向。
深入挖掘根本原因。
你能再让它坏掉一次吗?
给问题分类并定制对应方法。
Do not discount a theory outright; try to prove it right or wrong by experiment.
Use the shotgun wedding approach to get to the root of the problem quickly.
Start by checking the simple things first.
Look outside your specialty.
Don’t ignore anything, and the corollary, don’t assume anything.
Look for what doesn’t belong.
Use estimation and intuition to lead you in the right direction.
Dig for the root cause.
Can you break it again?
Categorize the problem and customize your approach.
机器中的幽灵: 电磁干扰#
GHOST IN THE MACHINE: EMI
你是否遇到过电路或设计出现了你无法解释的异常行为?更糟的是,它并不是一直出现,而是只有在“星象排列合适”时才发生?你可能遇到了电路被EMI(发音为“艾米”)幽灵困扰的情况。应对EMI绝对是一门吃尽苦头的课程。这里给即将入门的你们准备了一些“速成笔记”。
EMI代表电磁干扰,哇,它确实会干扰一切!我记得我第一次与这个“幽灵”较量的时候。我们刚完成一个显示屏的设计,测试台上效果很好,产品中大多数时间也能正常工作。但是,当我们打开电机时,大约20%的时间显示屏会突然失控。经过一整夜的反复试验,我们终于找到了解决方案,使生产线重新启动。从那以后,我学到了许多如何定位和解决EMI问题的方法。我这里提到的内容与之前讨论的故障排除技术结合使用效果很好。
很少有工程师会在非故障排查的情况下主动处理EMI。事实是,我们不去找EMI,它自己就能找到我们!让我们先了解EMI到底是什么。
Have you ever had a circuit or design do something you don’t want it to and you just can’t explain why it does it? Worse yet, it doesn’t do it all the time, just when the planets are properly aligned. You might just have a circuit haunted by EMI’s (pronounced Emmy’s) ghost. Dealing with EMI is definitely a school-of-hard-knocks course. Here are a few“CliffsNotes” for those of you who are about to enroll.
EMI stands for electromagnetic interference and, boy, does it ever interfere! I remember one of my first bouts with this ghoul. We had recently completed a design of a display that worked great on the bench and even worked most of the time on the product. However, about 20% of the time when we turned the motor on, the display would simply freak out. By an all-night process of trial and error, we finally stumbled across a solution to get production up and running again. Since then, I have learned a lot about how to pinpoint an EMI problem and resolve it. The things I point out here work well when combined with the troubleshooting techniques previously discussed.
Few engineers have ever dealt with EMI on anything other than a troubleshooting basis. Let’s face it, we don’t go looking for EMI, it does just fine finding us by itself! Let’s start by getting a basic understanding of what EMI is.
What Is EMI?#
什么是EMI?
EMI基本上是进入你电路中的不需要的信号。它仍然是电信号,仍然遵守欧姆定律,尽管它表现出超自然的行为,但本质上仍然只是信号。这是好消息!意味着你可以将这些“恶魔”从设计中驱除,因为它们依然遵守物理定律。
EMI is basically an unwanted signal entering your circuit. It is still an electrical signal, it still obeys Ohm’s Law, and, for all its supernatural behavior, it is still just a signal. This is good news! It means that you can exorcise these demons from your design because they still obey the laws of physics.
幽灵的途径#
The Ways of the Ghost
首先,EMI是如何进入电路的?只有两种方式:传导和辐射。第一种情况下,不需要的信号必须通过电路板上的线迹、导线或其他直接连接路径进入干扰区域。第二种情况,信号无需导线而传播。知道信号是如何进入的对采取的解决方案至关重要。
First, how does EMI get into a circuit? There are only two ways: It’s conducted or it’s radiated. In the first case, the unwanted signal has to travel on a trace, wire, or other directly connected path into the area of disruption. In the second case, the signal propagates without wires. It is important to know how the signal is getting in because that affects the solution you will need to employ.
传导EMI#
Conducted EMI
如何判断是否为传导EMI?最简单的方法是逐个断开连接,直到问题消失。举个例子:我们曾将计算机连接到电路板,连接点既有声卡的音频输出,也有串口。扬声器中出现了烦人的嗡嗡声,其音调与电路板上的显示同步变化。当我拔掉串口连接时,嗡嗡声消失了。我们遇到了所谓的接地环路,这是传导EMI的一种特定类型。我通常先检测是否为传导EMI,因为这最容易检查。如果你的设备由交流电(AC)供电,千万别忽略墙壁插座的连接。我曾见过每次投影仪插上电源时,设计都会被干扰。
How do you know if it is conducted EMI? The easiest thing to do is disconnect everything part by part until the problem goes away. Case in point: We were hooking a computer up to a circuit board, both at the audio output of the sound card as well as the serial port. There was an annoying buzz in the speakers that changed tone in sync with the displays on the board. When I unplugged the serial connection, the buzz went away. We had what’s known as a ground loop. This is a specific type of conducted EMI. I usually try to detect whether the problem is conducted EMI first, since this is the easiest to check. Don’t overlook the connection to a wall outlet if the AC line powers your device. I once saw a design disrupted every time an overhead projector was plugged in.
辐射EMI#
Radiated EMI
我学到的判断辐射干扰最好的方法是将其分为两大类:近场效应 和 射频(RF)效应。
近场效应又可以细分为电流和电压干扰。这里有个经验法则:任何在一个波长范围内的都是近场,超过这个范围则为射频。在近场范围内,磁场会在电路中感应电流波动,电场则引起电压波动。
这是个用你工作台上可能已有设备做的简单测试。拿示波器探头,像 :ref:图6.1 <Figure 6.1> 所示那样让地线悬空。然后将探头移近一个交流电插座。调整电压量程,很快你就会看到漂亮的60Hz正弦波。这个示波器配置本质上是一个偶极天线,对电场响应良好。 图6.2 显示的是我将其靠近一个电池充电器的AC输入时的情况,你可以看到正弦波及可能由开关电源产生的其它频率成分。
那么磁场呢?磁场由电流流动产生。现在,当你听到“电流”和“磁场”时,希望你会想到“回路”这个答案。所以我们用示波器探头把地线夹在探头尖端,变成一个回路天线(参见 图6.3)。你会发现先前插座产生的电压信号消失了。

图6.1 电压引线测试。#
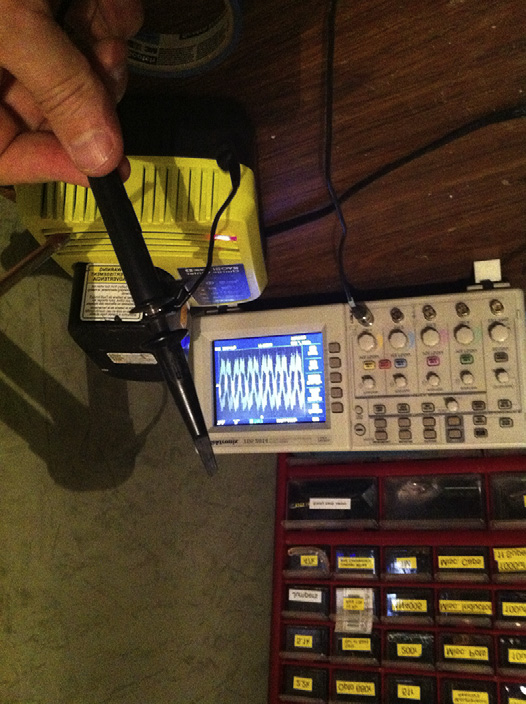
图6.2 电压示波器波形。#
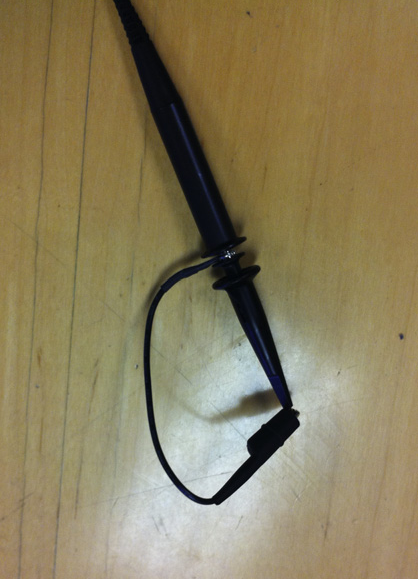
图6.3 电压示波器波形。#
不过,将你的新“传感器”移近你正在使用的示波器电源线或其他有电流流动的设备。瞧——你用这个配置捕捉到了磁场。请看我的例子(参见 :ref:图6.4 <Figure 6.4>),我将它移近我怀疑电流流动较大的电池处,你可以看到它捕捉到的快速脉冲。你经常可以用这个简单技巧判断你面对的EMI类型。(并且你不必购买昂贵的探测器和频谱分析仪!)这还能帮助你确定问题的频率,很多时候频率信息就能指引你找到解决方案。
当距离超过一个波长时,电场和磁场的优势逐渐消失,此时你面对的是射频干扰。怎么判断是射频干扰?试着把怀疑的干扰源移开一个波长以上,看看问题是否还存在。
总结一下,辐射EMI可分为三类:近场磁场、近场电场和远场射频。做这个区分的唯一目的就是为了找出消除问题的方法。在这三种情况下,辐射效应最终都必须转变成传导效应才能干扰电路。关键是阻止这种转变发生。
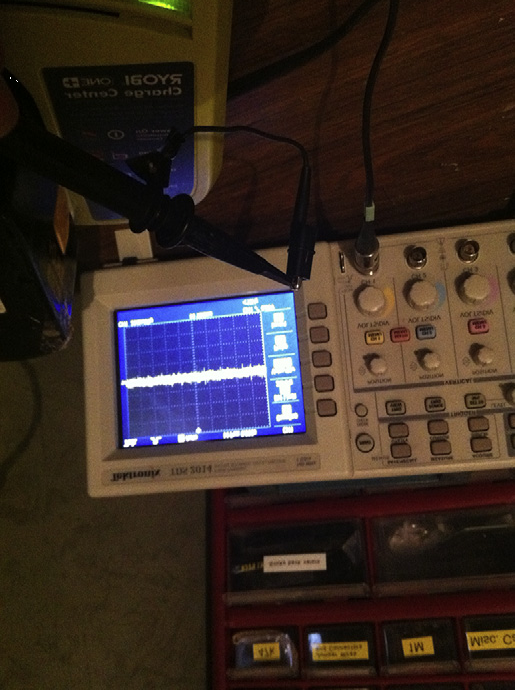
图6.4 电压示波器波形。#
The best way I have learned to determine radiated effects is to divide them into two camps: the near-field effects and the RF effects.
Near-field effects can be easily divided further into current and voltage disruptions. Consider this rule of thumb: Anything within a wavelength is near field and anything outside that range is RF. Inside the near-field range, magnetic fields induce current fluctuations into a circuit and electric fields produce voltage fluctuations.
Here is a simple test with a piece of equipment that you are likely to have on your bench. Take your oscilloscope probe and leave the ground dangling as shown in Figure 6.1. Now move it near an AC outlet. Adjust the voltage range and quickly you will see a nice 60 Hz sine wave. This scope configuration is basically a dipole antenna and it responds well to electric fields. Figure 6.2 is an example where I bring it near the AC input of a battery charger. You can see the sine wave as well as other frequencies most likely due to the switching power supply inside this charger.
But what about magnetic fields, you say? Magnetic fields are caused by current flow. By now, hopefully, when you hear current and magnetic field in a word association game, you come up with the answer loop. So let’s turn our scope lead into a loop antenna by clipping the ground to the probe tip (Figure 6.3). You will see that the previous voltage signal from the outlet disappears.
Figure 6.1 Voltage lead test.#
Figure 6.2 Voltage scope.#
Figure 6.3 Voltage scope.#
However, move your new sensor near the power cord of the scope you are using or some other device that is moving current. Voilà—you pick up magnetic fields with this configuration. Take a look at my example (Figure 6.4). I moved it near the battery where I suspected a lot of current flow and you can see the fast spikes it is picking up. You can often use this simple technique to determine the type of EMI you are dealing with. (And you didn’t have to buy expensive sniffers and spectrum analyzers!) It also helps you figure out the frequency of the problem, and that can lead you to a solution as often as not.
Once you get more than a wavelength away, the prominence of one field over the other tends to disappear and that leaves you dealing with RF, or radio frequency, interference. How do you find out if the problem is RF? Try moving the suspected interference source more than a wavelength away and see whether you still have a problem.
To sum up, radiated EMI can be divided into three categories: near-field magnetic, near-field electric, and far-field or RF. The only reason to do this, though, is to identify ways to eliminate the problem. In all three cases, at some point the radiated effects have to turn into a conducted effect to disrupt your circuit. The trick is to stop that from happening.
Figure 6.4 Voltage scope.#
Deal With It#
Deal With It
无论来源如何,在你的职业生涯中某个阶段,你将有机会驱除电磁干扰(EMI)这个电路中的幽灵。在进入具体细节之前,比如什么时候以及在哪里悬挂“juju珠”[5]_,有一些基本概念会帮助你把这些恶魔重新装回瓶子里。
Whatever the source, at some point in your career you are going to have the opportunity to exorcize the EMI ghost from your circuit. Before we get into specifics, such as when and where to hang a juju bead, [5]_ there are some basic concepts that will help put these demons back in their bottle.
打破它来证明你可以修复它#
Break It to Prove You Can Fix It
记住,EMI是由某种电磁场引起的,无论是传导的还是辐射的。通常这种现象只是偶尔发生。这本身就会使追踪变得困难。所以我们将回顾“弄坏它”的概念。如果你认为自己解决了某个问题,你需要移除解决方案,看看问题是否会复现。弄坏它,修复它,再弄坏它,正如我们之前学到的。由于EMI的隐蔽性,这一点尤为重要。
举个例子:有一次我试图消除我们使用的显示器的闪烁问题。当我弄清楚情况时,我尝试在线束上装一个铁氧体珠。问题消失了。我以为自己解决了问题,就指示生产线在所有机器上安装铁氧体珠。你大概能猜到发生了什么。生产线重新启动后不久,闪烁又出现了。我后来发现问题是由电机刷弧光引起的。我恰好是在电机刷“磨合”时装的铁氧体珠,正好消除了噪声源。现在我总是多次移除并重新安装解决方案,以确保问题能够反复出现并被稳定消除。当任何工程师带着修复方案回来时,我首先会问:“你有没有移除它,确认问题还存在?”如果你不能随时“弄坏它”,就不能确定修复方案是有效的。
Remember that EMI is caused by some sort of electromagnetic field, either conducted or radiated. Often this only occurs on an occasional basis. That in itself can make it hard to track down. So we will review the concept of breaking it. If you ever think you have solved a particular problem, you will need to remove the solution and see whether the problem comes back. Break it, fix it, and break it again, as we learned earlier. Due to the sneaky nature of EMI it is particularly important in this case.
Here’s an example: One time I was trying to eliminate a flickering problem on a display we were using. As I worked out what was going on, I tried putting a ferrite on the wire harness. The problem went away. Thinking I had solved the problem, I instructed the production line to install ferrites on all the machines. You can probably guess what happened. Shortly after the line started up again, the flicker was back. I later discovered that the problem was caused by motor brush arcing. I just happened to put the ferrite on when the motor brushes “burned in,” eliminating the noise source. Now I will always remove and reinstall the fix several times to be sure the problem returns and is eliminated consistently. The first thing I ask any engineer when he or she returns with a fix is, “Did you remove it and make sure the problem is still there?” If you can’t break it at will, you can’t be sure the fix is legit.
时机就是一切#
TIMING IS everything
我还学到的一点是,要在电路出现故障的瞬间去追踪它。你可能会想等有时间再研究它,但当你去查找时,问题已经不再出现。你必须抓住它“作案”的时刻。所以一旦发生,不要犹豫,拿起你的“juju套装”去“捕鬼”。不要惊讶生产线上的问题在实验室里无法复现。去生产线现场尝试查明原因。
生产车间能发现大量噪声。通常有各种电机和设备运行,制造EMI。我工作过的一个生产线上有一张金属桌子,当便携CD播放器靠近桌面约2英寸时,播放就会紊乱。桌子接地在支撑天花板的钢柱上。我了解到,在插座地线与建筑物钢结构间噪声电压可高达50伏。将桌子接地到插座地线后,问题消失了。我没有忘记通过移除修复方案来“弄坏它”,实际上我反复多次这样做,以确保问题确实解决。
让EMI问题随意复现很难,所以不要害怕在问题发生的时间和地点去现场。
Another thing I have learned is to track down the sick circuit right when it is failing. Often you might be tempted to leave it until you have time to research it. Then when you go looking, you can’t find it because it’s working now. You have to catch it in the act, so to speak. So when it happens, don’t wait, grab your“juju kit” and go ghost hunting. Don’t be surprised if something happens on the production line that you can’t get to repeat in the lab. Go to the line and try to figure it out.
Amazing amounts of noise can be found on the production floor. There are usually all sorts of motors and equipment running and creating EMI on a production floor. A production line where I worked had a metal table that would mess up a portable CD player whenever it was within about 2 inches of the table surface. The table was grounded to a steel post holding up the ceiling. I learned that you can have upward of 50 V of noise between ground in the outlet and the steel in a building that is tied to that ground. Tying the table to the outlet ground made the problem go away. I didn’t forget to try to break it by removing the fix. In fact, I did this several times just to be sure it really was the problem.
It is difficult to get an EMI problem to occur at will, so don’t be afraid to go to the problem where and when it happens.
压力之下#
UNDER PRESSURE
有时我们面临快速开发解决方案的压力。你可能会试图一次性施加所有你能想到的措施。如果成功了,再逐个移除看看效果。EMI问题往往是多种因素的组合。如果只尝试单一修复,可能会忽视组合修复的效果。你可能既需要在 AC 线上装0.1μF电容,也需要在数据线束上加铁氧体夹。多数情况下,你需要多重修复才能解决问题。
Sometimes we are under pressure to develop a solution fast. To do that you might try throwing everything you’ve got at it at once. If you solve it, then try removing one piece at a time. EMI problems are often combinations of various things. If you try one fix at a time, you might overlook a combination of fixes that would have solved your dilemma. You might need that 0.1 μf cap on the AC line and the ferrite clamp on the data harness. As often as not, you will need more than one fix to solve the case.
做好应对意外的准备#
BE PREPARED FOR SURPRISES
一个跨线的 AC 电容对滤除进入系统的噪声效果极佳,这也是它们被装在浪涌抑制器中的原因。这对我来说曾是绝对真理,直到不久前我在追踪通信线束噪声问题时发现一件怪事。我观察通信线上的噪声时,叫工程师把测试单元插入浪涌抑制器而非直接插墙上,结果噪声更严重了。我至今不明白为什么,但我们用此经验改进了滤波和数据可靠性。故事寓意是:不要做任何假设,所有都要测试。
An across-the-line AC cap will do great things to filter out noise coming into your system. That’s why they put them in surge suppressors. That was an absolute truth for me until a while back when I was tracking down a noise problem on a communications harness and I noticed something funny. I was observing the noise on the communication lines when I asked one of my engineers to plug the unit under test into a surge suppressor instead of directly into the wall. The noise got worse. I’m still not sure why, but we used it to improve our filtering and the reliability of the data. The moral of the story is: Don’t make any assumptions. Test everything.
并非所有元件都生而平等#
Not All Components Are Created Equal
1μF电容和0.01μF电容在1MHz频率下的容抗Xc是多少?计算公式是Xc=1/(2*3.14*10M*C),乘法,指数约去,咕哝,咕哝,最后分别是0.016Ω和1.6Ω。理论上大电容应该更有效地把噪声短路到地。但现实并非完美如此。看看稳压器数据手册,推荐的电容是一个大电容加一个小电容。原因是大电容在高频下往往不像小电容那样有效。理想电容会如此,但理想电容不存在,只有完美计算。提示:选择电容时,滚降频率最好接近你要抑制的频率。
还有一点:电容器外壳上的容量标称值只在标注的工作电压下才准确。故事寓意是:你可能选对了组件,但参数错了——这没关系,实验可以解决。
What is Xc for a 1 μf cap and 0.01 μf cap at a frequency of 1 MHz? Let’s see, Xc=1/(2 * 3.14 * 10 M * C), so multiply, cancel the exponents, mumble, mumble, grunt, grunt. You get 0.016 Ω and 1.6 Ω, respectively. The larger cap should effectively short more noise to ground. Too bad this isn’t a perfect world or that would be the case. Take a look at a regulator data book; what are the recommended capacitors? One large and one small one, right? The reason is that the larger capacitors often do not work like smaller caps at higher frequencies. A perfect cap would, but alas, there are no perfect caps, only perfect calculations. Hint: Select a cap with a roll-off close to the frequency you are trying to clamp.
One other thing: The capacitance printed on the case is only legitimate when it’s used at the operating voltage on the case of the cap. The moral of the story: You might have the right component but the wrong value—nothing a little experimentation can’t solve.
受控环境#
Controlled Environment
每个工程师都知道受控环境对测试有效性的关键性,但我在追踪EMI问题时常见这点被忽视。也许是因为EMI难以复现。再现EMI的测试环境有一些标准方法。如果你曾接触欧洲CE认证,你可能熟悉其中一些,比如EN 61000-4-4。该标准涉及一个我觉得特别有用的测试:EFTBN测试,意为 极快瞬态突发噪声 测试。它是检测设计抗干扰能力的极好手段。
EFTBN测试的历史可以追溯到1960和1970年代。当时开发的基于IC的时钟使用中会变得不准确。没人找到噪声源,但他们发现如果时钟能通过他们开发的测试,就能准确计时。最终形成了EFTBN测试。(它产生的噪声特征类似UL以前用的“淋浴电弧”测试,后来被EFTBN测试取代。)还记得第四章中的锈蚀锉刀测试吗?这就是它的合法可控版本。
同一标准中还有其他测试协议,包括静电测试、线路浪涌等。深入研究这些标准会发现,测试房间的湿度也会影响结果。配备一个能完成所有这些测试的实验室费用高昂,但如果不配备,测试结果的波动不要惊讶。我个人经验是静电测试是最难重复并获得一致结果的测试之一。我见过电路测试时通过某一等级,但相同板子稍后复测时结果不同。[6]_
需要提醒的是:仅仅通过所有抗干扰测试不能保证你的设计完全可靠。问题可能仍会困扰你。这时你需要制定自己的内部测试,确保设计能正常工作。
Every engineer knows the importance of a controlled environment to determine the validity of a test, yet I see this concern overlooked often when I’m trying to track down an EMI problem. Maybe it is because EMI is so difficult to reproduce. There are some standard techniques for reproducing EMI in a test environment. If you have ever dealt with the European CE requirements, you might be familiar with some of them, such as EN 61000-4-4. This standard references one test that I find particularly useful: the EFTBN test. It stands for extremely fast transient burst noise. This is a great test for finding immunity problems with a given design.
The EFTBN test’s history goes back to the 1960s and 1970s. Some IC-based clocks that were being developed seemed to become inaccurate during use. No one ever really located the source of the noise, but they found that if the clocks could pass this test they developed, they kept time correctly. What they had developed eventually became the EFTBN test. (It creates a similar noise profile to the showering arc test that UL used for some time before replacing it with the EFTBN test.) Remember the rusty file test from Chapter 4? This is the legit, controllable version of that.
In the same standard, you can find other test protocols, including static, line surge, and others. As you look into these standards, you will find that even the humidity of the room where the test is performed can make a difference. Fully equipping a lab to be able to perform all these tests can be very expensive, but if you do not, don’t be surprised by some variation in your results. My own experience with static testing shows it to be one of the most difficult tests to repeat and get the same results. I have seen a circuit tested and seen it pass one level only to repeat the test on exactly the same board at a later date and get a different result. [6]_
One word of caution: Merely passing all the immunity tests is no guarantee that your design is good to go. There could still be problems that plague you. In this case you will need to develop your own internal tests that you need to pass to guarantee correct operation.
穷人的EMI测试#
Poor Man’s EMI Tests
正如我们在上一节中讨论的,建立一个完全受控的测试实验室可能非常昂贵。在这样的实验室租用时间也不便宜。那么,如果你的预算有限,该怎么办?放弃不管吗?虽然这听起来很诱人(特别是当你被某个问题难住时),但通常这不是一个选项。
在我所学的每个学科中,总有一个反复出现的规律,那就是85/15法则(你可能听过80/20或90/10)。意思是:完成85%的工作只需15%的努力,而完成剩下15%的工作却需要85%的努力。EMI领域也是如此。即使你没有完美受控的环境,你仍然可以学到一些关于EMI的知识。只是你得不到明确的通过或失败的结论。
我之前提到过用生锈的锉刀测试,作为一种廉价且粗糙的EFT机替代方案,但它既不受控,也远不如安全。这是穷人的喷弧测试版本。(喷弧测试曾被UL使用过一段时间,后来被EFT测试替代。)我对因穷到不得不用生锈锉刀测试而造成的伤害概不负责,也不推荐这样做。个人认为,你应该让公司掏钱买一台EFT机器。虽然要花几千美元,但你能得到很多好处,而不用花费高价建造屏蔽室和购买各种环境控制设备。再说了,如果不用担心工程师拿锈锉擦电线,我晚上会睡得更安心。
我听说有人用烧烤架里的压电点火器做廉价粗糙的静电测试;它能输出15到20千伏的静电击打。在干燥的日子里,穿上一条漂亮的莱卡短裤,你也能产生大约5到10千伏的静电。(不过要小心——如果同事看到你穿着骑行短裤光脚拿着PCB四处走动,可能会投来奇怪的目光。)
同样,你可以买一把静电枪,价格远低于带接地地板和湿度控制的房间,而且能达到80%的控制效果。
线路浪涌可以通过简单开关来切换交流电机制造。沃尔玛的交流风扇是这种噪声的常见来源。虽然你无法控制浪涌的强度,但至少可以判断你的设计是否能抵抗EMI。
总的来说,你应该尽可能检查你的设计。如果条件允许,花点钱买些设备来测试,但不用一开始就全力投入才能从EMI测试中获益。这样,你可以在实验室完成大部分改进,带去认证测试实验室时节省时间和金钱。
As we discussed in the previous section, it can be very expensive to set up a completely controlled test lab. Renting time at one isn’t cheap, either. So, what do you do if you don’t have much of a budget? Throw your arms up and forget about it? Though that is certainly appealing (especially when you are really stumped on a particular problem), it usually isn’t an option.
There is a rule that crops up time and time again in every discipline that I have studied. It is the 85/15 rule (you might have heard 80/20 or 90/10). What it means is that it takes 15% of the effort to get 85% of what you need and 85% of the effort to get the last 15%. This is true in the world of EMI as well. Even if you do not have a perfectly controlled environment, you can still learn something about EMI. What you will not get is a definite pass or fail conclusion.
I have already mentioned the rusty file test as a cheap and dirty version of an EFT machine, but it’s not as controlled or even anywhere close to being as safe. It is a poor man’s version of the showering arc test. (The showering arc test was used by UL for some time before it was replaced by the EFT test.) I take no responsibility for injury caused by being so poor that you have to use the rusty file test, and I do not recommend it. Personally I think you should get your company to cough up the money for an EFT machine. You will have to spend a few grand, but you can get a lot from that without the expensive shielding room and all the environmental control equipment. Besides, I will sleep better at night if I don’t have to worry about engineers rubbing wires on rusty files.
I have heard of cheap and dirty static tests using Piezo igniters out of barbecue grills; they pump out 15 to 20 kV in a static jolt. You can get about 5 to 10 kV with a nice pair of Lycra shorts on a dry day. (Beware, though—you might get some funny looks from coworkers if they see you shuffling around in your biker shorts and stocking feet carrying a PCB to test.)
Again, you can purchase a static gun for a lot less than you can get the whole humidity-controlled room with a grounded floor, and you’ll get 80% of the controllability that you need.
Line surges can be created by switching AC motors on and off with a simple switch. An AC fan from Wal-Mart is a common source of this type of noise. Again, you won’t be able to control the level, but you will get an idea of whether or not your design can handle EMI at all.
In general, you should do what you can to check your design. If possible, spend some money for some equipment to test, but you don’t have to dive in whole hog to get some benefit out of EMI testing. This way, you can do most of the improvements at your lab, saving time and money when you take it to a certified testing lab.
我梦见了Juju#
I Dream of Juju
经验在对抗EMI的战斗中非常宝贵,但你不必全靠自己吃苦学习。你可以从别人的错误中学习。尽可能多读些相关资料,但要注意:关于这个话题有许多不同观点。不要把你找到的内容当成绝对真理套用到你自己的具体情况。
由于EMI的性质和复杂性,它往往难以应付。你会发现一些解决方案对别人有效,对你却不一定。应对的方法是为你找到的每个修复方案记录原因和结论,经常参考和更新。给自己做一本“Juju日志”。(听起来像实验记录本,对吧?)过一段时间你会发现有些方案特别适合你的产品。有了这些信息,你能比以前更快更省钱地解决问题。甚至会开始预见到避免问题的办法。我甚至半夜醒来时就想到了解决方案。但别做过头了,不然你梦里全是Juju珠和PCB。
Experience is of great value in the battle against EMI, but you don’t have to learn all the courses the hard way. You can learn from others’ mistakes. Read what you can on the subject, but beware: There are many different opinions on this topic. Don’t take what you find as gospel in your particular situation.
By its nature and complexity, EMI can be a bear to handle. You will find that some solutions won’t work as well for you as they do for other people you read about. The best way to deal with this is to document your reasons and conclusions for a given fix you have found, refer to it, and update it often. Make yourself a“Juju journal.” (Yeah, sounds a lot like keeping a lab book, doesn’t it?) You will find after a while that there are some solutions that work particularly well for your product. Armed with this information, you will solve these problems faster and more cheaply than before. You will even begin anticipating ways to avoid them after a while. I have even woken up in the middle of the night with the solution in mind. Don’t overdo it, though; you don’t want all your dreams to be of Juju beads and PCBs.
它在空中#
It’s in the Air
如果你试图阻止空气中的EMI,最可能的解决方案是屏蔽,也就是把你的设计放入导电盒子中。如果是射频干扰,你需要保证盒子上的孔洞比你想屏蔽的信号波长小。
如果是近场干扰,盒子形态可以变化。有时只需在电路和噪声源之间放一个接地板即可。对于磁场或电流影响,铁磁屏蔽效果好;对于电压或电容影响,简单的导电材料就行。不管哪种方法,空气中阻止EMI都涉及屏蔽,且通常是反复试验的过程。这也是成本最高的方案。因此,我一般把屏蔽作为最后手段,优先从电线开始着手。
If you are trying to stop EMI out in the air, your most likely solution will involve some type of shielding, which means putting your design in a conductive box. If it is RF, you will need to keep the holes in the box smaller than the wavelength of the signal you don’t want.
If it is near field, there are some variations on the box. Sometimes all you need is a grounded plate between the circuit you are trying to protect and the source of the noise. For magnetic fields or current effects, ferrous shielding works well. For voltage or capacitive effects, something simply conductive will work. Whatever your approach, if you try to stop it in the air, it will involve some type of shielding and will very much be a trial-and-error process. It is also the most costly solution. For this reason, I tend to treat shielding as a last resort. I go to the wire first.
就在电线里!#
It’s in the Wire!
归根结底,所有EMI都是传导的。EMI不经过传导无法破坏任何东西。即使是近场和射频干扰,最终除非它破坏了板上的信号,否则无关紧要。这也说明学习如何应对传导EMI的重要性。这意味着PCB和电路设计本身对EMI影响巨大。以下是一些PCB和电路设计中抑制线缆中EMI的经验法则。
At the end of the day, all EMI is conducted. EMI can’t disrupt anything until it is conducted. Even when you are dealing with near-field and RF disturbances, when it is all said and done, unless it disrupts a signal on your board, it doesn’t matter. That alone makes learning how to deal with conducted EMI important. It also means that the board and circuit design itself can affect EMI tremendously. Here are some rules of thumb in PCB and circuit design that you can use to stop EMI in the wire.
低电流(电源)信号容易被干扰#
Low Current (Power) Signals Are Disrupted Easily
信噪比基于功率,即电压和电流。我们大多数情况下保持电压不变,让电流变化。加上节能需求,信号电流往往很低。问题是,如果信号功率低,干扰它所需的功率也不高。
举例来说,你可以用手轻轻挡住一个售价49美分的喷水枪水流,轻易偏转水流,破坏信号。试试用消防水龙带,你可能连手都保不住。
大多数情况下,辐射信号进入你的电路时功率并不大。这样你可以用一种简单方法应对它们:让受干扰电路消耗更多电流和功率——变成消防水龙带,这样就不易被破坏。
比如一个传感器末端有1兆欧的上拉电阻,连着4英尺长的线。把上拉电阻改成10千欧,观察变化。这也是为什么传统4/10毫安电流环这么坚固,难以被干扰。
如果你实在无法多用电流,就需要一个在你想抑制的频率上阻抗低,而在信号工作频率上阻抗高的元件。这样的器件有,它们叫电容。把它放在设备输入端,能在特定频率上形成负载,使得不需要的信号难以破坏有用信号。
Signal-to-noise ratio is based on power, both voltage and current. Mostly we work in a world where we keep voltage the same and current is allowed to vary. That combined with a need to conserve power often leads to some very lowcurrent signals. The problem is, if the signal is low in power, the corollary is that it won’t take much power to disrupt it.
For example, you can stick your hand in a stream from a 49-cent squirt gun and easily deflect the water, disrupting the signal. Try doing that with a fire hose and you might lose your hand.
In most cases, radiated signals don’t have much power behind them once they are absorbed into your circuit. That makes it easy to combat them in one simple way: Make the circuit under distress use more current and thus more power—turn it into the fire hose so it can’t be easily disrupted.
Take a sensor with a 1 meg pull-up at the end of a 4-foot wire. Change the pullup to 10 K and watch what happens. This is one reason that the old 4/10 mA current loops are so darn robust. They are hard to disrupt.
If you really can’t spare the extra current, you will need a component that has a low impedance at the frequency you are trying to suppress and a high impedance at the lower frequency at which your signal is operating. They have those; they are called capacitors. Putting one of these on back at the input of the device in question will create a load at a specific frequency, making it harder for the unwanted signal to disrupt the wanted signal.
找到天线并破坏它#
Find the Antenna and Break It
给电路增加功率通常是有效的,除非干扰信号与您需要读取的信号频率相同。在这种情况下,您就需要考虑天线的问题了。
在电子世界中,从非常实际的角度来看,一切都是天线。唯一的问题是,它作为天线的“性能”如何。但首先,我们要问,什么是天线?
天线是一种将辐射场转换为传导信号的装置。基本有两种类型:偶极天线——一根接地线和一段导线;以及环形天线——没错,就是一圈导线。我们之前已经学习了如何将示波器探头变成这两种天线,以检测世界中的某些电磁干扰(EMI)。环形天线特别擅长拾取磁效应,而偶极天线则更适合电容效应。在射频(RF)级别上,存在各种公式和负载计算方法,远超本文范围。可以简单地说,RF 信号可以通过这两种天线被接收。
关键在于识别您设计中的天线。一旦找到了它们,就可以判断如何处理。
有时,在检测传导干扰时,您可能会识别出电路中一个未知的天线。例如,您可能拔掉一根长导线,结果发现问题消失了。我就多次遇到这种情况:我断开了一些受到静电放电影响的接点,问题依旧存在。问题只有在把连接到这些接点的导线拔掉后才真正解决。我移除了那个天线。
偶极天线往往是插入设计中的线束。一个在高频下抑制这些天线的方法是在线上加一个铁氧体磁珠。现在你知道为什么这么多线缆上都有那些小“鼓包”了吧。
环形天线通常就位于 PCB 板上。频率越高,出问题所需的环路就越小。通常来说,环路越小,你的设计就越好。如果你有预算,一个简单的改进方法是使用四层 PCB,中间两层分别作为接地层和 Vcc 电源层。这样可以始终保持最小的环路面积。如果你没预算上四层板,那就需要通过练习和耐心,在单层或双层板上实现类似的效果。如果是这种情况,我强烈建议为你的 PCB 设计人员安排一门相关课程。目前有很多讲师可供选择。
通常来说,良好的辐射器也是良好的接收器。也就是说,你可以打开电路,使用示波器探头,在 PCB 或线束上寻找热点,从而大致判断问题出在哪里。如果你需要更精确的判断,可能需要为设备投资一些近场探头和嗅探器。找出你电路中的天线并破坏它们(让它们变成不良天线),从而阻止 EMI。
Increasing power to a circuit works great unless the signal causing you fits is at the same frequency as the signal you need to read. When this is the case, you need to consider antennas.
In a very real sense in the world of electronics, everything is an antenna. The only question is, how good an antenna is it? But first, what is an antenna?
An antenna is a device that turns a radiated field into a conducted signal. There are two basic types: the dipole, a ground and a length of wire, and the loop—you guessed it, a loop of wire. Earlier we learned how to turn a scope lead into both types of antennas to discover some of the EMI in the world. The loop is particularly good at picking up magnetic effects, whereas the dipole does well with capacitive effects. At RF levels, there are all sorts of equations and loading formulas that are more in depth than the scope of this text. Suffice it to say that RF can be picked up with both antenna types.
The trick is identifying antennas in your design. Once you find them, you can figure out what to do with them.
Sometimes you might identify an unknown antenna in your circuit when you are checking for conducted effects. You might unplug a long wire, for example, and discover that the problem goes away. I have had this exact thing happen more than once where I unhooked some contacts that were getting a static dis- charge, only to still have a problem. The problem only went away when the wires that routed out to these contacts were unplugged. I had removed the antenna.
Dipole antennas tend to be wire harnesses that plug into the design. One way to hamper these antennas at higher frequencies is to put a ferrite bead on them. Now you know why those little bumps are on so many wires these days.
Loop antennas are often found right on the PCB. The higher the frequency, the smaller the loop needed to have a problem. In general, the smaller these loops, the better your design. An easy way to improve this, if you have money to spend, is to go to a four-layer PCB with a ground plane and Vcc plane on the center two layers. That way you always have the smallest loop area. If you don’t have the bucks to spend on a four-layer board, it will take some practice and patience to learn how to do the same thing with a single- or double-layer PCB. I highly recommend a class on this topic for your PCB designers if this is the case. There are many available lecturers on the subject.
As a general rule, good radiators are good receivers. This being said, you can turn your circuit on and, using the scope probes, find hot spots on your PCB or wire harnesses and get an idea of where the trouble is. If you need to be more precise, you might want to invest in some near-field and sniffer probes for your equipment. Find the antennas in your circuit and break them (make them bad antennas) to stop EMI.
结语#
In Conclusion
处理 EMI 没有简单的方法,这一领域更多依赖经验,因此不要害怕动手去尝试解决问题。此外,市面上有许多相关书籍可以参考,本文讨论远不算全面,但我需要提醒你:并非所有人都赞同同一种处理方式。你需要找到对你和你的产品有效的方法并坚持使用。
最后一点:你为阻止 EMI 进入所做的事情,也将在你试图通过那些越来越严格的辐射标准测试时,帮助你阻止 EMI 向外泄漏。让你的电路更难以被干扰,找出那些未知的天线并破坏它们;如果一切办法都失败,那就给电路加上屏蔽层。
使用以下“经验法则”来帮助你驱赶机器里的“幽灵”。
There is no simple approach to dealing with EMI, and experience rules in this arena, so don’t be afraid to get your hands dirty trying to figure this out. Also, there are many texts out there on this topic and this discussion is by no means comprehensive, but I will warn you that not everyone agrees on the same approach. You will need to find out what works for you and your product and go with that.
One final note: The things you do to keep EMI out will also keep it in when you are trying to pass those emissions standards that seem to get tougher and tougher, with no end in sight. Make your circuits more difficult to disrupt, ferret out those unknown antennas and break them, and when all else fails, shield your circuits.
Use the following Thumb Rules to help you exorcize the ghost that’s in the machine.
经验法则(Thumb Rules)
EMI 有两种形式:传导式和辐射式。
辐射效应可以进一步分为近场和射频(RF)效应。
近场效应可以是磁场的,也可以是电场的。
识别你所面对的 EMI 类型,有助于制定解决方案。
从能拔的、能断的开始处理。
解决方法是否可重复?拔掉补救措施后问题是否复现?
在问题发生的地方和时间点上追踪它。
请记住,元器件并不完美。
保留一个解决方案日志。
低电流信号更容易被干扰。
找到天线并关闭它!
给偶极天线加负载以阻止电场干扰。
减小 PCB 上的环路面积以防止磁场干扰。
好的辐射器就是好的接收器。
如果一切都失败了,那就加屏蔽吧。
EMI comes in two flavors: conducted and radiated.
Radiated effects can be divided into near field and RF.
Near-field effects can be magnetic or electric.
Identifying the type of EMI you are dealing with can help you develop a solution.
Start with unplugging and unhooking whatever you can.
Is the fix repeatable? Can you break it by removing the fix?
Chase down the problem where and when it is happening.
Remember, components aren’t perfect.
Keep a log of solutions.
Low-current signals are disrupted easily.
Find the antenna and shut it down!
Load the dipole antennas to stop electric fields.
Minimize loop area on the PCB to stop magnetic fields.
Good radiators are good receivers.
When all else fails, shield it.
代码迷们要小心了#
CODE JUNKIES BEWARE
我们的世界越来越依赖软件。这么说时,我包括了固件——那种你通常不会频繁更改的软件。它无处不在。就连优秀的旧式模拟电路,在大多数情况下也是由软件来评估的。 这是一件好事,因为它带来了灵活性和新的功能(没有 DSP,我家的音响就不会是现在这个样子!),但这也付出了代价。我们今天所生活的充满漏洞的软件世界,就是这个代价。
Our world relies more and more on software. In saying this, I include firmware, which is really software that you simply don’t change as often. It is in everything. Even good old analog circuits are evaluated by software in most cases. This is a good thing because of the flexibility that it has created and the new features that are available (my home stereo wouldn’t be the same without DSP!), but it comes at a price. The world of buggy software we live in today is that price.
无 Bug 的软件可能是不可能的#
Bug-Free Software Might Be Impossible
如果说 20 行代码,我们可以做到没有 bug,但如果是 100 万行呢?或者 1000 行?代码越多,做到没有 bug 就越难。我没有爱因斯坦那样的证据,但我认为这类似于相对论——你越接近光速,就越难达到,基本上让它变得不可能。同样,代码越多,做到没有 bug 就越难。
你的代码是 50% 无 bug 还是 99% 无 bug,主要取决于一件事:你花了多少时间测试它。代码的功能和复杂性越多,所需的时间就越多。在某个时候,你必须在可接受的 bug 水平和产品发布时间之间找到平衡。由于我们消费者现在要求所有东西都以最低可能的价格获得,我们创造了一个可升级的世界。你可以现在购买我可能有 bug 的程序,稍后再升级它。这甚至发生在日常设备上,而不仅仅是计算机。我已经多次升级我的 PDA,最近才发现我的 PSP 有新的操作系统版本。我甚至升级过几次 GPS 设备,我也说不清我的 iPod 已经更新了多少次。
因此,如果你的代码非常庞大,而你又想要真正无 bug 的东西,你的成本会很高,而且需要大量时间。航天飞机的代码就处于无 bug 的领域,它可能是有史以来每行代码成本最高的代码。
这就是为什么那些以 M 等字母开头的软件大公司会卖给你代码,而你实际上并不真正拥有它,他们也不对其故障负责。要保证它完全无 bug 实在是太昂贵了,没人会买得起。软件永远不可能真正完美,但它可以足够好。“足够好”完全是主观的,由你和你的公司来决定那个水平是什么。以下是一些调试代码的方法,帮助你判断它是否足够好到可以发布。
If we are talking 20 lines of code, we can make it bug free, but what about a million lines? Or even 1000? The more code there is, the harder it becomes to make it bug free. I have no proof as Einstein did, but I think it is akin to the law of relativity—the closer you get to the speed of light, the harder it is to get there, basically making it impossible. Likewise, the more code you get, the harder it is to make bug free.
Whether your code is 50% bug free or 99% bug free depends primarily on one thing: how much time you have tested it. The more features and complexity in the code, the more time is required. At some point you have to figure out a balance between a level of bugs you can live with and when you need to ship the product. Since we as consumers now demand everything at the lowest possible price, we have created a world of upgradeability. You can buy my possibly buggy program now and upgrade it later. This even happens in everyday devices, not just computers. I have upgraded my PDA several times, and I just found out there is a new version of OS for my PSP. I have even upgraded my GPS unit a couple of times and I couldn’t tell you how many times my iPod has been updated.
So, if your code is gargantuan and you want really bug-free stuff, your cost will be high and it will take lots of time. Space Shuttle code is up there in the bugfree realm, and it is possibly the most expensive code per line ever written.
This is why big software companies that start with letters like M sell you code that you never truly own and aren’t responsible for it malfunctioning. To guarantee it would simply be so expensive that no one would ever buy it. Software never can be truly perfect, but it can be good enough.“Good enough” is completely subjective, however, and it is up to you and your company to determine what level that is. Here are some ways to troubleshoot your code and help you determine whether it is good enough to ship.
测试、测试、再测试#
Testing, Testing, and More Testing
好的代码需要大量测试,如果你还没有明白这一点的话。我特别喜欢人类测试,即让最终用户参与测试。我们人类总是能发现一些你在设计时根本想不到的破坏方式。
然而,人类测试的问题在于让他们记住出错时做了什么。记忆是善变的,当你费力地进行测试时,你很可能无法准确记录设备出错时你做了什么。在我工作过的一个地方,我们在测试实验室安装了摄像头来观察人类测试人员,这样我们可以回放录像,看看发生了什么。这让我们避免了很多死胡同。
自动化测试——让你的代码自我测试——可能非常有价值,但编写检查代码的代码通常和编写代码本身一样耗时。随着代码变得越来越复杂,这种方法往往会有回报。我更喜欢设计者在代码中加入测试钩子,但由独立的人编写测试代码。这可以避免大多数情况下的视野局限,但通常会花费更多时间,因为独立测试者需要理解设计才能实现测试代码。
Good code takes a lot of testing, if you hadn’t gotten that idea already. I parti- cularly like human testing, where the person who’s going to use it is involved. We humans always seem to discover ways to break stuff that you simply didn’t think of when you designed it.
The problem with human testers, though, is getting them to remember what they did when it broke. Memory can be a fickle thing, and when you are drud- ging through a test, exactly what you did when the unit malfunctioned is likely a poor recording. In one place where I worked, we put cameras in the test lab to watch the human testers so that we could back up the tape and look at what happened. It saved us from chasing down more than one dead end. Automated testing where your code tests itself can be very valuable, but often writing the code that checks your code takes just as long as the code itself. It tends to payoff as code becomes more complex. I prefer that the designer put hooks in to test with, but that an independent person writes the test code. This prevents tunnel vision for the most part, however it typically will take a bit longer as the independent view has to understand the design to implement the test code.
复现问题#
Repeat the Problem
像大多数难以追踪的问题一样,那些难以复现的问题是最难发现的。在软件中,bug 的出现通常需要特定的条件组合——某些按键组合,或者可能是时序问题。如果你在追踪一个 bug,而它恰好复现了,停下来,回想 30 秒前你在做什么,看看能否再次复现。不断尝试导致 bug 出现的条件变化,直到你能再次触发它,然后再试一次。持续尝试,直到你能随心所欲地复现它。如果你能让它在特定条件下必然发生,你就能更容易地追踪到它的根源。
Like most difficult-to-trace problems, the ones that are hard to repeat are the hardest to find. With software, it is not unusual to have a certain set of condi- tions required for the bug to manifest—certain key-press combinations, or maybe timing. If you are chasing down a bug and you just happen to make it repeat, stop, rewind your brain about 30 seconds, and see if you can do it again. Keep trying slight variations on whatever it was that made the bug show up until you get it to happen again, and then try to repeat it one more time. Keep trying till you can get it to happen whenever you like. If you can get it to hap- pen on cue, you will be able to track it down much more easily.
设置追踪器#
Set Up Tracers
在代码中,可以设置跟踪寄存器来记录关键信息,帮助你找出问题所在。这可能会增加一些开发时间,但在调试过程中会带来巨大的回报。
有一次,我们的控制面板似乎在随机时间重置。我们通过创建一个寄存器来跟踪堆栈的增长深度,检查了堆栈。当我们观察它时,堆栈变得非常大,以至于覆盖了代码的其他区域,导致系统进入“胡言乱语”状态,直到看门狗超时重置它。
通常你可以使用现有的显示器来显示这些信息。然而,有时你可能需要比显示器更新速度更快的信息,或者显示器可能无法显示你想查看的内容。在这种情况下,你应该设置一个 D/A——某种电路或信号,可以将微控制器中的任何寄存器转换为模拟信号,以便连接示波器。
在使用之前,你必须调试它并建立信任。方法是向已知寄存器加载任意数字,观察示波器是否显示预期结果。一旦它工作良好,你就可以用它进行与硬件工程师相同的根本原因分析。你有条不紊地在计算的各个阶段输入每个数字,从错误的输出反向追溯,直到找到问题的根源。
这种方法可以用于简单的 RC 电路、串行 D/A 或任何其他选项。有些芯片甚至内置了一些跟踪功能。关键是要遵循之前讨论过的相同根本原因分析方法,但在这种情况下,你需要了解芯片在处理过程中的任何给定时刻内部发生了什么。
In code it is possible to set up tracing registers that can keep track of key infor- mation that will help you figure out what went wrong. This can take up some extra time in development, but it will pay huge dividends in the debugging process.
One time we had a problem with a control panel resetting at apparently ran- dom intervals. We checked the stack by creating a register that kept track of how deep the stack would grow. As we watched it, the stack would get so big it would overwrite other areas of the code and it would go into“la la land” until a watchdog timeout reset it.
Often you can use an available display to show this information. However, there are times when you might want the information faster than the display can update, or maybe the display can’t show you what you want to look at. In this case you should set up a D/A—some type of circuit or signal that can take any register in your micro and turn it into an analog signal that you can hook a scope up to.
You have to debug this and gain trust in it before you use it. Do so by loading any number into a known register and look at the scope and see whether it is what you expect. Once it is working well, you can use it to do the same type of root-cause analysis as the hardware guys. You methodically plug each num- ber into it at various stages of calculation and work your way back from the offending output’til you find the cause of it all.
This method can be used with simple RC circuits, serial D/A, or any myriad of options. Some chips even have some tracers built right into them. The point is to follow the same root-cause analysis as previously discussed, but in this case you need an idea of what is happening inside the chip at any given point in its processing.
代码评审#
Code Reviews
调试代码的一种方法是进行代码审查:将你的代码展示在多个工程师面前的屏幕上,然后由一位工程师(特别注意不能是编写该代码的工程师)逐步引导你通读代码。如果你能克服在这种会议上自然产生的打瞌睡倾向,这种方法其实相当有效。我建议针对特定情况使用它,并保持审查时间简短,因为理解代码功能是确保这种方法奏效的关键。
One way to debug code is with a review process: Put your code up onscreen in front of several engineers, and have one engineer (specifically not the one who wrote it) walk you through the code step by step. If you can overcome the natural tendency to nod off in this type of meeting, it can be quite effec- tive. I suggest using it for specific cases and keeping the review time short, since focus on understanding what the code is doing is paramount to making this work.
再次破坏它#
Break It Again
正如我们已经了解到的,这是确保你同时修复了软件和硬件问题的好方法。如果你能随意地破坏它然后再修复它,那么很可能你已经找到了 bug。随着 Flash 芯片的出现,这种方法变得容易多了。在过去使用 OTP 制造和 EPROM 原型芯片的时代,你不得不等待它们在紫外线下擦除,这简直要花上永远那么长的时间(将近 20 分钟,你能相信吗?)。
Just as we already learned, this is a great way to make sure that you have fixed the problem in software as well as hardware. If you can break it and fix it at will, chances are that you have found the bug. This is much easier with the advent of Flash chips. In the old days of OTP manufacturing and EPROM prototyping chips, you had to wait forever (nearly 20 minutes, can you believe it?) for them to erase under UV.
解决 Bug#
Hunting Bugs
尽管我本质上是个死忠的模拟电路爱好者,但上次我查看时,软件显然不会很快消失。所以我们不得不接受这样一个事实:我的 DVD 播放器启动和读取光盘的时间,比我 30 年前电视预热电子管的时间还要长。
事实是,代码已经成为一种生活方式。我们甚至在教我们的孩子如何处理编写代码所需的那种复杂而扭曲的思维方式。只要看看他们玩的电子游戏就知道了!我想我需要升级一下我的大脑才能玩这些游戏,而我当年在街机厅投入的硬币比我大多数同龄人当年都要多。
回忆就到这里。软件已经扎根,除非互联网很快获得意识并能自己调试自己,否则这就要靠我们了,祝大家 bug 狩猎好运!
Even though I’m a diehard analog guy at heart, last time I looked software wasn’t going away anytime soon. So we do have to live with the fact that my DVD player takes longer to boot up and read a disk than my TV took to warm up its tubes 30 years ago.
The fact is, code has become a way of life. We are even teaching our children how to handle the convoluted and twisted thinking you need to write code. Just take a look at the video games they are playing! I think I need an upgrade to my noodle just to play them, and I dumped more quarters in the arcades than most of my peers did years ago.
Enough reminiscing. Software is here to stay, and unless the Internet gains con- sciousness sometime soon and can debug itself, it is up to us, so good luck on the bug hunt!
经验法则(Thumb Rules)
多测试,以某种方式记录信息,不要依赖人类记忆。
回想 30 秒前并尝试复现问题。
设置跟踪器;利用芯片已有的功能,如果没有,就自己构建。
使用代码审查来解释和验证你的思路。
反复破坏和修复以证明你已经找到了 bug。
Test a lot, record information somehow, and don’t rely on human memory.
Rewind your brain 30 seconds and try to repeat the problem.
Set up tracers; use what the chip has, and if not there, build in your own.
Use code reviews to explain and review your thinking.
Repetitively break it and fix it to prove that you have found the bug.