注释#
annotations
如何添加和修改注释#
How to Add and Modify Annotations
在 PyMuPDF 中,可以通过 Page 方法添加新的注释。一旦注释存在,就可以使用 Annot 类的方法对其进行大范围修改。
注释 只能 插入到 PDF 页面中——其他文档类型不支持注释插入。
与许多其他工具不同,初始插入注释时仅需设置最少的属性。我们将诸如作者、创建日期或主题等属性的设置留给程序员自行处理。
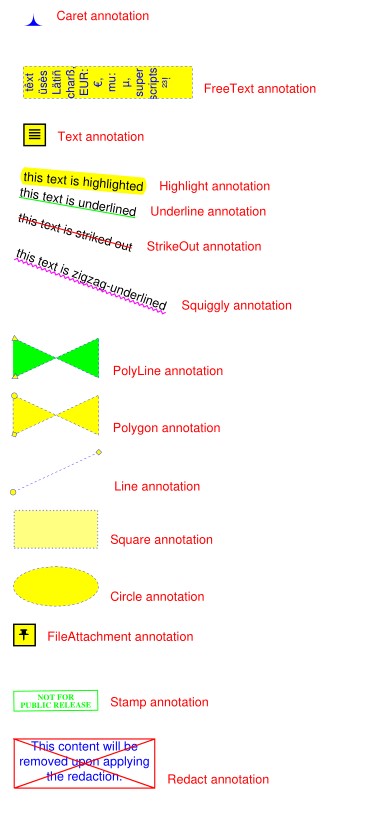
为了概览这些功能,请查看以下脚本,该脚本在 PDF 页面上填充了大部分可用的注释。请在接下来的章节中查看更多特殊情况:
# -*- coding: utf-8 -*-
"""
-------------------------------------------------------------------------------
Demo script showing how annotations can be added to a PDF using PyMuPDF.

It contains the following annotation types:
Caret, Text, FreeText, text markers (underline, strike-out, highlight,
squiggle), Circle, Square, Line, PolyLine, Polygon, FileAttachment, Stamp
and Redaction.
There is some effort to vary appearances by adding colors, line ends,
opacity, rotation, dashed lines, etc.

Dependencies
------------
PyMuPDF v1.17.0
-------------------------------------------------------------------------------
"""
from __future__ import print_function

import gc
import sys

import pymupdf

print(pymupdf.__doc__)
if pymupdf.VersionBind.split(".") < ["1", "17", "0"]:
    sys.exit("PyMuPDF v1.17.0+ is needed.")

gc.set_debug(gc.DEBUG_UNCOLLECTABLE)

highlight = "this text is highlighted"
underline = "this text is underlined"
strikeout = "this text is striked out"
squiggled = "this text is zigzag-underlined"
red = (1, 0, 0)
blue = (0, 0, 1)
gold = (1, 1, 0)
green = (0, 1, 0)

displ = pymupdf.Rect(0, 50, 0, 50)
r = pymupdf.Rect(72, 72, 220, 100)
t1 = u"têxt üsès Lätiñ charß,\nEUR: €, mu: µ, super scripts: ²³!"


def print_descr(annot):
    """Print a short description to the right of each annot rect."""
    annot.parent.insert_text(
        annot.rect.br + (10, -5), "%s annotation" % annot.type[1], color=red
    )


doc = pymupdf.open()
page = doc.new_page()

page.set_rotation(0)

annot = page.add_caret_annot(r.tl)
print_descr(annot)

r = r + displ
annot = page.add_freetext_annot(
    r,
    t1,
    fontsize=10,
    rotate=90,
    text_color=blue,
    fill_color=gold,
    align=pymupdf.TEXT_ALIGN_CENTER,
)
annot.set_border(width=0.3, dashes=[2])
annot.update(text_color=blue, fill_color=gold)
print_descr(annot)

r = annot.rect + displ
annot = page.add_text_annot(r.tl, t1)
print_descr(annot)

# Adding text marker annotations:
# first insert a unique text, then search for it, then mark it
pos = annot.rect.tl + displ.tl
page.insert_text(
    pos,  # insertion point
    highlight,  # inserted text
    morph=(pos, pymupdf.Matrix(-5)),  # rotate around insertion point
)
rl = page.search_for(highlight, quads=True)  # need a quad b/o tilted text
annot = page.add_highlight_annot(rl[0])
print_descr(annot)

pos = annot.rect.bl  # next insertion point
page.insert_text(pos, underline, morph=(pos, pymupdf.Matrix(-10)))
rl = page.search_for(underline, quads=True)
annot = page.add_underline_annot(rl[0])
print_descr(annot)

pos = annot.rect.bl
page.insert_text(pos, strikeout, morph=(pos, pymupdf.Matrix(-15)))
rl = page.search_for(strikeout, quads=True)
annot = page.add_strikeout_annot(rl[0])
print_descr(annot)

pos = annot.rect.bl
page.insert_text(pos, squiggled, morph=(pos, pymupdf.Matrix(-20)))
rl = page.search_for(squiggled, quads=True)
annot = page.add_squiggly_annot(rl[0])
print_descr(annot)

pos = annot.rect.bl
r = pymupdf.Rect(pos, pos.x + 75, pos.y + 35) + (0, 20, 0, 20)
annot = page.add_polyline_annot([r.bl, r.tr, r.br, r.tl])  # 'Polyline'
annot.set_border(width=0.3, dashes=[2])
annot.set_colors(stroke=blue, fill=green)
annot.set_line_ends(pymupdf.PDF_ANNOT_LE_CLOSED_ARROW, pymupdf.PDF_ANNOT_LE_R_CLOSED_ARROW)
annot.update(fill_color=(1, 1, 0))
print_descr(annot)

r += displ
annot = page.add_polygon_annot([r.bl, r.tr, r.br, r.tl])  # 'Polygon'
annot.set_border(width=0.3, dashes=[2])
annot.set_colors(stroke=blue, fill=gold)
annot.set_line_ends(pymupdf.PDF_ANNOT_LE_DIAMOND, pymupdf.PDF_ANNOT_LE_CIRCLE)
annot.update()
print_descr(annot)

r += displ
annot = page.add_line_annot(r.tr, r.bl)  # 'Line'
annot.set_border(width=0.3, dashes=[2])
annot.set_colors(stroke=blue, fill=gold)
annot.set_line_ends(pymupdf.PDF_ANNOT_LE_DIAMOND, pymupdf.PDF_ANNOT_LE_CIRCLE)
annot.update()
print_descr(annot)

r += displ
annot = page.add_rect_annot(r)  # 'Square'
annot.set_border(width=1, dashes=[1, 2])
annot.set_colors(stroke=blue, fill=gold)
annot.update(opacity=0.5)
print_descr(annot)

r += displ
annot = page.add_circle_annot(r)  # 'Circle'
annot.set_border(width=0.3, dashes=[2])
annot.set_colors(stroke=blue, fill=gold)
annot.update()
print_descr(annot)

r += displ
annot = page.add_file_annot(
    r.tl, b"just anything for testing", "testdata.txt"  # 'FileAttachment'
)
print_descr(annot)  # annot.rect

r += displ
annot = page.add_stamp_annot(r, stamp=10)  # 'Stamp'
annot.set_colors(stroke=green)
annot.update()
print_descr(annot)

r += displ + (0, 0, 50, 10)
rc = page.insert_textbox(
    r,
    "This content will be removed upon applying the redaction.",
    color=blue,
    align=pymupdf.TEXT_ALIGN_CENTER,
)
annot = page.add_redact_annot(r)
print_descr(annot)

doc.save(__file__.replace(".py", "-%i.pdf" % page.rotation), deflate=True)
运行此脚本应会产生以下输出:
In PyMuPDF, new annotations can be added via Page methods. Once an annotation exists, it can be modified to a large extent using methods of the Annot class.
Annotations can only be inserted in PDF pages - other document types do not support annotation insertion.
In contrast to many other tools, initial insert of annotations happens with a minimum number of properties. We leave it to the programmer to e.g. set attributes like author, creation date or subject.
As an overview for these capabilities, look at the following script that fills a PDF page with most of the available annotations. Look in the next sections for more special situations:
# -*- coding: utf-8 -*-
"""
-------------------------------------------------------------------------------
Demo script showing how annotations can be added to a PDF using PyMuPDF.

It contains the following annotation types:
Caret, Text, FreeText, text markers (underline, strike-out, highlight,
squiggle), Circle, Square, Line, PolyLine, Polygon, FileAttachment, Stamp
and Redaction.
There is some effort to vary appearances by adding colors, line ends,
opacity, rotation, dashed lines, etc.

Dependencies
------------
PyMuPDF v1.17.0
-------------------------------------------------------------------------------
"""
from __future__ import print_function

import gc
import sys

import pymupdf

print(pymupdf.__doc__)
if pymupdf.VersionBind.split(".") < ["1", "17", "0"]:
    sys.exit("PyMuPDF v1.17.0+ is needed.")

gc.set_debug(gc.DEBUG_UNCOLLECTABLE)

highlight = "this text is highlighted"
underline = "this text is underlined"
strikeout = "this text is striked out"
squiggled = "this text is zigzag-underlined"
red = (1, 0, 0)
blue = (0, 0, 1)
gold = (1, 1, 0)
green = (0, 1, 0)

displ = pymupdf.Rect(0, 50, 0, 50)
r = pymupdf.Rect(72, 72, 220, 100)
t1 = u"têxt üsès Lätiñ charß,\nEUR: €, mu: µ, super scripts: ²³!"


def print_descr(annot):
    """Print a short description to the right of each annot rect."""
    annot.parent.insert_text(
        annot.rect.br + (10, -5), "%s annotation" % annot.type[1], color=red
    )


doc = pymupdf.open()
page = doc.new_page()

page.set_rotation(0)

annot = page.add_caret_annot(r.tl)
print_descr(annot)

r = r + displ
annot = page.add_freetext_annot(
    r,
    t1,
    fontsize=10,
    rotate=90,
    text_color=blue,
    fill_color=gold,
    align=pymupdf.TEXT_ALIGN_CENTER,
)
annot.set_border(width=0.3, dashes=[2])
annot.update(text_color=blue, fill_color=gold)
print_descr(annot)

r = annot.rect + displ
annot = page.add_text_annot(r.tl, t1)
print_descr(annot)

# Adding text marker annotations:
# first insert a unique text, then search for it, then mark it
pos = annot.rect.tl + displ.tl
page.insert_text(
    pos,  # insertion point
    highlight,  # inserted text
    morph=(pos, pymupdf.Matrix(-5)),  # rotate around insertion point
)
rl = page.search_for(highlight, quads=True)  # need a quad b/o tilted text
annot = page.add_highlight_annot(rl[0])
print_descr(annot)

pos = annot.rect.bl  # next insertion point
page.insert_text(pos, underline, morph=(pos, pymupdf.Matrix(-10)))
rl = page.search_for(underline, quads=True)
annot = page.add_underline_annot(rl[0])
print_descr(annot)

pos = annot.rect.bl
page.insert_text(pos, strikeout, morph=(pos, pymupdf.Matrix(-15)))
rl = page.search_for(strikeout, quads=True)
annot = page.add_strikeout_annot(rl[0])
print_descr(annot)

pos = annot.rect.bl
page.insert_text(pos, squiggled, morph=(pos, pymupdf.Matrix(-20)))
rl = page.search_for(squiggled, quads=True)
annot = page.add_squiggly_annot(rl[0])
print_descr(annot)

pos = annot.rect.bl
r = pymupdf.Rect(pos, pos.x + 75, pos.y + 35) + (0, 20, 0, 20)
annot = page.add_polyline_annot([r.bl, r.tr, r.br, r.tl])  # 'Polyline'
annot.set_border(width=0.3, dashes=[2])
annot.set_colors(stroke=blue, fill=green)
annot.set_line_ends(pymupdf.PDF_ANNOT_LE_CLOSED_ARROW, pymupdf.PDF_ANNOT_LE_R_CLOSED_ARROW)
annot.update(fill_color=(1, 1, 0))
print_descr(annot)

r += displ
annot = page.add_polygon_annot([r.bl, r.tr, r.br, r.tl])  # 'Polygon'
annot.set_border(width=0.3, dashes=[2])
annot.set_colors(stroke=blue, fill=gold)
annot.set_line_ends(pymupdf.PDF_ANNOT_LE_DIAMOND, pymupdf.PDF_ANNOT_LE_CIRCLE)
annot.update()
print_descr(annot)

r += displ
annot = page.add_line_annot(r.tr, r.bl)  # 'Line'
annot.set_border(width=0.3, dashes=[2])
annot.set_colors(stroke=blue, fill=gold)
annot.set_line_ends(pymupdf.PDF_ANNOT_LE_DIAMOND, pymupdf.PDF_ANNOT_LE_CIRCLE)
annot.update()
print_descr(annot)

r += displ
annot = page.add_rect_annot(r)  # 'Square'
annot.set_border(width=1, dashes=[1, 2])
annot.set_colors(stroke=blue, fill=gold)
annot.update(opacity=0.5)
print_descr(annot)

r += displ
annot = page.add_circle_annot(r)  # 'Circle'
annot.set_border(width=0.3, dashes=[2])
annot.set_colors(stroke=blue, fill=gold)
annot.update()
print_descr(annot)

r += displ
annot = page.add_file_annot(
    r.tl, b"just anything for testing", "testdata.txt"  # 'FileAttachment'
)
print_descr(annot)  # annot.rect

r += displ
annot = page.add_stamp_annot(r, stamp=10)  # 'Stamp'
annot.set_colors(stroke=green)
annot.update()
print_descr(annot)

r += displ + (0, 0, 50, 10)
rc = page.insert_textbox(
    r,
    "This content will be removed upon applying the redaction.",
    color=blue,
    align=pymupdf.TEXT_ALIGN_CENTER,
)
annot = page.add_redact_annot(r)
print_descr(annot)

doc.save(__file__.replace(".py", "-%i.pdf" % page.rotation), deflate=True)
This script should lead to the following output:
如何使用 FreeText#
How to Use FreeText
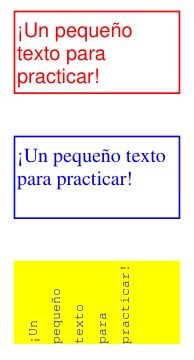
此脚本展示了处理 ‘FreeText’ 注释的几种基本方法:
# -*- coding: utf-8 -*-
import pymupdf

# some colors
blue = (0, 0, 1)
green = (0, 1, 0)
red = (1, 0, 0)
gold = (1, 1, 0)

# a new PDF with 1 page
doc = pymupdf.open()
page = doc.new_page()

# 3 rectangles, same size, above each other
r1 = pymupdf.Rect(100, 100, 200, 150)
r2 = r1 + (0, 75, 0, 75)
r3 = r2 + (0, 75, 0, 75)

# the text, Latin alphabet
t = "¡Un pequeño texto para practicar!"

# add 3 annots, modify the last one somewhat
a1 = page.add_freetext_annot(r1, t, text_color=red, border_color=red)
a2 = page.add_freetext_annot(r2, t, fontname="Ti", text_color=blue, border_color=blue)
a3 = page.add_freetext_annot(r3, t, fontname="Co", text_color=blue, rotate=90)
a3.set_border(width=0)
a3.update(fontsize=8, fill_color=gold)

# save the PDF
doc.save("a-freetext.pdf")
运行结果如下所示:
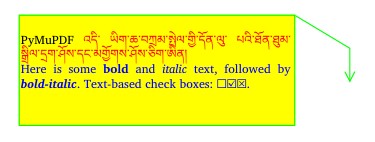
下面是一个使用富文本和标注线的示例:
import pymupdf

"""Use rich text for FreeText annotations"""

# define an overall styling
ds = """font-size: 11pt; font-family: sans-serif;"""

# some special characters
bullet = chr(0x2610) + chr(0x2611) + chr(0x2612)

# the annotation text with HTML and styling syntax
text = f"""<p style="text-align:justify;margin-top:-25px;">
PyMuPDF <span style="color: red;">འདི་ ཡིག་ཆ་བཀྲམ་སྤེལ་གྱི་དོན་ལུ་ པའི་ཐོན་ཐུམ་སྒྲིལ་དྲག་ཤོས་དང་མགྱོགས་ཤོས་ཅིག་ཨིན།</span>
<span style="color:blue;">Here is some <b>bold</b> and <i>italic</i> text, followed by <b><i>bold-italic</i></b>. Text-based check boxes: {bullet}.</span>
 </p>"""

# here are some colors
gold = (1, 1, 0)
green = (0, 1, 0)

# new/empty PDF
doc = pymupdf.open()

# make a page in ISO-A4 format
page = doc.new_page()

# text goes into this:
rect = pymupdf.Rect(100, 100, 350, 200)

# define some points for callout lines
p2 = rect.tr + (50, 30)
p3 = p2 + (0, 30)

# define the annotation
annot = page.add_freetext_annot(
    rect,
    text,
    fill_color=gold,  # fill color
    opacity=1,  # non-transparent
    rotate=0,  # no rotation
    border_width=1,  # border and callout line width
    dashes=None,  # no dashing
    richtext=True,  # this is rich text
    style=ds,  # my styling default
    callout=(p3, p2, rect.tr),  # define end, knee, start points
    line_end=pymupdf.PDF_ANNOT_LE_OPEN_ARROW,  # symbol shown at p3
    border_color=green,
)

doc.save(__file__.replace(".py", ".pdf"), pretty=True)
运行结果如下所示:
This script shows a couple of basic ways to deal with ‘FreeText’ annotations:
# -*- coding: utf-8 -*-
import pymupdf

# some colors
blue = (0, 0, 1)
green = (0, 1, 0)
red = (1, 0, 0)
gold = (1, 1, 0)

# a new PDF with 1 page
doc = pymupdf.open()
page = doc.new_page()

# 3 rectangles, same size, above each other
r1 = pymupdf.Rect(100, 100, 200, 150)
r2 = r1 + (0, 75, 0, 75)
r3 = r2 + (0, 75, 0, 75)

# the text, Latin alphabet
t = "¡Un pequeño texto para practicar!"

# add 3 annots, modify the last one somewhat
a1 = page.add_freetext_annot(r1, t, text_color=red, border_color=red)
a2 = page.add_freetext_annot(r2, t, fontname="Ti", text_color=blue, border_color=blue)
a3 = page.add_freetext_annot(r3, t, fontname="Co", text_color=blue, rotate=90)
a3.set_border(width=0)
a3.update(fontsize=8, fill_color=gold)

# save the PDF
doc.save("a-freetext.pdf")
The result looks like this:
Here is an example for using rich text and call-out lines:
import pymupdf

"""Use rich text for FreeText annotations"""

# define an overall styling
ds = """font-size: 11pt; font-family: sans-serif;"""

# some special characters
bullet = chr(0x2610) + chr(0x2611) + chr(0x2612)

# the annotation text with HTML and styling syntax
text = f"""<p style="text-align:justify;margin-top:-25px;">
PyMuPDF <span style="color: red;">འདི་ ཡིག་ཆ་བཀྲམ་སྤེལ་གྱི་དོན་ལུ་ པའི་ཐོན་ཐུམ་སྒྲིལ་དྲག་ཤོས་དང་མགྱོགས་ཤོས་ཅིག་ཨིན།</span>
<span style="color:blue;">Here is some <b>bold</b> and <i>italic</i> text, followed by <b><i>bold-italic</i></b>. Text-based check boxes: {bullet}.</span>
 </p>"""

# here are some colors
gold = (1, 1, 0)
green = (0, 1, 0)

# new/empty PDF
doc = pymupdf.open()

# make a page in ISO-A4 format
page = doc.new_page()

# text goes into this:
rect = pymupdf.Rect(100, 100, 350, 200)

# define some points for callout lines
p2 = rect.tr + (50, 30)
p3 = p2 + (0, 30)

# define the annotation
annot = page.add_freetext_annot(
    rect,
    text,
    fill_color=gold,  # fill color
    opacity=1,  # non-transparent
    rotate=0,  # no rotation
    border_width=1,  # border and callout line width
    dashes=None,  # no dashing
    richtext=True,  # this is rich text
    style=ds,  # my styling default
    callout=(p3, p2, rect.tr),  # define end, knee, start points
    line_end=pymupdf.PDF_ANNOT_LE_OPEN_ARROW,  # symbol shown at p3
    border_color=green,
)

doc.save(__file__.replace(".py", ".pdf"), pretty=True)
The result looks like this:
如何使用墨迹注释#
How to Use Ink Annotations
墨迹(Ink)注释用于包含手写涂鸦。一个典型示例是包含名字和姓氏的签名图像。从技术上讲,墨迹注释实现为 点列表的列表。每个点列表被视为一条连续的线段,连接其中的各个点。不同的点列表表示注释中的独立线段。
以下脚本创建了一个墨迹注释,其中包含两条数学曲线(正弦和余弦函数图)作为线段:
import math
import pymupdf

#------------------------------------------------------------------------------
# preliminary stuff: create function value lists for sine and cosine
#------------------------------------------------------------------------------
w360 = math.pi * 2  # go through full circle
deg = w360 / 360  # 1 degree as radians
rect = pymupdf.Rect(100,200, 300, 300)  # use this rectangle
first_x = rect.x0  # x starts from left
first_y = rect.y0 + rect.height / 2.  # rect middle means y = 0
x_step = rect.width / 360  # rect width means 360 degrees
y_scale = rect.height / 2.  # rect height means 2
sin_points = []  # sine values go here
cos_points = []  # cosine values go here
for x in range(362):  # now fill in the values
    x_coord = x * x_step + first_x  # current x coordinate
    y = -math.sin(x * deg)  # sine
    p = (x_coord, y * y_scale + first_y)  # corresponding point
    sin_points.append(p)  # append
    y = -math.cos(x * deg)  # cosine
    p = (x_coord, y * y_scale + first_y)  # corresponding point
    cos_points.append(p)  # append

#------------------------------------------------------------------------------
# create the document with one page
#------------------------------------------------------------------------------
doc = pymupdf.open()  # make new PDF
page = doc.new_page()  # give it a page

#------------------------------------------------------------------------------
# add the Ink annotation, consisting of 2 curve segments
#------------------------------------------------------------------------------
annot = page.add_ink_annot((sin_points, cos_points))
# let it look a little nicer
annot.set_border(width=0.3, dashes=[1,])  # line thickness, some dashing
annot.set_colors(stroke=(0,0,1))  # make the lines blue
annot.update()  # update the appearance

page.draw_rect(rect, width=0.3)  # only to demonstrate we did OK

doc.save("a-inktest.pdf")
运行结果如下所示:
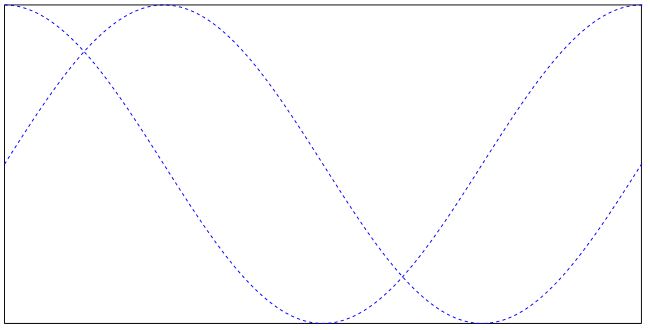
Ink annotations are used to contain freehand scribbling. A typical example may be an image of your signature consisting of first name and last name. Technically an ink annotation is implemented as a list of lists of points. Each point list is regarded as a continuous line connecting the points. Different point lists represent independent line segments of the annotation.
The following script creates an ink annotation with two mathematical curves (sine and cosine function graphs) as line segments:
import math
import pymupdf

#------------------------------------------------------------------------------
# preliminary stuff: create function value lists for sine and cosine
#------------------------------------------------------------------------------
w360 = math.pi * 2  # go through full circle
deg = w360 / 360  # 1 degree as radians
rect = pymupdf.Rect(100,200, 300, 300)  # use this rectangle
first_x = rect.x0  # x starts from left
first_y = rect.y0 + rect.height / 2.  # rect middle means y = 0
x_step = rect.width / 360  # rect width means 360 degrees
y_scale = rect.height / 2.  # rect height means 2
sin_points = []  # sine values go here
cos_points = []  # cosine values go here
for x in range(362):  # now fill in the values
    x_coord = x * x_step + first_x  # current x coordinate
    y = -math.sin(x * deg)  # sine
    p = (x_coord, y * y_scale + first_y)  # corresponding point
    sin_points.append(p)  # append
    y = -math.cos(x * deg)  # cosine
    p = (x_coord, y * y_scale + first_y)  # corresponding point
    cos_points.append(p)  # append

#------------------------------------------------------------------------------
# create the document with one page
#------------------------------------------------------------------------------
doc = pymupdf.open()  # make new PDF
page = doc.new_page()  # give it a page

#------------------------------------------------------------------------------
# add the Ink annotation, consisting of 2 curve segments
#------------------------------------------------------------------------------
annot = page.add_ink_annot((sin_points, cos_points))
# let it look a little nicer
annot.set_border(width=0.3, dashes=[1,])  # line thickness, some dashing
annot.set_colors(stroke=(0,0,1))  # make the lines blue
annot.update()  # update the appearance

page.draw_rect(rect, width=0.3)  # only to demonstrate we did OK

doc.save("a-inktest.pdf")
This is the result: