Shape#
该类允许在 PDF 页面上创建相互连接的图形元素。其方法的名称和含义与相应的 Page 方法相同。
实际上,每个 Page 的绘图方法只是以下操作的便利封装:
1. 调用一个 Shape 类的绘图方法,
2. 调用 Shape.finish() 方法,
3. 调用 Shape.commit() 方法。
对于页面文本插入,仅调用 Shape.commit() 方法即可。如果在页面上执行多个绘图和文本操作,应优先考虑使用 Shape 对象。
可以连续执行多个绘图方法,每个方法都会为同一个绘图贡献元素。一旦绘图完成,必须调用 Shape.finish() 方法,以应用颜色、虚线、线宽、变形等属性。
该类的 绘图 方法(包括 Shape.insert_textbox())会记录它们覆盖的区域,并存储在一个矩形框中(Shape.rect)。例如,该属性可以用于设置 Page.cropbox_position。
文本插入 方法 Shape.insert_text() 和 Shape.insert_textbox() 会隐式执行 “finish” 操作,因此只需调用 Shape.commit() 使其生效。因此,这些方法包含控制颜色等属性的参数。
方法 / 属性 |
描述 |
|---|---|
更新页面内容 |
|
绘制三次贝塞尔曲线 |
|
绘制一个以点为中心的圆 |
|
使用一个辅助点绘制三次贝塞尔曲线 |
|
绘制一条直线 |
|
绘制椭圆 |
|
连接一系列点,绘制折线 |
|
绘制四边形 |
|
绘制矩形 |
|
绘制圆扇形或饼状区域 |
|
绘制波浪线 |
|
绘制锯齿线 |
|
结束一组绘图命令 |
|
插入文本行 |
|
将文本适配到矩形区域内 |
|
存储当前页面所属的文档 |
|
记录自上次 |
|
存储页面高度 |
|
记录当前绘图点 |
|
存储当前 Shape 所属的页面 |
|
记录围绕所有绘图元素的矩形区域 |
|
记录所有已插入的文本内容 |
|
记录所有待存储到 |
|
存储页面宽度 |
Class API
- class Shape#
- __init__(self, page)#
创建一个新的绘图。在导入 PyMuPDF 时,pymupdf.Page 对象会被赋予一个便捷方法 new_shape(),用于构造 Shape 对象。在实例化过程中,会检查是否为 PDF 页面,否则会引发异常。
- 参数:
page (Page) – 一个已存在的 PDF 文档页面。
- draw_line(p1, p2)#
从
point_like对象 p1 到 p2 画一条直线。- 参数:
p1 (point_like) – 起点
p2 (point_like) – 终点
- 返回类型:
- 返回:
终点 p2。
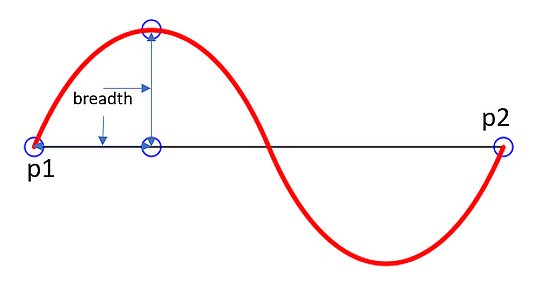
- draw_squiggle(p1, p2, breadth=2)#
从
point_like对象 p1 到 p2 画一条波浪线(起伏的、波状的)。始终会绘制整数个完整波浪周期,每个周期的长度为 4 * breadth。breadth 参数将根据需要进行调整,以满足此条件。绘制的波浪线在离开 p1 时始终向“左”转,并在连接 p2 时始终从“右”侧进入。- 参数:
p1 (point_like) – 起点
p2 (point_like) – 终点
breadth (float) – 每个波的振幅。条件 2 * breadth < abs(p2 - p1) 必须成立,以确保至少能容纳一个完整的波形。请参阅下图,该图显示了两个点通过一个完整周期连接的情况。
- 返回类型:
- 返回:
终点 p2。
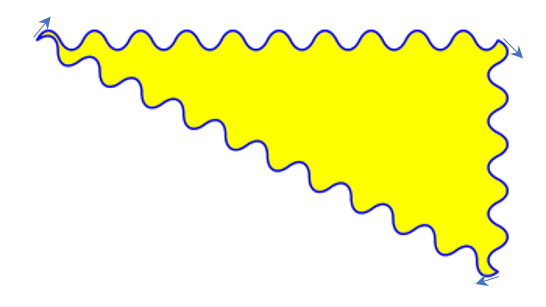
下面是一个示例,绘制了三条相连的波浪线,形成一个封闭的填充三角形。小箭头指示了绘制方向。
>>> import pymupdf
>>> doc = pymupdf.open()
>>> page = doc.new_page()
>>> r = pymupdf.Rect(100, 100, 300, 200)
>>> shape = page.new_shape()
>>> shape.draw_squiggle(r.tl, r.tr)
>>> shape.draw_squiggle(r.tr, r.br)
>>> shape.draw_squiggle(r.br, r.tl)
>>> shape.finish(color=(0, 0, 1), fill=(1, 1, 0))
>>> shape.commit()
>>> doc.save("x.pdf")
备注
绘制的波浪线 不是 三角函数(正弦/余弦)曲线。如果需要这样的曲线,请查看 draw.py。
- draw_zigzag(p1, p2, breadth=2)#
从
point_like对象 p1 到 p2 画一条锯齿线。除此之外,该方法的工作方式与Shape.draw_squiggle()完全相同。- 参数:
p1 (point_like) – 起点
p2 (point_like) – 终点
breadth (float) – 运动的振幅。条件 2 * breadth < abs(p2 - p1) 必须成立,以确保至少能容纳一个完整周期。
- 返回类型:
- 返回:
终点 p2。
- draw_polyline(points)#
在序列 points 中的点之间绘制多条相连的直线。通过使最后一个点与第一个点相等,可以用于创建任意多边形。
- 参数:
points (sequence) – 一个包含
point_like对象的序列。其长度必须至少为 2(如果仅有 2 个点,则等同于 draw_line())。- 返回类型:
- 返回:
points[-1] —— 传入序列中的最后一个点。
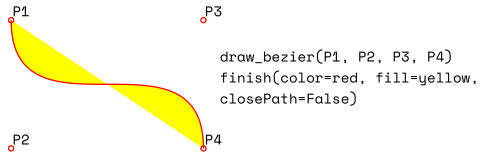
- draw_bezier(p1, p2, p3, p4)#
从 p1 到 p4 绘制一条标准的三次贝塞尔曲线,使用 p2 和 p3 作为控制点。
所有参数均为
point_like对象。- 返回类型:
- 返回:
终点 p4。
备注
这些点不一定要不同 —— 试着让其中一些点相等,看看会发生什么!
示例:
- draw_oval(tetra)#
在指定的四边形(四边形区域)内绘制一个“椭圆”。如果该区域是正方形,则绘制一个标准圆形;如果是矩形,则绘制椭圆。而对于一般的四边形,则可能得到各种不同的形状。
该绘制过程从
bottom-left -> top-left线段的中点开始,并沿逆时针方向完成。- 参数:
tetra (rect_like,quad_like) –
自版本 1.14.5 变更: 现在支持四边形(quad)。
- 返回类型:
- 返回:
线段
rect.bl -> rect.tl或quad.ll -> quad.ul的中点。请查看以下示例,或查阅 PyMuPDF-Utilities 仓库中的 quad-show?.py 脚本。
- draw_circle(center, radius)#
根据给定的圆心和半径绘制一个圆。绘制从
center - (radius, 0)这一点开始,并沿 逆时针 方向完成。该点位于包围正方形左侧边的中点。这是
draw_sector(center, start, 360, fullSector=False)的简写形式。要以 顺时针 方向绘制相同的圆,请使用-360作为角度参数。- 参数:
center (point_like) – 圆心。
radius (float) – 圆的半径,必须为正数。
- 返回类型:
- 返回:
Point(center.x - radius, center.y)。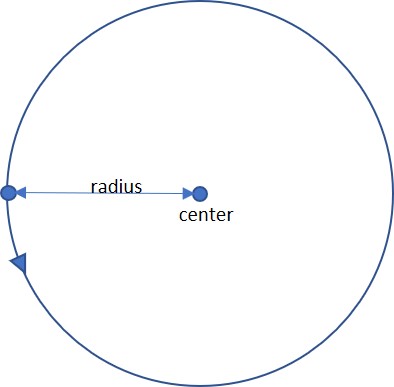
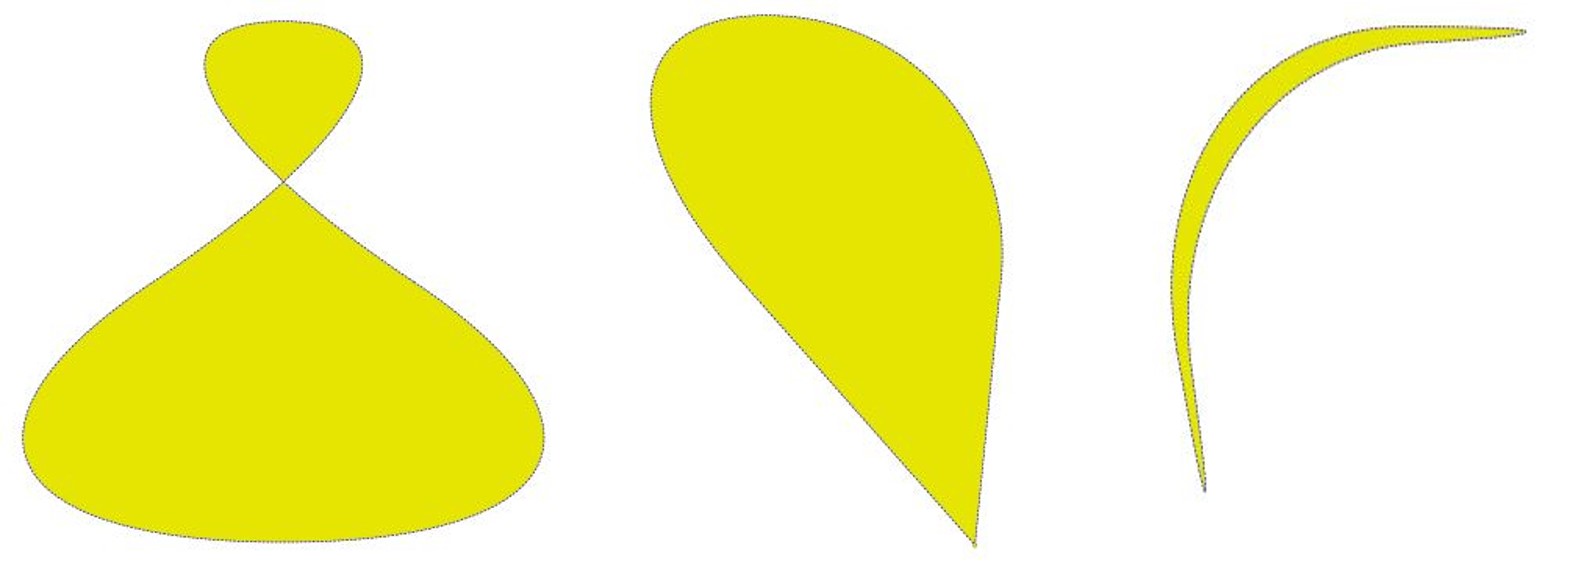
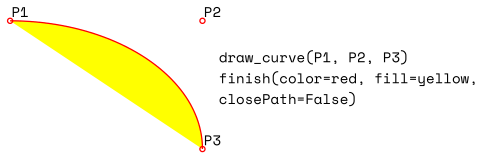
- draw_curve(p1, p2, p3)#
该方法是 draw_bezier() 的特例:从 p1 到 p3 绘制一条三次贝塞尔曲线。在
p1 -> p2和p3 -> p2这两条线上分别生成一个控制点,因此两个控制点始终位于p1 -> p3线的同一侧。这保证了曲线的曲率不会改变符号。如果两条线与 p2 交叉的角度为 90 度,则所得曲线是一个四分之一椭圆(如果两段长度相等,则是四分之一圆)。所有参数均为
point_like。- 返回类型:
- 返回:
终点 p3。下图展示了一个填充的四分之一椭圆区域,黄色部分的方向为 顺时针:
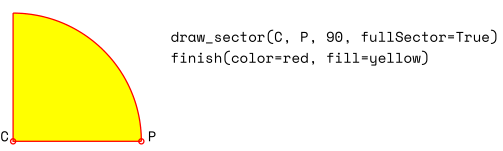
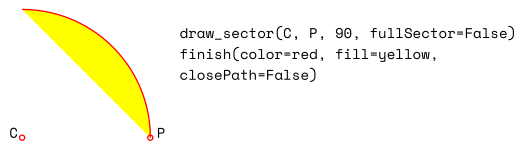
- draw_sector(center, point, angle, fullSector=True)#
绘制一个扇形(圆弧部分可以选择是否连接到圆心,使其成为“饼状”)。
- 参数:
center (point_like) – 圆心。
point (point_like) – 扇形弧线段的一个端点,另一个端点由 angle 计算得出。
angle (float) – 扇形的角度(以度为单位)。用于计算弧线的另一端点。根据符号,弧线将以逆时针(正值)或顺时针(负值)方向绘制。
fullSector (bool) – 是否将弧线的两端连接到圆心。如果指定了填充颜色,则整个“饼状”区域将被填充颜色,否则仅填充弧形区域。
- 返回类型:
- 返回:
弧线的另一端点。此返回值可用作后续调用的起点,以创建逻辑上相连的饼状图。例如:
- draw_rect(rect, *, radius=None)#
v1.22.0 版本变更: 添加了 radius 参数。
绘制一个矩形。绘制从左上角开始,并沿 逆时针 方向完成。
- 参数:
rect (rect_like) – 矩形在页面上的位置。
radius (multiple) – 绘制圆角矩形。如果不为
None,则指定曲率半径,作为矩形边长的百分比。该值必须是一个浮点数,或者包含两个浮点数的元组,满足0 < radius <= 0.5,其中0.5表示相应边长的 50%。如果为单个浮点数,则曲率半径计算为radius * min(width, height),角的轮廓将绘制为四分之一圆。如果提供(rx, ry)形式的元组,则水平和垂直方向的曲率将不同。值radius=(0.5, 0.5)将绘制一个椭圆。
- 返回类型:
- 返回:
矩形的左上角。
- draw_quad(quad)#
绘制一个四边形。绘制从左上角 (
Quad.ul) 开始,并沿 逆时针 方向完成。该方法是Shape.draw_polyline()的简写,参数为(ul, ll, lr, ur, ul)。
- finish(width=1, color=(0,), fill=None, lineCap=0, lineJoin=0, dashes=None, closePath=True, even_odd=False, morph=(fixpoint, matrix), stroke_opacity=1, fill_opacity=1, oc=0)#
结束一组 *draw*() 方法的绘制,并对其应用 公共参数。
该方法不会影响
Shape.insert_text()和Shape.insert_textbox()。该方法还支持 对组合绘图进行形变 (morphing),使用 Point fixpoint 作为固定点,并应用 Matrix matrix 进行变换。
- 参数:
morph (sequence) – 通过对某个任意 Point fixpoint 应用 Matrix matrix 来变换文本或组合图形。此操作会保持 fixpoint 位置不变。默认情况下不进行变换 (None)。矩阵的前四个分量可以包含任意值,但必须满足 matrix.e == matrix.f == 0。这意味着可以进行缩放、剪切、旋转、翻转等操作,但不能进行平移。
stroke_opacity (float) – (v1.18.1 新增) 设置描边颜色的透明度。值范围 < 0 或 > 1 的数值将被忽略,默认值为 1(不透明)。
fill_opacity (float) – (v1.18.1 新增) 设置填充颜色的透明度,默认值为 1(不透明)。
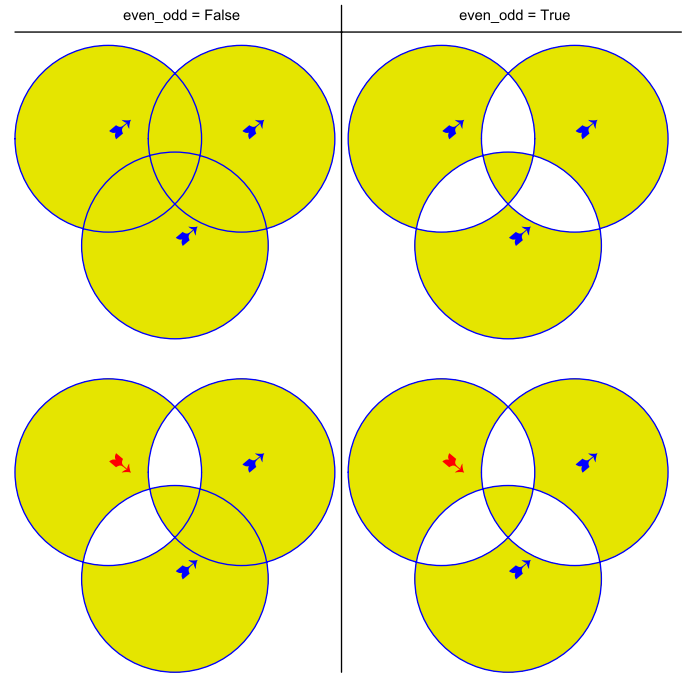
even_odd (bool) – 请求填充时使用 “奇偶规则”。默认值为 False,即使用 “非零环绕数规则”。这些规则用于确定填充颜色在重叠区域的应用方式。只有在复杂形状中,这些规则才会产生不同的填充效果。详细说明请参考 Adobe PDF 参考 第 137 页及后续部分。以下示例演示了两种规则的不同效果:
oc (int) – (v1.18.4 新增) 指定此绘图的
xref号,使其可按条件显示,适用于OCG或OCMD。
备注
对于形状中的每个像素,系统会执行以下步骤:
“奇偶规则” 计算包含该像素的区域数量。如果该数量为 奇数,则像素被视为 形状内部,如果为 偶数,则像素被视为 形状外部。
默认规则 “非零环绕数” 还会检查每个区域的 “方向”:如果区域是 逆时针 绘制的,则计数 加 1;如果是 顺时针 绘制的,则计数 减 1。如果最终结果为零,则像素被视为 外部,否则为 形状内部。
上图中的四个形状中,上面两行的三个圆形均采用标准方式(逆时针)绘制(可参考箭头方向)。下面两行的形状中,左上角的圆形是 顺时针 绘制的。可以看到,在右列(奇偶规则)中,区域的方向不影响填充结果。
- insert_text(point, text, *, fontsize=11, fontname='helv', fontfile=None, set_simple=False, encoding=TEXT_ENCODING_LATIN, color=None, lineheight=None, fill=None, render_mode=0, miter_limit=1, border_width=1, rotate=0, morph=None, stroke_opacity=1, fill_opacity=1, oc=0)#
在
point位置插入文本行。- 参数:
point (point_like) –
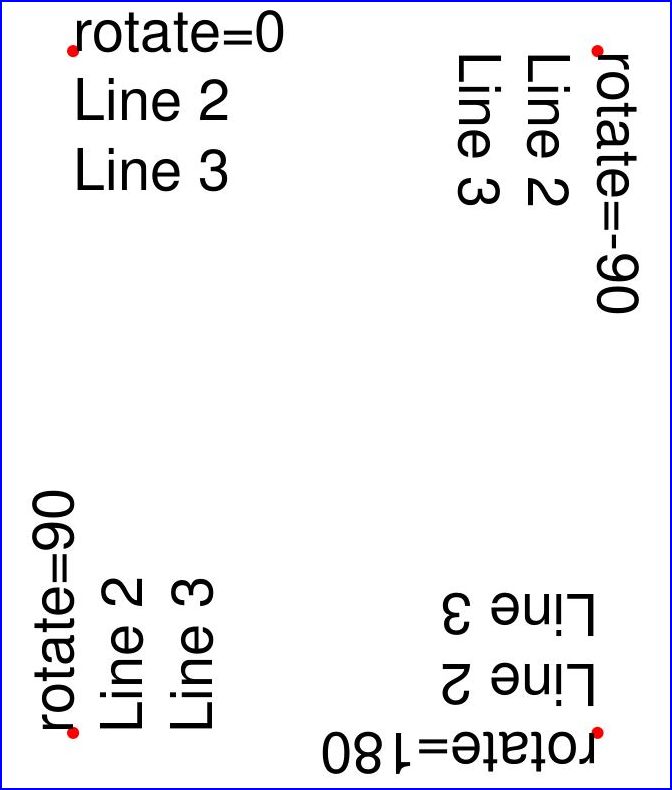
文本首字符的 左下角 位置(像素)。需要注意该参数如何与 rotate 参数协同工作。请参考下图,红色小点表示在四种不同旋转角度下 point 的位置:
text (str/sequence) – 要插入的文本,可以是字符串或序列类型。如果字符串包含换行符
\n,或提供了序列类型,则会插入多行文本。不会自动处理超出页面宽度的文本,但插入的行数会受页面的 “垂直” 空间限制(根据 rotate 参数确定的阅读方向)。多余的文本将被丢弃,但返回值会包含实际插入的行数。lineheight (float) – 设定行高的调整系数,覆盖字体默认的行高计算方式。如果不为
None,则行高将设定为fontsize * lineheight。stroke_opacity (float) – (v1.18.1 新增) 设定描边颜色(字符 边框)的透明度,仅支持
0 <= value <= 1。默认值为 1(完全不透明)。fill_opacity (float) – (v1.18.1 新增) 设定填充颜色(文本颜色)的透明度。默认值为 1(完全不透明)。此参数控制文本颜色的透明度,而 stroke_opacity 仅影响字符边框。
rotate (int) –
设定文本的旋转角度。仅支持 90° 的整数倍:
0(默认):文本从 左到右 水平显示。90:逆时针旋转,文本 向上 显示。180:文本上下颠倒,从 右到左 显示。270(或-90):顺时针旋转,文本 向下 显示。
在所有情况下,point 都表示首字符矩形的 左下角 坐标。如果存在多行文本,则它们按照 rotate 参数确定的阅读方向排列。例如,在
rotate = 180时,第 2 行将出现在 第 1 行的上方。oc (int) – (v1.18.4 新增) 指定文本的
xref号,以使其可按条件显示,适用于OCG或OCMD。
- 返回类型:
int
- 返回:
实际插入的行数。
其他参数的详细说明请参见 公共参数。
- insert_textbox(rect, buffer, *, fontsize=11, fontname='helv', fontfile=None, set_simple=False, encoding=TEXT_ENCODING_LATIN, color=None, fill=None, render_mode=0, miter_limit=1, border_width=1, expandtabs=8, align=TEXT_ALIGN_LEFT, rotate=0, lineheight=None, morph=None, stroke_opacity=1, fill_opacity=1, oc=0)#
仅适用于 PDF:在指定矩形区域内插入文本。文本将被分割为单词和行,并填充到可用空间中。文本填充的起始角由
rotate参数决定。换行符和多个空格会被保留。- 参数:
rect (rect_like) – 指定文本框的矩形区域。必须是有限且非空的区域。
buffer (str/sequence) – 要插入的文本,必须是字符串或字符串序列。字符串序列中的换行符也会被保留。
align (int) – 设置文本的对齐方式。默认值为
0(左对齐)。还支持居中、右对齐和两端对齐(TEXT_ALIGN_JUSTIFY)。需要注意,两端对齐仅适用于 “简单”(单字节)字体,包括 PDF Base 14 字体。lineheight (float) – 设定行高调整系数,覆盖字体默认的行高计算方式。如果不为
None,行高将设定为fontsize * lineheight。expandtabs (int) – 控制制表符
\t的处理方式。每一行都会使用string.expandtabs()方法进行转换。stroke_opacity (float) – (v1.18.1 新增) 设置描边颜色(字符 边框)的透明度,仅接受
0 <= value <= 1的值。默认值为1(完全不透明)。fill_opacity (float) – (v1.18.1 新增) 设置填充颜色(文本颜色)的透明度,默认值为
1(完全不透明)。此参数控制文本颜色的透明度,而stroke_opacity仅影响字符边框。rotate (int) –
设置文本在矩形区域内的旋转角度。该值必须是
90的整数倍,支持0、90、180和270(或-90):0(默认):从左上角开始填充文本。90:从 左下角 开始填充文本。180:从 右下角 开始填充文本。270(或-90):从 右上角 开始填充文本。
旋转参数会覆盖
morph变换效果。请参考以下示例,其中一个示例展示了文本先向左旋转90度,之后整个矩形围绕左下角顺时针旋转。oc (int) – (v1.18.4 新增) 指定文本的
xref号,以使其可按条件显示,适用于OCG或OCMD。
- 返回类型:
float
- 返回:
如果返回值为正或零:执行成功,返回未使用的矩形行高(单位:像素)。该值可用于优化矩形、调整后续元素位置等。
如果返回值为负:未能执行,返回值表示插入文本所需的额外空间。建议增大矩形区域、减少字体大小或减少文本量。

其他参数的详细说明请参见 公共参数。
- commit(overlay=True)#
将累积的绘图和文本插入更新到页面的
contents。如果文本与绘图重叠,文本将覆盖在绘图之上。该方法会重置以下属性:
Shape.rect、lastPoint、draw_cont、text_cont和totalcont。之后,该形状对象仍可用于 同一页面。- 参数:
overlay (bool) – 是否将内容放置在前景(默认)或背景中。仅当页面已有非空的
contents时才相关。
———- 属性 ———-
- height#
页面高度的副本。
- Type:
float
- width#
页面宽度的副本。
- Type:
float
- draw_cont#
绘图方法 的累积命令缓冲区。每次执行
finish方法后,该缓冲区的内容会追加到Shape.totalcont。- Type:
str
- text_cont#
文本插入 的累积缓冲区。所有文本插入都会存储在此缓冲区中,并在执行
Shape.commit()时追加到totalcont,确保文本不会被同一 Shape 内的绘图覆盖。- Type:
str
- rect#
包围绘图的矩形。此属性供您使用,可以随时更改。当创建或提交形状时,默认值为 None。每次调用 draw 方法和
Shape.insert_textbox()时,都会更新该属性(即 根据需要扩大 矩形)。然而,变换(Morphing) 操作(如Shape.finish()、Shape.insert_textbox())会被忽略。该属性的典型用法是在创建形状时,将
Page.cropbox_position设置为该值,尤其是当您为后续或外部使用创建形状时。如果您没有手动操作该属性,它应反映包含所有绘图的矩形。如果您使用了变换并需要包含变换对象的矩形,可以使用以下代码:
>>> # 假设 ...
>>> morph = (point, matrix)
>>> # ... 重新计算形状矩形如下:
>>> shape.rect = (shape.rect - pymupdf.Rect(point, point)) * ~matrix + pymupdf.Rect(point, point)
- Type:
- totalcont#
累积的绘图和文本插入命令缓冲区。此缓冲区将在
Shape.commit()中使用。- Type:
str
This class allows creating interconnected graphical elements on a PDF page. Its methods have the same meaning and name as the corresponding Page methods.
In fact, each Page draw method is just a convenience wrapper for (1) one shape draw method, (2) the Shape.finish() method, and (3) the Shape.commit() method. For page text insertion, only the Shape.commit() method is invoked. If many draw and text operations are executed for a page, you should always consider using a Shape object.
Several draw methods can be executed in a row and each one of them will contribute to one drawing. Once the drawing is complete, the Shape.finish() method must be invoked to apply color, dashing, width, morphing and other attributes.
Draw methods of this class (and Shape.insert_textbox()) are logging the area they are covering in a rectangle (Shape.rect). This property can for instance be used to set Page.cropbox_position.
Text insertions Shape.insert_text() and Shape.insert_textbox() implicitly execute a “finish” and therefore only require Shape.commit() to become effective. As a consequence, both include parameters for controlling properties like colors, etc.
Method / Attribute |
Description |
|---|---|
update the page’s contents |
|
draw a cubic Bezier curve |
|
draw a circle around a point |
|
draw a cubic Bezier using one helper point |
|
draw a line |
|
draw an ellipse |
|
connect a sequence of points |
|
draw a quadrilateral |
|
draw a rectangle |
|
draw a circular sector or piece of pie |
|
draw a squiggly line |
|
draw a zigzag line |
|
finish a set of draw commands |
|
insert text lines |
|
fit text into a rectangle |
|
stores the page’s document |
|
draw commands since last |
|
stores the page’s height |
|
stores the current point |
|
stores the owning page |
|
rectangle surrounding drawings |
|
accumulated text insertions |
|
accumulated string to be stored in |
|
stores the page’s width |
Class API
用法#
Usage
图形对象的构造方式是通过 shape = page.new_shape()。在此之后,可以根据需要进行任意数量的绘制、完成和文本插入方法调用。每个绘制序列必须在提交之前完成。整体的代码模式如下所示:
>>> shape = page.new_shape()
>>> shape.draw1(...)
>>> shape.draw2(...)
>>> ...
>>> shape.finish(width=..., color=..., fill=..., morph=...)
>>> shape.draw3(...)
>>> shape.draw4(...)
>>> ...
>>> shape.finish(width=..., color=..., fill=..., morph=...)
>>> ...
>>> shape.insert_text*
>>> ...
>>> shape.commit()
>>> ....
备注
每个
finish()方法会将之前的绘制操作合并为一个逻辑图形,赋予它统一的颜色、线宽、形态等。如果指定了closePath,它还会将最后一个绘制的终点与第一个绘制的起点连接起来。为了成功创建复合图形,确保每个
draw方法的起点是上一个绘制的终点。在上面的伪代码中,draw2方法应该使用draw1返回的 Point 作为起点。如果没有这样做,将自动开始一个新的路径,并且finish()方法可能无法按预期工作(但不会报错)。文本插入可以在
commit之前的任何位置进行,它们不会影响Shape.draw_cont或Shape.lastPoint。文本将直接追加到Shape.totalcont中,而绘制操作则由Shape.finish方法追加。每个
commit方法会将所有文本插入和图形放置在页面的前景或背景中,从而提供对图形层次的控制。只有
commit会更新 页面内容,其他方法基本上是字符串操作。
A drawing object is constructed by shape = page.new_shape(). After this, as many draw, finish and text insertions methods as required may follow. Each sequence of draws must be finished before the drawing is committed. The overall coding pattern looks like this:
>>> shape = page.new_shape()
>>> shape.draw1(...)
>>> shape.draw2(...)
>>> ...
>>> shape.finish(width=..., color=..., fill=..., morph=...)
>>> shape.draw3(...)
>>> shape.draw4(...)
>>> ...
>>> shape.finish(width=..., color=..., fill=..., morph=...)
>>> ...
>>> shape.insert_text*
>>> ...
>>> shape.commit()
>>> ....
备注
Each finish() combines the preceding draws into one logical shape, giving it common colors, line width, morphing, etc. If closePath is specified, it will also connect the end point of the last draw with the starting point of the first one.
To successfully create compound graphics, let each draw method use the end point of the previous one as its starting point. In the above pseudo code, draw2 should hence use the returned Point of draw1 as its starting point. Failing to do so, would automatically start a new path and finish() may not work as expected (but it won’t complain either).
Text insertions may occur anywhere before the commit (they neither touch
Shape.draw_contnorShape.lastPoint). They are appended to Shape.totalcont directly, whereas draws will be appended by Shape.finish.Each commit takes all text insertions and shapes and places them in foreground or background on the page – thus providing a way to control graphical layers.
Only commit will update the page’s contents, the other methods are basically string manipulations.
例子#
Examples
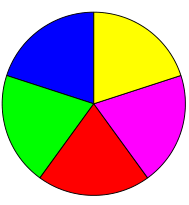
创建一个由不同颜色的饼状图构成的完整圆形
shape = page.new_shape()  # 开始一个新形状
cols = (...)  # 一个RGB颜色三元组的序列
pieces = len(cols)  # 需要绘制的部分数量
beta = 360. / pieces  # 每个饼块的角度
center = pymupdf.Point(...)  # 饼的中心
p0 = pymupdf.Point(...)  # 起始点
for i in range(pieces):
   p0 = shape.draw_sector(center, p0, beta,
                           fullSector=True)  # 绘制饼块
   # 现在填充它,但不要连接弧的端点
   shape.finish(fill=cols[i], closePath=False)
shape.commit()  # 更新页面
这是五种颜色的示例:
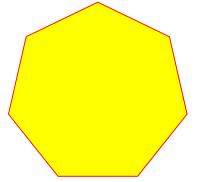
创建一个规则的n边多边形(黄色填充,红色边框)。我们仅使用 draw_sector() 来计算圆周上的点,并在绘制多边形之前清空绘图命令缓冲区
shape = page.new_shape()  # 开始一个新形状
beta = -360.0 / n  # 角度,顺时针绘制
center = pymupdf.Point(...)  # 圆心
p0 = pymupdf.Point(...)  # 从这里开始(第一个边)
points = [p0]  # 存储多边形的边
for i in range(n):  # 计算边
   p0 = shape.draw_sector(center, p0, beta)
   points.append(p0)
shape.draw_cont = ""  # 不绘制圆的扇形
shape.draw_polyline(points)  # 绘制多边形
shape.finish(color=(1,0,0), fill=(1,1,0), closePath=False)
shape.commit()
这是 n = 7 时的多边形:
Create a full circle of pieces of pie in different colors:
shape = page.new_shape()  # start a new shape
cols = (...)  # a sequence of RGB color triples
pieces = len(cols)  # number of pieces to draw
beta = 360. / pieces  # angle of each piece of pie
center = pymupdf.Point(...)  # center of the pie
p0 = pymupdf.Point(...)  # starting point
for i in range(pieces):
   p0 = shape.draw_sector(center, p0, beta,
                        fullSector=True) # draw piece
   # now fill it but do not connect ends of the arc
   shape.finish(fill=cols[i], closePath=False)
shape.commit()  # update the page
Here is an example for 5 colors:
Create a regular n-edged polygon (fill yellow, red border). We use draw_sector() only to calculate the points on the circumference, and empty the draw command buffer again before drawing the polygon:
shape = page.new_shape() # start a new shape
beta = -360.0 / n  # our angle, drawn clockwise
center = pymupdf.Point(...)  # center of circle
p0 = pymupdf.Point(...)  # start here (1st edge)
points = [p0]  # store polygon edges
for i in range(n):  # calculate the edges
   p0 = shape.draw_sector(center, p0, beta)
   points.append(p0)
shape.draw_cont = ""  # do not draw the circle sectors
shape.draw_polyline(points)  # draw the polygon
shape.finish(color=(1,0,0), fill=(1,1,0), closePath=False)
shape.commit()
Here is the polygon for n = 7:
公共参数#
Common Parameters
fontname (str)
通常有三种选择:
使用标准的 PDF Base 14 字体 中的一种字体。在这种情况下, 必须不 指定 fontfile,如果省略该参数,则使用 “Helvetica”。
选择页面中已使用的字体。然后指定其 引用 名称,并在前面加上斜杠 “/”,例如下面的示例。
指定计算机系统中存在的字体文件。在这种情况下,为此参数选择一个任意但新的名称(不带 “/” 前缀)。
如果插入的文本应该重用页面中的某个字体,可以使用
Page.get_fonts()中显示的引用名称,如下所示:假设字体列表中有项 [1024, 0, ‘Type1’, ‘NimbusMonL-Bold’, ‘R366’],那么指定 fontname = “/R366”, fontfile = None 来使用字体 NimbusMonL-Bold。
fontfile (str)
计算机上现有字体的文件路径。如果指定了 fontfile ,确保使用的 fontname 不出现在 上述列表中。这个新字体将在 doc.save() 时嵌入到 PDF 中。与新图像类似,字体文件只会嵌入一次。使用一个 MD5 码表来确保这一点。
set_simple (bool)
从文件安装的字体默认为 Type0 字体。如果只想使用 1 字节字符,将此设置为 true。此设置无法恢复。后续的更改将被忽略。
fontsize (float)
文本的字体大小,参见:
fontsize。
dashes (str)
使线条以虚线方式绘制。一般格式是
"[n m] p",由最多 3 个浮动值组成,表示像素长度。n是虚线的长度,m(可选)是随后的间隙长度,p(“相位” - 必需,即使是 0!)指定在开始绘制虚线之前应跳过多少像素。如果省略m,它默认为n。使用
"[] 0"或 None 或""绘制连续的线条(无虚线)。示例如下:
指定
"[3 4] 0"意味着虚线长度为 3,间隙长度为 4 像素,依次排列。
"[3 3] 0"和"[3] 0"的效果相同。有关如何实现复杂虚线效果的详细信息,请参见 Adobe PDF 参考,第 217 页。
color / fill (list, tuple)
描边和填充颜色可以用 0 到 1 之间的浮点数元组或列表指定。这些序列的长度必须为 1(灰度 GRAY)、3(RGB)或 4(CMYK)。对于灰度色彩空间,除了 (float,) 或 [float] 这种较繁琐的格式外,也可以直接使用单个浮点数。可以使用默认值(Accept),或者使用
None以忽略该参数。为了简化颜色指定,可以使用 pymupdf.utils 中的 getColor() 方法,通过颜色名称获取预定义的 RGB 颜色三元组。它接受一个字符串作为颜色名称,并返回相应的 RGB 颜色三元组。该方法支持 540 多种颜色名称,详见 颜色数据库。
请注意,术语 color 在与填充颜色一起使用时通常指的是“描边”颜色。
如果将颜色参数默认设为
None,那么不会生成相应的颜色选择命令。如果 fill 和 color 都为None,那么绘制内容将不包含任何颜色指定。但仍然会被“描边”,导致 PDF 默认颜色“黑色”被 Adobe Acrobat 及其他查看器使用。
width (float)
形状元素(如果适用)的描边(“边框”)宽度,默认值为 1。参数 width、color 和 fill 之间的关系如下:
如果
fill=None,形状元素始终会带有边框,即使color=None(此时默认使用黑色)或width=0(此时默认使用 1)。只有在指定填充颜色(可以是白色)时,才可以绘制无边框的形状。要实现这一点,需要指定
width=0,此时color参数会被忽略。
stroke_opacity / fill_opacity (floats)
这两个值的取值范围均为 [0, 1]。负值或大于 1 的值在大多数情况下会被忽略。这两个参数用于设置透明度,其中 0.5 代表 50% 透明度,0 代表完全透明,1 代表不透明。例如,对于矩形,stroke_opacity 适用于边框,fill_opacity 适用于内部填充。
对于文本插入(
Shape.insert_text()和Shape.insert_textbox()),使用 fill_opacity 控制文本透明度。乍看之下这可能令人困惑,但结合render_mode可以理解:fill_opacity适用于黄色部分,stroke_opacity适用于蓝色部分。
border_width (float)
设置文本插入的边框宽度。新增于 v1.14.9,仅在 render_mode 取值大于 0 时有效。
render_mode (int)
自 v1.14.9 版本新增:取值范围
range(8),用于控制文本外观(适用于Shape.insert_text()和Shape.insert_textbox())。详见 Adobe PDF 参考 第 246 页。本版本新增了填充色与描边色的区分。
默认值 0:仅使用填充颜色绘制文本。为保持向后兼容性,也可以使用 color 参数代替。
渲染模式 1:仅绘制字符(字形)的边框,边框厚度由 border_width 参数指定。颜色使用 color 参数指定,fill 参数被忽略。
渲染模式 2:字形既填充又描边,使用 fill 和 color 参数,以及指定的边框宽度。可以使用该模式模拟 加粗文本,方法是为 fill 和 color 选择相同的颜色,并设置适当的 border_width。
渲染模式 3:字形既不填充也不描边,即文本不可见。
下列示例使用
border_width=0.3,字体大小fontsize=15,描边颜色为蓝色,填充颜色为黄色。
miter_limit (float)
一个浮点数,指定可接受的最大“斜接比”(miter quotient),计算方式为
miter-length / line-width。该参数用于文本输出方法,仅在非零渲染模式下相关 —— 也就是说,当字符带有描边(stroked)时才生效。当某个字符的描边线在一个锐角(≤ 90°)处相交,并且线宽较大时,可能会出现“尖刺”现象,导致不美观的视觉效果,如下所示。更多背景信息可参考 Adobe PDF 参考 第 126 页。
例如,当连接点以 90° 角度相交时,斜接长度(miter length)为
sqrt(2) * line-width,斜接比(miter quotient)为sqrt(2)。如果
miter_limit被超过,则所有超过该比值的连接处都会被截断,呈现为斜切(“butt”)的外观。
默认值为 1(以及任何更小的值),这会确保所有连接点都呈现为斜切(butt)。
设为
None时,则使用 PDF 的默认值。示例:
出现尖刺的文本(
miter_limit=None):
抑制尖刺的文本(
miter_limit=1):
overlay (bool)
控制元素是出现在前景(默认)还是背景。
morph (sequence)
使形状(由 draw() 方法创建)或文本(由 insert_textbox() / insert_text() 方法插入)发生“变形”(morphing)。如果不为 None,则必须是一个 (fixpoint, matrix) 对,其中:
例如:
如果 matrix 是旋转或缩放变换,则 fixpoint 是变换的中心。
如果 matrix 是左右或上下翻转变换,则镜像轴分别是经过 fixpoint 的垂直线或水平线。
备注
一些方法(如
Shape.insert_text()或Shape.draw_rect())会检查插入的元素是否能够完全适应页面。但是对于变形操作的结果,系统不会进行此类检查,因此完全由开发者自行负责。
lineCap (int) (已弃用: “roundCap”)
控制线条端点的外观。默认值为 0,表示线条在指定坐标处以锐角结束。其他选项包括:
0:线条在端点处直接终止,形成锐角。
1:在线条端点处添加一个半圆,半圆的中心为端点,直径等于线宽。
2:在线条端点处添加一个半方形,边长等于线宽,中心为端点。
在 v1.14.15 版本修改
lineJoin (int)
自 v1.14.15 版本新增:控制线条连接处的外观:
0:尖角连接(sharp edge)。
1:圆角连接(rounded join)。
2:斜切连接(cut-off edge,”butt”)。
closePath (bool)
使绘制的终点自动与起点相连(使用一条直线闭合路径)。
fontname (str)
In general, there are three options:
Use one of the standard PDF Base 14 字体. In this case, fontfile must not be specified and “Helvetica” is used if this parameter is omitted, too.
Choose a font already in use by the page. Then specify its reference name prefixed with a slash “/”, see example below.
Specify a font file present on your system. In this case choose an arbitrary, but new name for this parameter (without “/” prefix).
If inserted text should re-use one of the page’s fonts, use its reference name appearing in
Page.get_fonts()like so:Suppose the font list has the item [1024, 0, ‘Type1’, ‘NimbusMonL-Bold’, ‘R366’], then specify fontname = “/R366”, fontfile = None to use font NimbusMonL-Bold.
fontfile (str)
File path of a font existing on your computer. If you specify fontfile, make sure you use a fontname not occurring in the above list. This new font will be embedded in the PDF upon doc.save(). Similar to new images, a font file will be embedded only once. A table of MD5 codes for the binary font contents is used to ensure this.
set_simple (bool)
Fonts installed from files are installed as Type0 fonts by default. If you want to use 1-byte characters only, set this to true. This setting cannot be reverted. Subsequent changes are ignored.
fontsize (float)
Font size of text, see:
fontsize.
dashes (str)
Causes lines to be drawn dashed. The general format is
"[n m] p"of (up to) 3 floats denoting pixel lengths.nis the dash length,m(optional) is the subsequent gap length, andp(the “phase” - required, even if 0!) specifies how many pixels should be skipped before the dashing starts. Ifmis omitted, it defaults ton.A continuous line (no dashes) is drawn with
"[] 0"or None or"". Examples:
Specifying
"[3 4] 0"means dashes of 3 and gaps of 4 pixels following each other.
"[3 3] 0"and"[3] 0"do the same thing.For (the rather complex) details on how to achieve sophisticated dashing effects, see Adobe PDF 参考, page 217.
color / fill (list, tuple)
Stroke and fill colors can be specified as tuples or list of of floats from 0 to 1. These sequences must have a length of 1 (GRAY), 3 (RGB) or 4 (CMYK). For GRAY colorspace, a single float instead of the unwieldy (float,) or [float] is also accepted. Accept (default) or use
Noneto not use the parameter.To simplify color specification, method getColor() in pymupdf.utils may be used to get predefined RGB color triples by name. It accepts a string as the name of the color and returns the corresponding triple. The method knows over 540 color names – see section 颜色数据库.
Please note that the term color usually means “stroke” color when used in conjunction with fill color.
If letting default a color parameter to
None, then no resp. color selection command will be generated. If fill and color are bothNone, then the drawing will contain no color specification. But it will still be “stroked”, which causes PDF’s default color “black” be used by Adobe Acrobat and all other viewers.
width (float)
The stroke (“border”) width of the elements in a shape (if applicable). The default value is 1. The values width, color and fill have the following relationship / dependency:
If
fill=Noneshape elements will always be drawn with a border - even ifcolor=None(in which case black is taken) orwidth=0(in which case 1 is taken).Shapes without border can only be achieved if a fill color is specified (which may be white of course). To achieve this, specify
width=0. In this case, thecolorparameter is ignored.
stroke_opacity / fill_opacity (floats)
Both values are floats in range [0, 1]. Negative values or values > 1 will ignored (in most cases). Both set the transparency such that a value 0.5 corresponds to 50% transparency, 0 means invisible and 1 means intransparent. For e.g. a rectangle the stroke opacity applies to its border and fill opacity to its interior.
For text insertions (
Shape.insert_text()andShape.insert_textbox()), use fill_opacity for the text. At first sight this seems surprising, but it becomes obvious when you look further down torender_mode:fill_opacityapplies to the yellow andstroke_opacityapplies to the blue color.
border_width (float)
Set the border width for text insertions. New in v1.14.9. Relevant only if the render mode argument is used with a value greater zero.
render_mode (int)
New in version 1.14.9: Integer in
range(8)which controls the text appearance (Shape.insert_text()andShape.insert_textbox()). See page 246 in Adobe PDF 参考. New in v1.14.9. These methods now also differentiate between fill and stroke colors.
For default 0, only the text fill color is used to paint the text. For backward compatibility, using the color parameter instead also works.
For render mode 1, only the border of each glyph (i.e. text character) is drawn with a thickness as set in argument border_width. The color chosen in the color argument is taken for this, the fill parameter is ignored.
For render mode 2, the glyphs are filled and stroked, using both color parameters and the specified border width. You can use this value to simulate bold text without using another font: choose the same value for fill and color and an appropriate value for border_width.
For render mode 3, the glyphs are neither stroked nor filled: the text becomes invisible.
The following examples use border_width=0.3, together with a fontsize of 15. Stroke color is blue and fill color is some yellow.
miter_limit (float)
A float specifying the maximum acceptable value of the quotient
miter-length / line-width(“miter quotient”). Used in text output methods. This is only relevant for non-zero render mode values – then, characters are written with border lines (i.e. “stroked”).If two lines stroking some character meet at a sharp (<= 90°) angle and the line width is large enough, then “spikes” may become visible – causing an ugly appearance as shown below. For more background, see page 126 of the Adobe PDF 参考.
For instance, when joins meet at 90°, then the miter length is
sqrt(2) * line-width, so the miter quotient issqrt(2).If
miter_limitis exceeded, then all joins with a larger qotient will appear as beveled (“butt” appearance).The default value 1 (and any smaller value) will ensure that all joins are rendered as a butt. A value of
Nonewill use the PDF default value.Example text showing spikes (
miter_limit=None):Example text suppressing spikes (
miter_limit=1):
overlay (bool)
Causes the item to appear in foreground (default) or background.
morph (sequence)
Causes “morphing” of either a shape, created by the draw*() methods, or the text inserted by page methods insert_textbox() / insert_text(). If not None, it must be a pair (fixpoint, matrix), where fixpoint is a Point and matrix is a Matrix. The matrix can be anything except translations, i.e. matrix.e == matrix.f == 0 must be true. The point is used as a fixed point for the matrix operation. For example, if matrix is a rotation or scaling, then fixpoint is its center. Similarly, if matrix is a left-right or up-down flip, then the mirroring axis will be the vertical, respectively horizontal line going through fixpoint, etc.
备注
Several methods contain checks whether the to be inserted items will actually fit into the page (like
Shape.insert_text(), orShape.draw_rect()). For the result of a morphing operation there is however no such guaranty: this is entirely the programmer’s responsibility.
lineCap (deprecated: “roundCap”) (int)
Controls the look of line ends. The default value 0 lets each line end at exactly the given coordinate in a sharp edge. A value of 1 adds a semi-circle to the ends, whose center is the end point and whose diameter is the line width. Value 2 adds a semi-square with an edge length of line width and a center of the line end.
Changed in version 1.14.15
lineJoin (int)
New in version 1.14.15: Controls the way how line connections look like. This may be either as a sharp edge (0), a rounded join (1), or a cut-off edge (2, “butt”).
closePath (bool)
Causes the end point of a drawing to be automatically connected with the starting point (by a straight line).