编辑要素#
Editing features
现在我们知道用户想要编辑的特征,接下来的任务是实现编辑特征的页面。为此,我们需要创建一个自定义表单,表单中有一个名为“geometry”的输入字段,使用地图编辑小部件来编辑特征的几何形状。
为了创建这个表单,我们将借用 GeoDjango 内置的“admin”界面中的一些元素,特别是 django.contrib.gis.admin.GeoModelAdmin 类。这个类提供了一个名为 get_map_widget() 的方法,该方法返回一个编辑小部件,我们可以将其包含在自定义生成的表单中。
构建这个表单的过程有点复杂,因为我们需要动态创建一个新的 django.forms.Form 子类来处理可以编辑的不同类型的几何形状。让我们把这个复杂性放到一个新的函数中,放在 shared.utils 模块里,命名为 get_map_form()。
编辑 utils.py 模块并输入以下代码:
def get_map_form(shapefile):
    geometry_field = calc_geometry_field(shapefile.geom_type)
    admin_instance = admin.GeoModelAdmin(Feature, admin.site)
    field       = Feature._meta.get_field(geometry_field)
    widget_type = admin_instance.get_map_widget(field)

    class MapForm(forms.Form):
        geometry = forms.CharField(widget=widget_type(),
                                    label="")
    return MapForm
你还需要在文件顶部添加以下导入语句:
from django import forms
from django.contrib.gis import admin
from shapeEditor.shared.models import Feature
get_map_form() 函数使用了一个 GeoModelAdmin 实例。我们在本章早些时候探讨 GeoDjango 内置的 admin 界面时已经见过 GeoModelAdmin;在这里我们使用它来生成一个适用于当前 shapefile 几何类型的地图小部件。
使用 GeoModelAdmin 实例,get_map_form() 函数创建并返回一个新的 django.forms.Form 子类,使用适当的小部件类型来编辑这个特定 shapefile 的特征。请注意,get_map_form() 函数返回的是 MapForm 类,而不是该类的实例;我们将使用返回的类在需要时创建适当的 MapForm 实例。
有了这个函数后,我们现在可以实现其余的编辑特征视图。首先设置视图的 URL;打开 editor 应用的 urls.py 模块,并将以下内容添加到 URL 模式列表中:
url(r'^edit_feature/(?P<shapefile_id>\d+)/' +
    r'(?P<feature_id>\d+)$', 'edit_feature'),
现在我们可以实现视图函数本身。编辑 views.py 模块并开始定义 edit_feature() 函数:
def edit_feature(request, shapefile_id, feature_id):
    try:
        shapefile = Shapefile.objects.get(id=shapefile_id)
    except ShapeFile.DoesNotExist:
            return HttpResponseNotFound()

    try:
        feature = Feature.objects.get(id=feature_id)
    except Feature.DoesNotExist:
        return HttpResponseNotFound()
到目前为止,这部分非常简单:我们加载当前 shapefile 的 Shapefile 对象,以及正在编辑的特征的 Feature 对象。接下来,我们需要加载该特征的属性列表,以便将其显示给用户:
attributes = []
for attr_value in feature.attributevalue_set.all():
    attributes.append([attr_value.attribute.name,
                        attr_value.value])
attributes.sort()
这时事情变得有趣了。我们需要创建一个 Django 表单对象(实际上是由我们之前编写的 get_map_form() 函数动态创建的 MapForm 类的实例),并使用该表单实例来显示要编辑的特征。当表单提交时,我们将提取更新后的几何形状并将其保存回 Feature 对象,然后将用户重定向回编辑 shapefile 页面,以选择另一个特征。
正如我们在创建导入 shapefile 表单时看到的那样,处理表单的基本 Django 习惯用法如下:
if request.method == "GET":
    form = MyForm()
    return render(request, "template.html",
                    {'form' : form})
elif request.method == "POST":
    form = MyForm(request.POST)
    if form.is_valid():
        # 提取并保存表单的内容...
        return HttpResponseRedirect("/somewhere/else")
    return render(request, "template.html",
                    {'form' : form})
当表单首次显示时, request.method 会被设置为 GET。在这种情况下,我们创建一个新的表单对象,并将表单作为 HTML 模板的一部分显示。当表单由用户提交时, request.method 会被设置为 POST。在这种情况下,会创建一个新的表单对象,并将其绑定到提交的 POST 参数。然后检查表单的内容,如果有效,则保存并将用户重定向到其他页面。如果表单无效,它会再次显示并附带适当的错误信息。
让我们看看这个习惯用法是如何在编辑特征视图中使用的。将以下内容添加到新视图函数的末尾:
geometry_field = \
    utils.calc_geometry_field(shapefile.geom_type)
form_class     = utils.get_map_form(shapefile)

if request.method == "GET":
    wkt = getattr(feature, geometry_field)
    form = form_class({'geometry' : wkt})
    return render(request, "edit_feature.html",
                    {'shapefile' : shapefile,
                    'form': form,
                    'attributes' : attributes})
elif request.method == "POST":
    form = form_class(request.POST)
    try:
        if form.is_valid():
            wkt = form.cleaned_data['geometry']
            setattr(feature, geometry_field, wkt)
            feature.save()

            return HttpResponseRedirect("/editor/edit/" +
                shapefile_id)
    except ValueError:
        pass

    return render(request, "edit_feature.html",
                    {'shapefile' : shapefile,
                    'form': form,
                    'attributes' : attributes})
正如你所见,我们调用 utils.get_map_form() 创建了一个新的 django.forms.Form 子类,用来编辑特征的几何形状。我们还调用 utils.calc_geometry_field() 查看在 Feature 对象中应该编辑哪个字段。
该函数的其余部分基本遵循 Django 的表单处理习惯。唯一值得注意的是,我们以 WKT 格式获取并设置几何字段(分别使用 getattr() 和 setattr() 函数)。GeoDjango 将几何字段视为字符字段,并以 WKT 格式存储几何数据。GeoDjango 的 JavaScript 代码会将该 WKT 数据(存储在一个名为 geometry 的隐藏表单字段中)传递给 OpenLayers,显示为向量几何。OpenLayers 允许用户编辑该向量几何,更新后的几何形状再次存储到隐藏的几何字段中,以 WKT 数据格式。然后我们提取更新后的几何形状的 WKT 文本,并将其存储回 Feature 对象。
至此,edit_feature() 视图函数就完成了。接下来,我们来创建该视图使用的模板。创建一个新的文件 edit_feature.html,并将以下内容输入到该文件中:
<html>
<head>
<title>ShapeEditor</title>
<script src="http://openlayers.org/api/OpenLayers.js">
</script>
</head>
<body>
<h1>Edit Feature</h1>
<form method="POST" action="">
<table>
{{ form.as_table }}
<tr>
<td></td>
<td align="right">
<table>
{% for attr in attributes %}
<tr>
<td>{{ attr.0 }}</td>
<td>{{ attr.1 }}</td>
</tr>
{% endfor %}
</table>
</td>
</tr>
<tr>
<td></td>
<td align="center">
<input type="submit" value="Save"/>
<button type="button" onClick='window.location="/editor/
edit/{{ shapefile.id }}";'>
Cancel
</button>
</td>
</tr>
</table>
</form>
</body>
</html>
这个模板使用 HTML 表格显示表单,并使用 form.as_table 模板函数将表单渲染为 HTML 表格行。接下来,我们在一个子表格中显示特征属性列表,并在底部放置保存和取消按钮。
完成这些代码后,我们终于能够在 ShapeEditor 中编辑特征了:
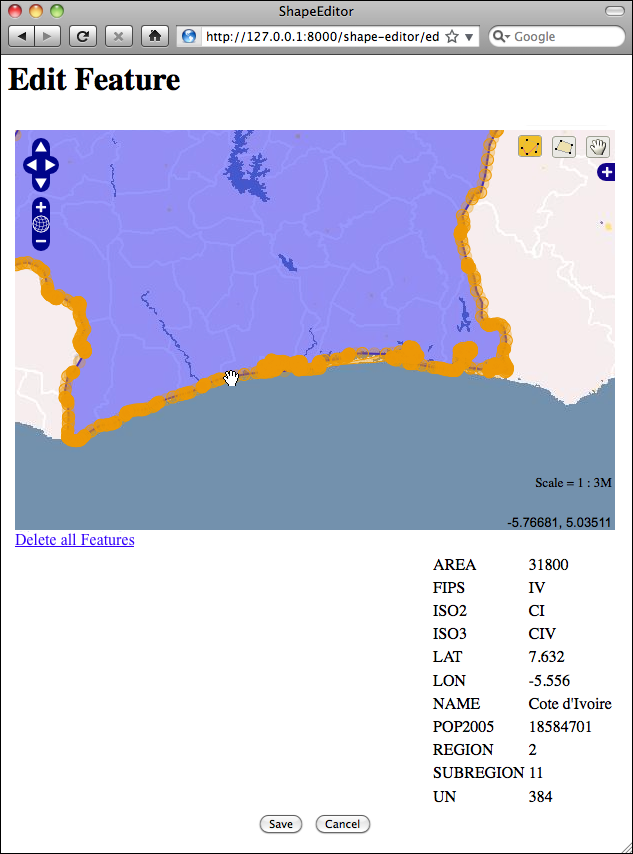
在这个编辑器中,你可以利用 GeoDjango 内置的许多功能来编辑几何形状:
你可以点击 Edit Geometry 工具(
 )来选择一个特征进行编辑。
你可以点击 Add Geometry 工具(
 )开始绘制新几何形状。
当选择了一个几何形状时,你可以点击一个深色圆圈并拖动它来移动线段的端点。
当选择了一个几何形状时,你可以点击一个浅色圆圈将现有的线段分成两段,生成一个新的点,并可以拖动它。
如果按住鼠标并按 Delete 键(或按 D),你可以删除该点。请注意,只有当几何形状有三个以上的点时,这才有效。
你可以点击 Delete all Features 超链接来删除当前特征的几何形状。稍后我们将详细查看这个超链接。
完成编辑特征后,你可以点击 Save 按钮保存编辑的特征,或者点击 Cancel 按钮放弃更改。
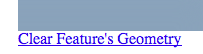
虽然这一切都在顺利进行,但有一个相当令人恼火的缺陷:GeoDjango 允许用户通过一个名为 Delete all Features 的超链接从地图中删除几何形状。由于我们当前正在编辑单个特征,这个超链接的命名让人感到困惑:实际上,它删除的是该特征的几何形状,而不是特征本身。我们来将这个超链接的文本改为更有意义的内容。
进入你下载的 Django 版本,导航到 contrib/gis/templates/gis/admin 目录。在这个目录中有一个名为 openlayers.html 的文件。复制这个文件并将其移动到你的 editor 应用的 templates 目录中,并重命名为 openlayers-custom.html。
打开这个文件,并在文件底部找到文本 Delete all Features,将其改为 Clear Feature’s Geometry,然后保存更改。
到目前为止,一切顺利。现在我们需要告诉 GeoDjango 编辑小部件使用我们自定义的 openlayers.html 文件。为此,编辑 utils.py 模块并找到 get_map_form() 函数的定义。用以下代码替换定义 admin_instance 变量的行:
def get_map_form(shapefile):
    geometry_field = calc_geometry_field(shapefile.geom_type)

    class CustomGeoModelAdmin(admin.GeoModelAdmin):
        map_template = "openlayers-custom.html"

    adminInstance = CustomGeoModelAdmin(Feature, admin.site)
    field = Feature._meta.get_field(geometry_field)
    widget_type = admin_instance.get_map_widget(field)

    class MapForm(forms.Form):
        geometry = forms.CharField(widget=widget_type(), label="")

    return MapForm
如果你现在尝试编辑一个特征,你会看到正在使用自定义版本的 openlayers.html 文件:
通过替换模板,并创建你自己的 GeoModelAdmin 子类,你可以更改内置编辑小部件的外观和功能。如果你想了解更多可能性,可以查看 django.contrib.gis.admin 目录中的模块。
Now that we know which feature the user wants to edit, our next task is to implement the edit feature page itself. To do this, we are going to have to create a custom form with a single input field, named geometry, that uses a map-editing widget for editing the feature’s geometry.
To create this form, we’re going to borrow elements from GeoDjango’s built-in “admin” interface, in particular the django.contrib.gis.admin.GeoModelAdmin class. This class provides a method named get_map_widget() which returns an editing widget which we can then include in a custom-generated form.
The process of building this form is a bit involved, thanks to the fact that we have to create a new django.forms.Form subclass on-the-fly to be handle the different types of geometries which can be edited. Let’s put this complexity into a new function within the shared.utils module, which we’ll call get_map_form().
Edit the utils.py module and type in the following code:
def get_map_form(shapefile):
    geometry_field = calc_geometry_field(shapefile.geom_type)
    admin_instance = admin.GeoModelAdmin(Feature, admin.site)
    field       = Feature._meta.get_field(geometry_field)
    widget_type = admin_instance.get_map_widget(field)

    class MapForm(forms.Form):
        geometry = forms.CharField(widget=widget_type(),
                                    label="")
    return MapForm
You’ll also need to add the following import statements to the top of the file:
from django import forms
from django.contrib.gis import admin
from shapeEditor.shared.models import Feature
The get_map_form() function makes use of a GeoModelAdmin instance. We met GeoModelAdmin earlier in this chapter when we explored GeoDjango’s built-in admin interface; here we are using it to generate an appropriate map widget for editing the type of geometry stored in the current shapefile.
Using the GeoModelAdmin instance, the get_map_form() function creates and returns a new django.forms.Form subclass with the appropriate widget type used to edit this particular shapefile’s features. Note that the get_map_form() function returns the MapForm class, rather than an instance of that class; we’ll use the returned class to create the appropriate MapForm instances as we need them.
With this function behind us, we can now implement the rest of the edit feature view. Let’s start by setting up the view’s URL; open the editor application’s urls. py module and add the following to the list of URL patterns:
url(r'^edit_feature/(?P<shapefile_id>\d+)/' +
    r'(?P<feature_id>\d+)$', 'edit_feature'),
We’re now ready to implement the view function itself. Edit the views.py module and start defining the edit_feature() function:
def edit_feature(request, shapefile_id, feature_id):
    try:
        shapefile = Shapefile.objects.get(id=shapefile_id)
    except ShapeFile.DoesNotExist:
            return HttpResponseNotFound()

    try:
        feature = Feature.objects.get(id=feature_id)
    except Feature.DoesNotExist:
        return HttpResponseNotFound()
So far this is quite straightforward: we load the Shapefile object for the current shapefile, and the Feature object for the feature we are editing. We next want to load into memory a list of that feature’s attributes, so these can be displayed to the user:
attributes = []
for attr_value in feature.attributevalue_set.all():
    attributes.append([attr_value.attribute.name,
                       attr_value.value])
attributes.sort()
This is where things get interesting. We need to create a Django Form object (actually, an instance of the MapForm class created dynamically by the get_map_ form() function we wrote earlier), and use this form instance to display the feature to be edited. When the form is submitted, we’ll extract the updated geometry and save it back into the Feature object again, before redirecting the user back to the edit shapefile page to select another feature.
As we saw when we created the import shapefile form, the basic Django idiom for processing a form is as follows:
if request.method == "GET":
    form = MyForm()
    return render(request, "template.html",
                    {'form' : form})
elif request.method == "POST":
    form = MyForm(request.POST)
    if form.is_valid():
        # Extract and save the form's contents here...
        return HttpResponseRedirect("/somewhere/else")
    return render(request, "template.html",
                  {'form' : form})
When the form is to be displayed for the first time, request.method will be set to GET. In this case, we create a new form object and display the form as part of an HTML template. When the form is submitted by the user, request.method will be set to POST. In this case, a new form object is created that is bound to the submitted POST arguments. The form’s contents are then checked, and if they are valid they are saved and the user is redirected back to some other page. If the form is not valid, it will be displayed again along with a suitable error message.
Let’s see how this idiom is used by the edit feature view. Add the following to the end of your new view function:
geometry_field = \
    utils.calc_geometry_field(shapefile.geom_type)
form_class     = utils.get_map_form(shapefile)

if request.method == "GET":
    wkt = getattr(feature, geometry_field)
    form = form_class({'geometry' : wkt})
    return render(request, "edit_feature.html",
                  {'shapefile' : shapefile,
                  'form': form,
                  'attributes' : attributes})
elif request.method == "POST":
    form = form_class(request.POST)
    try:
        if form.is_valid():
            wkt = form.cleaned_data['geometry']
            setattr(feature, geometry_field, wkt)
            feature.save()

            return HttpResponseRedirect("/editor/edit/" +
                shapefile_id)
        except ValueError:
            pass

        return render(request, "edit_feature.html",
                      {'shapefile' : shapefile,
                      'form': form,
                      'attributes' : attributes})
As you can see, we call utils.get_map_form() to create a new django.forms.Form subclass which will be used to edit the feature’s geometry. We also call utils.calc_ geometry_field() to see which field in the Feature object should be edited.
The rest of this function pretty much follows the Django idiom for form-processing. The only interesting thing to note is that we get and set the geometry field (using the getattr() and setattr() functions, respectively) in WKT format. GeoDjango treats geometry fields as if they were character fields which hold the geometry in WKT format. The GeoDjango JavaScript code then takes that WKT data (which is stored in a hidden form field named geometry) and passes it to OpenLayers for display as a vector geometry. OpenLayers allows the user to edit that vector geometry, and the updated geometry is stored back into the hidden geometry field as WKT data. We then extract that updated geometry’s WKT text, and store it back into the Feature object again.
So much for the edit_feature() view function. Let’s now create the template used by this view. Create a new file named edit_feature.html within the editor application’s templates directory, and enter the following text into this file:
<html>
<head>
<title>ShapeEditor</title>
<script src="http://openlayers.org/api/OpenLayers.js">
</script>
</head>
<body>
<h1>Edit Feature</h1>
<form method="POST" action="">
<table>
{{ form.as_table }}
<tr>
<td></td>
<td align="right">
<table>
{% for attr in attributes %}
<tr>
<td>{{ attr.0 }}</td>
<td>{{ attr.1 }}</td>
</tr>
{% endfor %}
</table>
</td>
</tr>
<tr>
<td></td>
<td align="center">
<input type="submit" value="Save"/>
<button type="button" onClick='window.location="/editor/
edit/{{ shapefile.id }}";'>
Cancel
</button>
</td>
</tr>
</table>
</form>
</body>
</html>
This template uses an HTML table to display the form, and uses the form.as_table template function call to render the form as HTML table rows. We then display the list of feature attributes within a sub-table, and finally include Save and Cancel buttons at the bottom.
With all this code written, we are finally able to edit features within the ShapeEditor:
Within this editor, you can make use of a number of GeoDjango’s built-in features to edit the geometry:
You can click on the Edit Geometry tool (
) to select a feature for editing.You can click on the Add Geometry tool (
) to start drawing a new geometry.When a geometry is selected, you can click on a dark circle and drag it to move the endpoints of a line segment.
When a geometry is selected, you can click on a light circle to split an existing line segment in two, making a new point which can then be dragged.
If you hold the mouse down over a dark circle, you can press the Delete key (or type D) to delete that point. Note that this only works if the geometry has more than three points.
You can click on the Delete all Features hyperlink to delete the current feature’s geometries. We’ll look at this hyperlink in more detail shortly.
Once you have finished editing the feature, you can click on the Save button to save the edited features, or the Cancel button to abandon the changes.
While this is all working well, there is one rather annoying quirk: GeoDjango lets the user remove the geometries from a map by using a hyperlink named Delete all Features. Since we’re currently editing a single feature, this hyperlink is rather confusingly named: what it actually does is delete the geometries for this feature, not the feature itself. Let’s change the text of this hyperlink to something more meaningful.
Go to the copy of Django that you downloaded, and navigate to the contrib/gis/templates/gis/admin directory. In this directory is a file named openlayers. html. Take a copy of this file, and move it into your editor application’s templates directory, renaming it to openlayers-custom.html.
Open your copy of this file, and look near the bottom for the text Delete all Features. Change this to Clear Feature’s Geometry, and save your changes.
So far so good. Now we need to tell the GeoDjango editing widget to use our custom version of the openlayers.html file. To do this, edit your utils.py module and find your definition of the get_map_form() function. Replace the line which defines the admin_instance variable with the following highlighted lines:
def get_map_form(shapefile):
    geometry_field = calc_geometry_field(shapefile.geom_type)

    class CustomGeoModelAdmin(admin.GeoModelAdmin):
        map_template = "openlayers-custom.html"

    adminInstance = CustomGeoModelAdmin(Feature, admin.site)
    field = Feature._meta.get_field(geometry_field)
    widget_type = admin_instance.get_map_widget(field)

    class MapForm(forms.Form):
        geometry = forms.CharField(widget=widget_type(), label="")

    return MapForm
If you then try editing a feature, you’ll see that your customized version of the openlayers.html file is being used:
By replacing the template, and by creating your own custom subclass of GeoModelAdmin, you can make various changes to the appearance and functionality of the built-in editing widget. If you want to see what is possible, take a look at the modules in the django.contrib.gis.admin directory.