2.7 套接字编程:创建网络应用#
2.7 Socket Programming: Creating Network Applications
现在我们已经了解了一些重要的网络应用程序,接下来我们将探讨网络应用程序实际上是如何创建的。回顾 第 2.1 节 中提到的,一个典型的网络应用由一对程序构成——一个客户端程序和一个服务器端程序,分别驻留在两个不同的端系统中。当这两个程序被执行时,就会创建一个客户端进程和一个服务器进程,这些进程通过读取和写入套接字来进行通信。因此,在创建一个网络应用时,开发者的主要任务就是编写客户端和服务器两个程序的代码。
网络应用有两种类型。一种是其操作在协议标准(如 RFC 或其他标准文档)中被指定的实现;这类应用有时被称为“开放”的,因为其操作规则为所有人所知。对于这样的实现,客户端和服务器程序必须遵循 RFC 所定义的规则。例如,客户端程序可以是 HTTP 协议客户端部分的一个实现,该协议在 第 2.2 节 中有描述,并在 RFC 2616 中被精确定义;同样,服务器端程序也可以是 HTTP 服务器协议的一个实现,同样在 RFC 2616 中被精确定义。如果一位开发者编写客户端程序的代码,而另一位开发者编写服务器端程序的代码,并且两人都严格遵循 RFC 的规则,那么这两个程序将能够互操作。事实上,当今许多网络应用都涉及由不同开发者编写的客户端和服务器程序之间的通信——例如,一个 Google Chrome 浏览器与 Apache Web 服务器之间的通信,或一个 BitTorrent 客户端与 BitTorrent 跟踪器之间的通信。
另一类网络应用是专有网络应用。在这种情况下,客户端和服务器程序使用的应用层协议没有以 RFC 或其他方式公开发布。一位开发者(或开发团队)会创建客户端和服务器两个程序,并对代码中的所有内容拥有完全控制权。但由于代码并未实现开放协议,其他独立开发者将无法开发与该应用兼容的代码。
在本节中,我们将考察开发客户端-服务器应用中的关键问题,并通过查看实现一个非常简单的客户端-服务器应用的代码来“亲自动手”。在开发阶段,开发者首先必须决定的一个问题是该应用是运行于 TCP 之上还是 UDP 之上。回顾一下,TCP 是面向连接的,并提供一个可靠的字节流通道用于在两个端系统之间传输数据。而 UDP 是无连接的,它将独立的数据报从一个端系统发送到另一个端系统,不提供任何传输保证。同样需要记住的是,当客户端或服务器程序实现的是由 RFC 定义的协议时,它应当使用与该协议相关的众所周知端口号;相反,在开发专有应用时,开发者必须小心避免使用这些众所周知端口号。(端口号在 第 2.1 节 中有简要介绍,在 第 3 章 中有更详细的讲解。)
我们将通过一个简单的 UDP 应用和一个简单的 TCP 应用来介绍 UDP 和 TCP 套接字编程。我们使用 Python 3 来展示这些 UDP 和 TCP 应用。我们本可以使用 Java、C 或 C++ 编写这些代码,但我们选择 Python 主要是因为它清晰地揭示了套接字的关键概念。使用 Python 可以减少代码行数,并且每一行代码都可以轻松地向初学者解释。但如果你不熟悉 Python,也不必担心。如果你有 Java、C 或 C++ 的编程经验,应该能够轻松理解这些代码。
如果你对使用 Java 进行客户端-服务器编程感兴趣,建议访问本教材的配套网站;事实上,你可以在该网站上找到本节中的所有示例(以及相关实验)的 Java 版本。对于对 C 语言客户端-服务器编程感兴趣的读者,有多本优秀的参考书可用 [Donahoo 2001;Stevens 1997;Frost 1994;Kurose 1996];我们下方的 Python 示例与 C 代码风格和逻辑相似。
Now that we’ve looked at a number of important network applications, let’s explore how network application programs are actually created. Recall from Section 2.1 that a typical network application consists of a pair of programs—a client program and a server program—residing in two different end systems. When these two programs are executed, a client process and a server process are created, and these processes communicate with each other by reading from, and writing to, sockets. When creating a network application, the developer’s main task is therefore to write the code for both the client and server programs.
There are two types of network applications. One type is an implementation whose operation is specified in a protocol standard, such as an RFC or some other standards document; such an application is sometimes referred to as “open,” since the rules specifying its operation are known to all. For such an implementation, the client and server programs must conform to the rules dictated by the RFC. For example, the client program could be an implementation of the client side of the HTTP protocol, described in Section 2.2 and precisely defined in RFC 2616; similarly, the server program could be an implementation of the HTTP server protocol, also precisely defined in RFC 2616. If one developer writes code for the client program and another developer writes code for the server program, and both developers carefully follow the rules of the RFC, then the two programs will be able to interoperate. Indeed, many of today’s network applications involve communication between client and server programs that have been created by independent developers—for example, a Google Chrome browser communicating with an Apache Web server, or a BitTorrent client communicating with BitTorrent tracker.
The other type of network application is a proprietary network application. In this case the client and server programs employ an application-layer protocol that has not been openly published in an RFC or elsewhere. A single developer (or development team) creates both the client and server programs, and the developer has complete control over what goes in the code. But because the code does not implement an open protocol, other independent developers will not be able to develop code that interoperates with the application.
In this section, we’ll examine the key issues in developing a client-server application, and we’ll “get our hands dirty” by looking at code that implements a very simple client-server application. During the development phase, one of the first decisions the developer must make is whether the application is to run over TCP or over UDP. Recall that TCP is connection oriented and provides a reliable byte-stream channel through which data flows between two end systems. UDP is connectionless and sends independent packets of data from one end system to the other, without any guarantees about delivery. Recall also that when a client or server program implements a protocol defined by an RFC, it should use the well-known port number associated with the protocol; conversely, when developing a proprietary application, the developer must be careful to avoid using such well-known port numbers. (Port numbers were briefly discussed in Section 2.1. They are covered in more detail in Chapter 3.)
We introduce UDP and TCP socket programming by way of a simple UDP application and a simple TCP application. We present the simple UDP and TCP applications in Python 3. We could have written the code in Java, C, or C++, but we chose Python mostly because Python clearly exposes the key socket concepts. With Python there are fewer lines of code, and each line can be explained to the novice programmer without difficulty. But there’s no need to be frightened if you are not familiar with Python. You should be able to easily follow the code if you have experience programming in Java, C, or C++.
If you are interested in client-server programming with Java, you are encouraged to see the Companion Website for this textbook; in fact, you can find there all the examples in this section (and associated labs) in Java. For readers who are interested in client-server programming in C, there are several good references available [Donahoo 2001; Stevens 1997; Frost 1994; Kurose 1996 ]; our Python examples below have a similar look and feel to C.
2.7.1 使用 UDP 的套接字编程#
2.7.1 Socket Programming with UDP
在本小节中,我们将编写使用 UDP 的简单客户端-服务器程序;在下一节中,我们将编写使用 TCP 的类似程序。
回顾 第 2.1 节,在不同主机上运行的进程通过向套接字中发送消息来相互通信。我们曾将每个进程比作一所房子,而进程的套接字就像这所房子的门。应用程序驻留在门的一侧(房子内部),而传输层协议驻留在门的另一侧(外部世界)。应用程序开发者可以控制套接字在应用层的一侧,但对传输层的一侧几乎没有控制力。
现在让我们更深入地了解使用 UDP 套接字进行通信的两个进程之间的交互。使用 UDP 时,在发送进程能将数据包推出套接字“门”之前,它必须先为数据包附加目标地址。在数据包通过发送方的套接字后,互联网将使用这个目标地址来将数据包路由到接收进程的套接字。当数据包到达接收套接字时,接收进程将通过该套接字获取数据包,然后检查其内容并采取相应的操作。
你也许会问:附加在数据包上的目标地址包括哪些内容?如你所料,目标主机的 IP 地址是目标地址的一部分。通过在数据包中包含目标 IP 地址,互联网中的路由器就能够将数据包路由至目标主机。但由于一个主机可能运行多个网络应用进程,每个进程可能有一个或多个套接字,因此还需要标识目标主机中具体的套接字。当一个套接字被创建时,会分配一个称为端口号的标识符。因此,数据包的目标地址还包括该套接字的端口号。总结来说,发送进程会为数据包附加一个目标地址,该地址由目标主机的 IP 地址和目标套接字的端口号组成。此外,我们很快就会看到,发送方的源地址——由源主机的 IP 地址和源套接字的端口号组成——也会被附加到数据包上。然而,附加源地址通常不是由 UDP 应用程序代码完成的;而是由底层操作系统自动完成的。
我们将使用以下这个简单的客户端-服务器应用来演示 UDP 和 TCP 的套接字编程:
客户端从键盘读取一行字符(数据),并将该数据发送至服务器。
服务器接收数据并将其转换为大写字母。
服务器将修改后的数据发送回客户端。
客户端接收修改后的数据,并将该行数据显示在屏幕上。
图 2.27 展示了通过 UDP 传输服务通信的客户端和服务器的主要套接字相关活动。
现在我们来“亲自动手”,查看一个基于 UDP 实现的简单客户端-服务器程序对。每个程序后我们还提供了逐行分析。我们将从 UDP 客户端开始,该客户端将向服务器发送一个简单的应用层消息。为了让服务器能够接收并回复客户端的消息,它必须已准备就绪并在运行中——也就是说,在客户端发送消息之前,服务器必须作为一个进程运行。
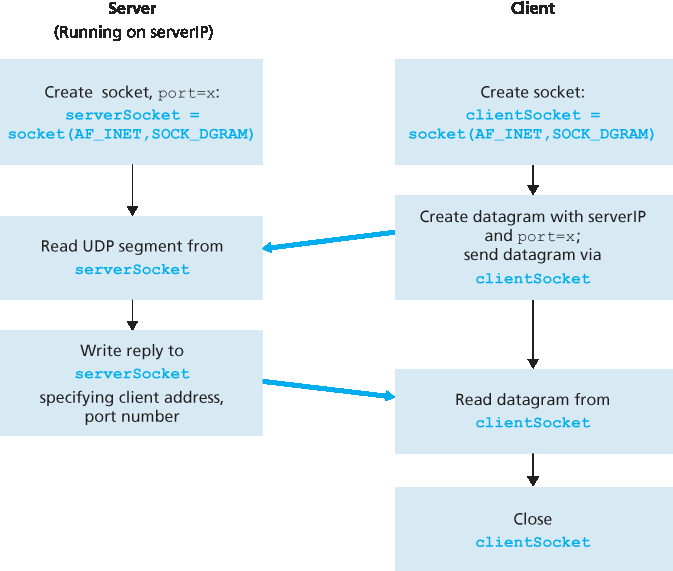
图 2.27 使用 UDP 的客户端-服务器应用
客户端程序命名为 UDPClient.py,服务器端程序命名为 UDPServer.py。为了突出关键问题,我们特意提供了极简的代码。“优秀的代码”在实际中应当包含更多辅助行,特别是用于处理错误情况。在本应用中,我们任意选择了 12000 作为服务器的端口号。
In this subsection, we’ll write simple client-server programs that use UDP; in the following section, we’ll write similar programs that use TCP.
Recall from Section 2.1 that processes running on different machines communicate with each other by sending messages into sockets. We said that each process is analogous to a house and the process’s socket is analogous to a door. The application resides on one side of the door in the house; the transport-layer protocol resides on the other side of the door in the outside world. The application developer has control of everything on the application-layer side of the socket; however, it has little control of the transport-layer side.
Now let’s take a closer look at the interaction between two communicating processes that use UDP sockets. Before the sending process can push a packet of data out the socket door, when using UDP, it must first attach a destination address to the packet. After the packet passes through the sender’s socket, the Internet will use this destination address to route the packet through the Internet to the socket in the receiving process. When the packet arrives at the receiving socket, the receiving process will retrieve the packet through the socket, and then inspect the packet’s contents and take appropriate action.
So you may be now wondering, what goes into the destination address that is attached to the packet? As you might expect, the destination host’s IP address is part of the destination address. By including the destination IP address in the packet, the routers in the Internet will be able to route the packet through the Internet to the destination host. But because a host may be running many network application processes, each with one or more sockets, it is also necessary to identify the particular socket in the destination host. When a socket is created, an identifier, called a port number, is assigned to it. So, as you might expect, the packet’s destination address also includes the socket’s port number. In summary, the sending process attaches to the packet a destination address, which consists of the destination host’s IP address and the destination socket’s port number. Moreover, as we shall soon see, the sender’s source address—consisting of the IP address of the source host and the port number of the source socket—are also attached to the packet. However, attaching the source address to the packet is typically not done by the UDP application code; instead it is automatically done by the underlying operating system.
We’ll use the following simple client-server application to demonstrate socket programming for both UDP and TCP:
The client reads a line of characters (data) from its keyboard and sends the data to the server. 2. The server receives the data and converts the characters to uppercase.
The server sends the modified data to the client.
The client receives the modified data and displays the line on its screen.
Figure 2.27 highlights the main socket-related activity of the client and server that communicate over the UDP transport service.
Now let’s get our hands dirty and take a look at the client-server program pair for a UDP implementation of this simple application. We also provide a detailed, line-by-line analysis after each program. We’ll begin with the UDP client, which will send a simple application-level message to the server. In order for the server to be able to receive and reply to the client’s message, it must be ready and running—that is, it must be running as a process before the client sends its message.
Figure 2.27 The client-server application using UDP
The client program is called UDPClient.py, and the server program is called UDPServer.py. In order to emphasize the key issues, we intentionally provide code that is minimal. “Good code” would certainly have a few more auxiliary lines, in particular for handling error cases. For this application, we have arbitrarily chosen 12000 for the server port number.
UDPClient.py#
以下是该应用的客户端代码:
from socket import *

serverName = 'hostname'
serverPort = 12000

clientSocket = socket(AF_INET, SOCK_DGRAM)

message = raw_input('Input lowercase sentence:')

clientSocket.sendto(message.encode(),(serverName, serverPort))

modifiedMessage, serverAddress = clientSocket.recvfrom(2048)

print(modifiedMessage.decode())

clientSocket.close()
现在让我们逐行分析 UDPClient.py 中的代码。
from socket import *
socket 模块是 Python 中所有网络通信的基础。引入这一行后,我们就可以在程序中创建套接字了。
serverName = 'hostname'
serverPort = 12000
第一行将变量 serverName 设置为字符串 ‘hostname’。这里,我们提供一个字符串,内容可以是服务器的 IP 地址(例如 “128.138.32.126”)或服务器的主机名(例如 “cis.poly.edu”)。如果使用主机名,则系统会自动执行 DNS 查询以获取 IP 地址。第二行将整数变量 serverPort 设置为 12000。
clientSocket = socket(AF_INET, SOCK_DGRAM)
该行创建客户端的套接字,命名为 clientSocket。第一个参数表示地址族;特别地, AF_INET 表示底层网络使用 IPv4。(暂时无需担心 IPv4,我们将在 第 4 章 中讨论。)第二个参数表示套接字类型为 SOCK_DGRAM,即 UDP 套接字(而非 TCP 套接字)。注意我们在创建客户端套接字时并未指定端口号,而是让操作系统自动分配。现在客户端进程的“门”已创建好,我们接下来将创建一条消息,通过这扇门发送出去。
message = raw_input('Input lowercase sentence:')
raw_input() 是 Python 的一个内置函数。当该命令被执行时,客户端用户会看到提示“Input lowercase sentence:”,然后用户通过键盘输入一行内容,该内容会被存入变量 message。现在我们已经有了一个套接字和一条消息,我们将把消息通过该套接字发送到目标主机。
clientSocket.sendto(message.encode(),(serverName, serverPort))
在上述代码中,我们首先使用 encode() 方法将消息从字符串类型转换为字节类型,因为套接字只能发送字节数据。然后, sendto() 方法将目标地址 (serverName, serverPort) 附加到消息上,并将生成的数据包发送到 clientSocket 套接字中。(如前所述,源地址也会附加到数据包中,但这是由操作系统自动完成的,而不是由代码显式指定的。)使用 UDP 套接字从客户端向服务器发送消息就是这么简单!发送完数据包后,客户端会等待接收来自服务器的数据。
modifiedMessage, serverAddress = clientSocket.recvfrom(2048)
上述代码中,当来自互联网的数据包到达客户端的套接字时,数据包的内容会被放入变量 modifiedMessage 中,数据包的源地址会被放入变量 serverAddress 中。变量 serverAddress 包含服务器的 IP 地址和端口号。尽管 UDPClient 实际上并不需要该服务器地址信息(因为它一开始就知道服务器地址),但该行 Python 代码仍然返回了此信息。方法 recvfrom 同时接收一个缓冲区大小参数,此处为 2048。(这个缓冲区大小对于大多数场景已经足够。)
print(modifiedMessage.decode())
该行将变量 modifiedMessage 解码为字符串,并将其打印在用户的屏幕上。它应当是用户最初输入的那一行文本的全大写版本。
clientSocket.close()
这一行关闭套接字。进程随后终止。
Here is the code for the client side of the application:
from socket import *

serverName = 'hostname'
serverPort = 12000

clientSocket = socket(AF_INET, SOCK_DGRAM)

message = raw_input('Input lowercase sentence:')

clientSocket.sendto(message.encode(),(serverName, serverPort))

modifiedMessage, serverAddress = clientSocket.recvfrom(2048)

print(modifiedMessage.decode())

clientSocket.close()
Now let’s take a look at the various lines of code in UDPClient.py.
from socket import *
The socket module forms the basis of all network communications in Python. By including this line, we will be able to create sockets within our program.
serverName = 'hostname'
serverPort = 12000
The first line sets the variable serverName to the string ‘hostname’. Here, we provide a string containing either the IP address of the server (e.g., “128.138.32.126”) or the hostname of the server (e.g., “cis.poly.edu”). If we use the hostname, then a DNS lookup will automatically be performed to get
the IP address.) The second line sets the integer variable serverPort to 12000.
clientSocket = socket(AF_INET, SOCK_DGRAM)
This line creates the client’s socket, called clientSocket. The first parameter indicates the address family; in particular, AF_INET indicates that the underlying network is using IPv4. (Do not worry about this now—we will discuss IPv4 in Chapter 4.) The second parameter indicates that the socket is of type SOCK_DGRAM, which means it is a UDP socket (rather than a TCP socket). Note that we are not specifying the port number of the client socket when we create it; we are instead letting the operating system do this for us. Now that the client process’s door has been created, we will want to create a message to send through the door.
message = raw_input('Input lowercase sentence:')
raw_input() is a built-in function in Python. When this command is executed, the user at the client is prompted with the words “Input lowercase sentence:” The user then uses her keyboard to input a line, which is put into the variable message. Now that we have a socket and a message, we will want to send the message through the socket to the destination host.
clientSocket.sendto(message.encode(),(serverName, serverPort))
In the above line, we first convert the message from string type to byte type, as we need to send bytes into a socket; this is done with the encode() method. The method sendto() attaches the destination address (serverName, serverPort) to the message and sends the resulting packet into the process’s socket, clientSocket. (As mentioned earlier, the source address is also attached to the packet, although this is done automatically rather than explicitly by the code.) Sending a client-to-server message via a UDP socket is that simple! After sending the packet, the client waits to receive data from the server.
modifiedMessage, serverAddress = clientSocket.recvfrom(2048)
With the above line, when a packet arrives from the Internet at the client’s socket, the packet’s data is put into the variable modifiedMessage and the packet’s source address is put into the variable serverAddress. The variable serverAddress contains both the server’s IP address and the server’s port number. The program UDPClient doesn’t actually need this server address information, since it already knows the server address from the outset; but this line of Python provides the server address nevertheless. The method recvfrom also takes the buffer size 2048 as input. (This buffer size works for most purposes.)
print(modifiedMessage.decode())
This line prints out modifiedMessage on the user’s display, after converting the message from bytes to string. It should be the original line that the user typed, but now capitalized.
clientSocket.close()
This line closes the socket. The process then terminates.
UDPServer.py#
现在我们来看该应用的服务器端代码:
from socket import *

serverPort = 12000
serverSocket = socket(AF_INET, SOCK_DGRAM)
serverSocket.bind(('', serverPort))

print("The server is ready to receive")

while True:
    message, clientAddress = serverSocket.recvfrom(2048)
    modifiedMessage = message.decode().upper()

    serverSocket.sendto(modifiedMessage.encode(), clientAddress)
注意,UDPServer 的开头与 UDPClient 类似。它也导入了 socket 模块,也将变量 serverPort 设置为 12000,也创建了一个类型为 SOCK_DGRAM (UDP 套接字)的套接字。第一行与 UDPClient 明显不同的代码是:
serverSocket.bind(('', serverPort))
这行代码将端口号 12000 绑定(即分配)给服务器的套接字。因此,在 UDPServer 中,代码(由应用程序开发者编写)明确地为套接字分配了一个端口号。这样一来,当有人向服务器 IP 地址的 12000 端口发送数据包时,该数据包就会被定向到这个套接字。随后,UDPServer 进入一个 while 循环;这个循环允许 UDPServer 不断接收并处理来自客户端的数据包。在 while 循环中,UDPServer 等待某个数据包的到来。
message, clientAddress = serverSocket.recvfrom(2048)
这行代码与我们在 UDPClient 中看到的类似。当某个数据包到达服务器套接字时,数据部分被放入变量 message,数据包的源地址被放入变量 clientAddress。变量 clientAddress 包含客户端的 IP 地址和端口号。这里,UDPServer 会使用这个地址信息,就像普通邮件需要写回信地址一样。有了这个源地址信息,服务器就知道应当将响应发往何处。
modifiedMessage = message.decode().upper()
这行是我们简单应用程序的核心。它将客户端发送的文本转换为字符串后,使用 upper() 方法将其转换为全大写形式。
serverSocket.sendto(modifiedMessage.encode(), clientAddress)
最后这行将客户端地址(IP 地址和端口号)附加到修改后的消息上(在将其转换为字节后),并将生成的数据包通过服务器套接字发送出去。(如前所述,服务器地址也会附加到数据包上,但这是由操作系统自动完成的。)互联网随后会将该数据包发送到客户端地址。服务器发送完数据包后,继续留在 while 循环中,等待另一个 UDP 数据包的到来(可来自任何主机上的任何客户端)。
要测试这对程序,你可以在一台主机上运行 UDPClient.py,在另一台主机上运行 UDPServer.py。请确保在 UDPClient.py 中正确设置服务器的主机名或 IP 地址。接着,在服务器主机上运行 UDPServer.py(已编译的服务器程序)。这将在服务器中创建一个进程,直到被某个客户端联系之前它一直处于空闲状态。然后,在客户端主机上运行 UDPClient.py(已编译的客户端程序)。这将在客户端创建一个进程。最后,在客户端使用该应用时,你只需键入一句话并按下回车键。
如果你想开发自己的 UDP 客户端-服务器应用程序,可以从稍作修改现有客户端或服务器程序入手。例如,服务器端可以不将字母转换为大写,而是统计字母 s 出现的次数并返回该数字。又或者你可以修改客户端,使其在接收到大写句子后,允许用户继续输入并发送更多句子给服务器。
Let’s now take a look at the server side of the application:
from socket import *

serverPort = 12000
serverSocket = socket(AF_INET, SOCK_DGRAM)
serverSocket.bind(('', serverPort))

print("The server is ready to receive")

while True:
    message, clientAddress = serverSocket.recvfrom(2048)
    modifiedMessage = message.decode().upper()

    serverSocket.sendto(modifiedMessage.encode(), clientAddress)
Note that the beginning of UDPServer is similar to UDPClient. It also imports the socket module, also
sets the integer variable serverPort to 12000, and also creates a socket of type SOCK_DGRAM (a UDP socket). The first line of code that is significantly different from UDPClient is:
serverSocket.bind(('', serverPort))
The above line binds (that is, assigns) the port number 12000 to the server’s socket. Thus in UDPServer, the code (written by the application developer) is explicitly assigning a port number to the socket. In this manner, when anyone sends a packet to port 12000 at the IP address of the server, that packet will be directed to this socket. UDPServer then enters a while loop; the while loop will allow UDPServer to receive and process packets from clients indefinitely. In the while loop, UDPServer waits for a packet to arrive.
message, clientAddress = serverSocket.recvfrom(2048)
This line of code is similar to what we saw in UDPClient. When a packet arrives at the server’s socket, the packet’s data is put into the variable message and the packet’s source address is put into the variable clientAddress. The variable clientAddress contains both the client’s IP address and the client’s port number. Here, UDPServer will make use of this address information, as it provides a return address, similar to the return address with ordinary postal mail. With this source address information, the server now knows to where it should direct its reply.
modifiedMessage = message.decode().upper()
This line is the heart of our simple application. It takes the line sent by the client and, after converting the message to a string, uses the method upper() to capitalize it.
serverSocket.sendto(modifiedMessage.encode(), clientAddress)
This last line attaches the client’s address (IP address and port number) to the capitalized message (after converting the string to bytes), and sends the resulting packet into the server’s socket. (As mentioned earlier, the server address is also attached to the packet, although this is done automatically rather than explicitly by the code.) The Internet will then deliver the packet to this client address. After the server sends the packet, it remains in the while loop, waiting for another UDP packet to arrive (from any client running on any host).
To test the pair of programs, you run UDPClient.py on one host and UDPServer.py on another host. Be sure to include the proper hostname or IP address of the server in UDPClient.py. Next, you execute UDPServer.py, the compiled server program, in the server host. This creates a process in the server that idles until it is contacted by some client. Then you execute UDPClient.py, the compiled client program, in the client. This creates a process in the client. Finally, to use the application at the client, you type a sentence followed by a carriage return.
To develop your own UDP client-server application, you can begin by slightly modifying the client or server programs. For example, instead of converting all the letters to uppercase, the server could count the number of times the letter s appears and return this number. Or you can modify the client so that after receiving a capitalized sentence, the user can continue to send more sentences to the server.
2.7.2 使用 TCP 的套接字编程#
2.7.2 Socket Programming with TCP
与 UDP 不同,TCP 是一种面向连接的协议。这意味着在客户端和服务器开始互相发送数据之前,它们首先需要进行握手并建立一个 TCP 连接。TCP 连接的一端连接到客户端套接字,另一端连接到服务器套接字。在创建 TCP 连接时,我们会将客户端套接字地址(IP 地址和端口号)与服务器套接字地址(IP 地址和端口号)关联起来。在建立 TCP 连接之后,当一方想要向另一方发送数据时,只需通过其套接字将数据放入 TCP 连接即可。这与 UDP 不同,在 UDP 中服务器必须在将数据包放入套接字之前附加目标地址。
现在让我们更仔细地看看 TCP 中客户端和服务器程序之间的交互。客户端负责启动与服务器的联系。为了让服务器能够响应客户端的初始联系,服务器必须处于准备状态。这意味着两件事。首先,就像 UDP 的情况一样,TCP 服务器必须在客户端尝试联系之前作为一个进程运行。其次,服务器程序必须拥有一个特殊的门——更准确地说,是一个特殊的套接字——来接收来自运行在任意主机上的客户端进程的初始联系。使用我们关于进程/套接字的房子/门类比,我们有时将客户端的初始联系称为“敲响欢迎之门”。
当服务器进程正在运行时,客户端进程可以发起到服务器的 TCP 连接。这可以通过在客户端程序中创建一个 TCP 套接字来完成。当客户端创建其 TCP 套接字时,它会指定服务器中欢迎套接字的地址,即服务器主机的 IP 地址和套接字的端口号。在创建其套接字后,客户端发起三次握手并与服务器建立 TCP 连接。这个三次握手发生在传输层中,对客户端和服务器程序是完全不可见的。
在三次握手期间,客户端进程敲响服务器进程的欢迎之门。当服务器“听到”敲门声时,它会创建一个新的门——更准确地说,是一个专门用于该客户端的新套接字。在下面的示例中,欢迎之门是我们称为 serverSocket 的 TCP 套接字对象;为发起连接的客户端创建的新套接字称为 connectionSocket。初次接触 TCP 套接字的学生有时会混淆欢迎套接字(它是所有希望与服务器通信的客户端的初始接触点)与随后为每个客户端通信而创建的每个服务器端连接套接字。
从应用程序的角度来看,客户端的套接字和服务器的连接套接字由一条管道直接连接。如 图 2.28 所示,客户端进程可以将任意字节发送到其套接字中,TCP 保证服务器进程将按发送顺序接收(通过连接套接字)每一个字节。因此,TCP 在客户端和服务器进程之间提供了一种可靠的服务。此外,就像人可以通过同一扇门进出一样,客户端进程不仅将字节发送到其套接字中,也从中接收字节;同样,服务器进程不仅从其连接套接字接收字节,也向其中发送字节。
我们使用相同的简单客户端-服务器应用程序来演示使用 TCP 的套接字编程:客户端向服务器发送一行数据,服务器将该行转为大写后返回给客户端。图 2.29 突出了通过 TCP 传输服务通信的客户端和服务器的主要套接字相关活动。
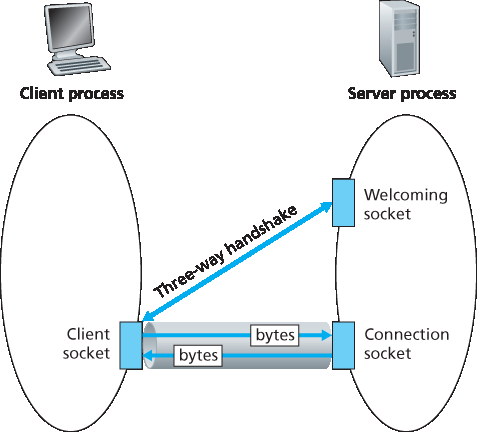
图 2.28 TCPServer 进程拥有两个套接字
Unlike UDP, TCP is a connection-oriented protocol. This means that before the client and server can start to send data to each other, they first need to handshake and establish a TCP connection. One end of the TCP connection is attached to the client socket and the other end is attached to a server socket. When creating the TCP connection, we associate with it the client socket address (IP address and port number) and the server socket address (IP address and port number). With the TCP connection established, when one side wants to send data to the other side, it just drops the data into the TCP connection via its socket. This is different from UDP, for which the server must attach a destination address to the packet before dropping it into the socket.
Now let’s take a closer look at the interaction of client and server programs in TCP. The client has the job of initiating contact with the server. In order for the server to be able to react to the client’s initial contact, the server has to be ready. This implies two things. First, as in the case of UDP, the TCP server must be running as a process before the client attempts to initiate contact. Second, the server program must have a special door—more precisely, a special socket—that welcomes some initial contact from a client process running on an arbitrary host. Using our house/door analogy for a process/socket, we will sometimes refer to the client’s initial contact as “knocking on the welcoming door.”
With the server process running, the client process can initiate a TCP connection to the server. This is done in the client program by creating a TCP socket. When the client creates its TCP socket, it specifies the address of the welcoming socket in the server, namely, the IP address of the server host and the port number of the socket. After creating its socket, the client initiates a three-way handshake and establishes a TCP connection with the server. The three-way handshake, which takes place within the transport layer, is completely invisible to the client and server programs.
During the three-way handshake, the client process knocks on the welcoming door of the server process. When the server “hears” the knocking, it creates a new door—more precisely, a new socket that is dedicated to that particular client. In our example below, the welcoming door is a TCP socket object that we call serverSocket; the newly created socket dedicated to the client making the connection is called connectionSocket. Students who are encountering TCP sockets for the first time sometimes confuse the welcoming socket (which is the initial point of contact for all clients wanting to communicate with the server), and each newly created server-side connection socket that is subsequently created for communicating with each client.
From the application’s perspective, the client’s socket and the server’s connection socket are directly connected by a pipe. As shown in Figure 2.28, the client process can send arbitrary bytes into its socket, and TCP guarantees that the server process will receive (through the connection socket) each byte in the order sent. TCP thus provides a reliable service between the client and server processes. Furthermore, just as people can go in and out the same door, the client process not only sends bytes into but also receives bytes from its socket; similarly, the server process not only receives bytes from but also sends bytes into its connection socket.
We use the same simple client-server application to demonstrate socket programming with TCP: The client sends one line of data to the server, the server capitalizes the line and sends it back to the client. Figure 2.29 highlights the main socket-related activity of the client and server that communicate over the TCP transport service.
- align:
center
Figure 2.28 The TCPServer process has two sockets
TCPClient.py#
以下是该应用程序客户端的代码:
from socket import *

serverName = 'servername'
serverPort = 12000

clientSocket = socket(AF_INET, SOCK_STREAM)
clientSocket.connect((serverName, serverPort))

sentence = raw_input('Input lowercase sentence:')
clientSocket.send(sentence.encode())

modifiedSentence = clientSocket.recv(1024)

print('From Server: ', modifiedSentence.decode())

clientSocket.close()
现在让我们看看代码中与 UDP 实现显著不同的各行。第一行是创建客户端套接字:
clientSocket = socket(AF_INET, SOCK_STREAM)
这行创建名为 clientSocket 的客户端套接字。第一个参数仍然表示底层网络使用 IPv4。第二个参数表示该套接字类型为 SOCK_STREAM,意味着这是一个 TCP 套接字(而不是 UDP 套接字)。注意我们在创建套接字时仍未指定客户端套接字的端口号;我们仍然让操作系统为我们完成此操作。接下来的代码与我们在 UDPClient 中看到的非常不同:
clientSocket.connect((serverName, serverPort))
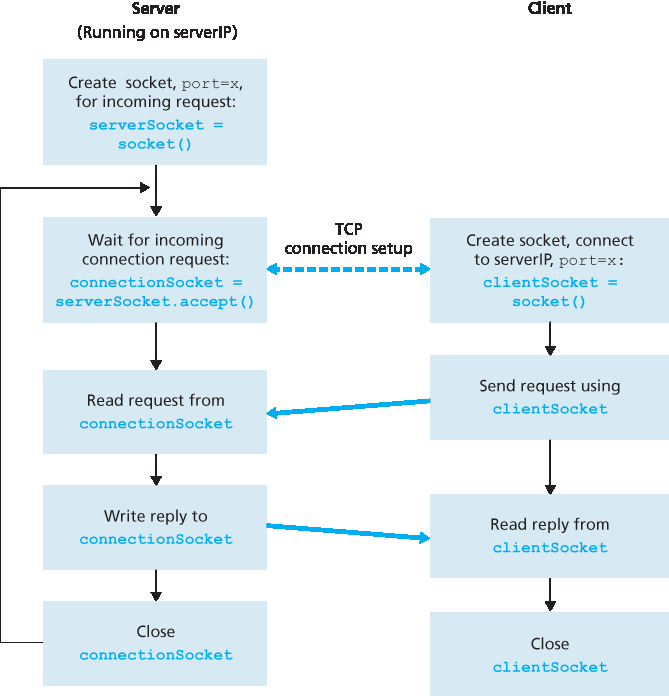
图 2.29 使用 TCP 的客户端-服务器应用程序
回顾一下,在客户端使用 TCP 套接字向服务器发送数据(或反过来)之前,必须首先在客户端和服务器之间建立一个 TCP 连接。上述这行代码发起了客户端与服务器之间的 TCP 连接。 connect() 方法的参数是连接中服务器端的地址。在该行代码执行之后,三次握手完成,客户端与服务器之间的 TCP 连接建立。
sentence = raw_input('Input lowercase sentence:')
与 UDPClient 类似,上述代码从用户处获取一行句子。字符串 sentence 将持续收集字符,直到用户按回车结束该行。下一行代码也与 UDPClient 非常不同:
clientSocket.send(sentence.encode())
上述代码通过客户端的套接字将 sentence 发送到 TCP 连接中。注意,该程序并没有显式地创建一个数据包并附加目标地址,就像使用 UDP 套接字那样。相反,客户端程序只是将 sentence 字符串中的字节放入 TCP 连接。随后客户端等待从服务器接收字节。
modifiedSentence = clientSocket.recv(2048)
当来自服务器的字符到达时,它们被放入字符串 modifiedSentence 中。字符将持续累积到 modifiedSentence 中,直到该行以回车字符结束。打印出大写后的句子之后,我们关闭客户端的套接字:
clientSocket.close()
最后这一行关闭了套接字,因此也关闭了客户端和服务器之间的 TCP 连接。这会使客户端中的 TCP 向服务器中的 TCP 发送一个 TCP 消息(参见 第 3.5 节)。
TCPServer.py#
现在我们来看服务器端程序。
from socket import *

serverPort = 12000
serverSocket = socket(AF_INET, SOCK_STREAM)
serverSocket.bind(('', serverPort))
serverSocket.listen(1)

print('The server is ready to receive')

while True:
    connectionSocket, addr = serverSocket.accept()
    sentence = connectionSocket.recv(1024).decode()
    capitalizedSentence = sentence.upper()
    connectionSocket.send(capitalizedSentence.encode())
    connectionSocket.close()
现在让我们看看与 UDPServer 和 TCPClient 显著不同的几行代码。与 TCPClient 一样,服务器使用以下代码创建一个 TCP 套接字:
serverSocket=socket(AF_INET, SOCK_STREAM)
类似于 UDPServer,我们将服务器端口号 serverPort 与该套接字关联起来:
serverSocket.bind(('', serverPort))
但在 TCP 中,serverSocket 将成为我们的欢迎套接字。在建立了这个欢迎之门之后,我们将等待并监听某个客户端的敲门:
serverSocket.listen(1)
这一行使服务器监听来自客户端的 TCP 连接请求。参数指定最大排队连接数(至少为 1)。
connectionSocket, addr = serverSocket.accept()
当有客户端敲门时,程序调用 accept() 方法作用于 serverSocket,它会在服务器中创建一个新套接字,称为 connectionSocket,专用于该特定客户端。客户端和服务器随后完成握手,在客户端的 clientSocket 和服务器的 connectionSocket 之间创建 TCP 连接。建立 TCP 连接后,客户端和服务器可以通过该连接互相发送字节。在 TCP 中,一方发送的所有字节不仅保证到达另一方,还保证按顺序到达。
connectionSocket.close()
在该程序中,在将修改后的句子发送给客户端之后,我们关闭连接套接字。但由于 serverSocket 保持开启,另一个客户端现在可以再次敲门,并向服务器发送句子以进行修改。
这就完成了我们对使用 TCP 进行套接字编程的讨论。我们鼓励你在两台主机上分别运行这两个程序,并对它们进行一些修改,以实现略有不同的目标。你应当将 UDP 程序对与 TCP 程序对进行比较,并观察它们之间的不同。你还应完成 第 2 章、第 4 章 和 第 9 章 末尾所描述的多个套接字编程练习。最后,我们希望有一天,在掌握了这些以及更高级的套接字程序之后,你能编写出属于自己的流行网络应用,变得非常富有和著名,并记得这本教材的作者!
Now let’s take a look at the server program.
from socket import *

serverPort = 12000
serverSocket = socket(AF_INET, SOCK_STREAM)
serverSocket.bind(('', serverPort))
serverSocket.listen(1)

print('The server is ready to receive')

while True:
    connectionSocket, addr = serverSocket.accept()
    sentence = connectionSocket.recv(1024).decode()
    capitalizedSentence = sentence.upper()
    connectionSocket.send(capitalizedSentence.encode())
    connectionSocket.close()
Let’s now take a look at the lines that differ significantly from UDPServer and TCPClient. As with TCPClient, the server creates a TCP socket with:
serverSocket=socket(AF_INET, SOCK_STREAM)
Similar to UDPServer, we associate the server port number, serverPort, with this socket:
serverSocket.bind(('', serverPort))
But with TCP, serverSocket will be our welcoming socket. After establishing this welcoming door, we will wait and listen for some client to knock on the door:
serverSocket.listen(1)
This line has the server listen for TCP connection requests from the client. The parameter specifies the maximum number of queued connections (at least 1).
connectionSocket, addr = serverSocket.accept()
When a client knocks on this door, the program invokes the accept() method for serverSocket, which creates a new socket in the server, called connectionSocket, dedicated to this particular client. The client and server then complete the handshaking, creating a TCP connection between the client’s clientSocket and the server’s connectionSocket. With the TCP connection established, the client and server can now send bytes to each other over the connection. With TCP, all bytes sent from one side not are not only guaranteed to arrive at the other side but also guaranteed arrive in order.
connectionSocket.close()
In this program, after sending the modified sentence to the client, we close the connection socket. But
since serverSocket remains open, another client can now knock on the door and send the server a sentence to modify.
This completes our discussion of socket programming in TCP. You are encouraged to run the two programs in two separate hosts, and also to modify them to achieve slightly different goals. You should compare the UDP program pair with the TCP program pair and see how they differ. You should also do many of the socket programming assignments described at the ends of Chapter 2, 4, and 9. Finally, we hope someday, after mastering these and more advanced socket programs, you will write your own popular network application, become very rich and famous, and remember the authors of this textbook!